Wireshark is a powerful tool for analyzing network traffic and protocols. With the help of Wireshark, you can capture network traffic and search within the captured traffic. Wireshark’s great features and ease of use make it one of the most popular network traffic analysis tools among network and security professionals. In this article, we try to teach you How to Use Wireshark in Nmap. It should note that you can visit the packages available in Eldernode if you want to buy a VPS server.
Table of Contents
Tutorial Use Wireshark in Nmap step by step
In the rest of this article, we’re going to teach you how to capture a network packet using Wireshark when an attacker scans the target using the NMAP port scanning method. In this tutorial, you will also learn how Wireshark records different packets of network traffic for open and closed ports. So we ask you to join us in this article with How to Use Wireshark in Nmap tutorial.
Wireshark applications
Wireshark can be used for the following:
1- Troubleshooting and debugging in the network
2- Testing security problems
3- Analysis and development of protocols
4- Performing hacking operations
5- Network and security training
Use Wireshark in Nmap
The important point to note in this section is that in this section, work is done with the IP address (192.168.1.102). This is common for Windows and Linux devices. So you can distinguish them by your MAC address. In the following, we will introduce you to the different sections on how to use Wireshark in Nmap. Please join us.
How TCP Scan works
TCP Scan scans the TCP port like ports 21, 22, 23, 445. It should note that this scan ensures listening to the (open) port via a three-way manual connection between the source port and the destination port. After doing this, if the port is open, the source requests with the SYN packet, sends the SYN response destination, the ACK packet, and then the ACK packet source. Finally, the source again sent RST, ACK packets.
You can type the NMAP command to scan TCP as shown below. Also start the Wireshark on the other side to get the package:
nmap -sT -p 445 192.168.1.102As you can see in the image below, executing the above command indicates that port 445 is open.
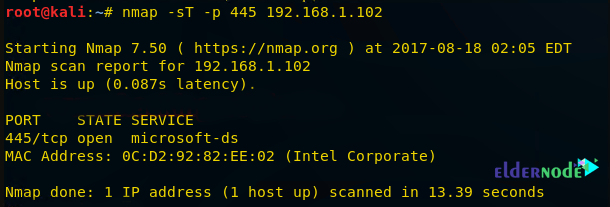
At this point, you can look over the sequence of packet transfer between source and destination captured through Wireshark.
1. Source sent SYN packet to the destination
2. Destination sent SYN, ACK to source
3. Source sent ACK packet to the destination
4. Source again sent RST, ACK to destination

At this point, you can check the network traffic for the close port. If the scan port is closed, then a 3-way handshake connection would not be possible between source and destination. The source sends the Syn Pack, and if the port is closed, the receiver sends a response via RST, ACK.
You can use the following command for TCP scan as well as start Wireshark on another hand to capture the sent Packet:
nmap -sT -p 3389 192.168.1.102As you can see in the image below, port 3389 is closed.

Now here you can Look over the sequence of packet transfer between source and destination captured through Wireshark.

How Stealth Scan works
SYN Scan is one of the most popular scans. This type of scan can be done easily and quickly and scans thousands of ports every second. It is also relatively typical and stealthy since it never completes TCP connections. Note that the port is also open if an SYN packet (without ACK flag) is received in response. Note that this scan is referred to as half-open scanning because you do not open the full TCP connection.
Like the following command, you can scan the NMAP instruction for TCP. You can also start Wireshark on the other side to record the packet sent:
nmap -sS -p 22 192.168.1.102By executing the above command, you will see that port 22 is open.
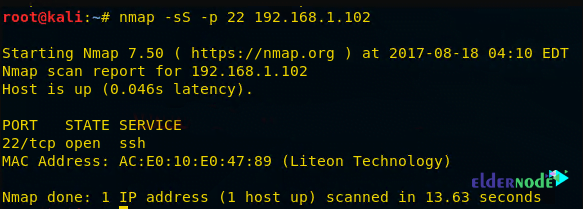
In the image below you can see a sequence of packet transfers between source and destination taken via Wireshark.
1. Source sent SYN packets to the destination
2. Destination sent SYN, ACK packets to the source
3. Source sent RST packets to the destination

Now you need to scan the NMAP instruction using the following command for TCP. Note that you must start the Wireshark on the other side to record the packet sent.
nmap -sS -p 3389 192.168.1.102As you can see in the image below, port 3389 is closed.
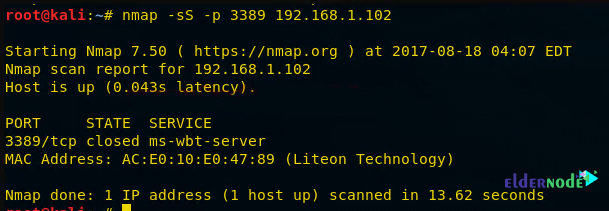
You will see the following image carefully:
1. Source sent SYN packets to the destination
2. Destination sent RST, ACK packets to the destination

How Fin Scan works
In this section, we will introduce the FIN packet. Note that the FIN packet is using to terminate the TCP connection between the source and destination ports after the complete data transfer. How to do this type of scan is as follows:
In the place of an SYN packet, Nmap starts a FIN scan by using a FIN packet.
If the port is open then no response will come from the destination port when the FIN packet is sent through source port.
Note: Fin-Scan is only workable in Linux machines and does not work on the latest version of windows.
As in the previous steps, you can type the following NMAP command for TCP scan as well as start Wireshark on another hand to capture the sent Packet:
nmap -sF -p 22 192.168.1.102You will see that port 22 is open.

As you can see in the image below:
1. Source sent FIN packets to the destination
2. Destination sent no reply to the source

Scan the following instructions for TCP again and start Wireshark to record the packet sent:
nmap -sF -p 3389 192.168.1.102As you can see, port 3389 is closed.
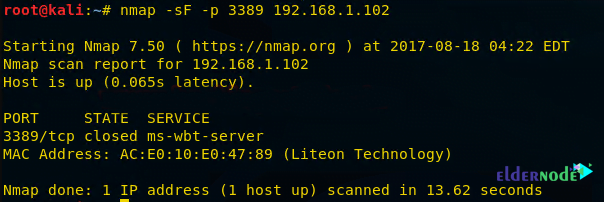
Looking at the sequence of packet transfers between the source and destination received via Wireshark, you will see that:
1. Source sent SYN packets to the destination
2. Destination sent RST packets to the destination

How Null Scan works
In this section, we are going to explain the Null Scan to you. A Null Scan is a series of TCP packets which hold a sequence number of “zeros” (0000000). Since there is no flag in this type of scan, the destination does not know how to respond to the request. For this reason, it destroys this packet and does not send any response indicating that the port is open.
Note: Null scan only works on Linux devices and does not work on the latest version of Windows.
As in the previous steps, you can type the following NMAP command for TCP scan as well as start Wireshark on another hand to capture the sent Packet:
nmap -sN -p 22 192.168.1.102By executing the above command, you will see that port 22 is open.
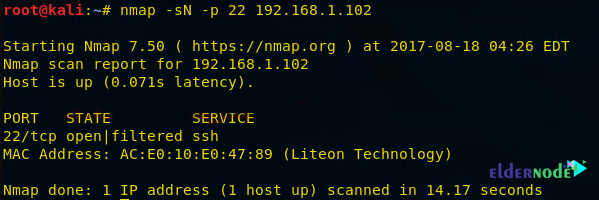
As you can see in the image below:
1. Source sent Null packets to the destination
2. Destination sent no reply to the source

Scan the following instructions for TCP again and start Wireshark to record the packet sent:
nmap -sN -p 3389 192.168.1.102As you can see, port 3389 is closed.

Looking at the sequence of packet transfers between the source and destination received via Wireshark, you will see that:
1. Source sent Null (none) packets to the destination
2. Destination sent RST, ACK to source

Conclusion
Wireshark is the name of an Internet analytics tool formerly called Ethereal. This software analyzes the packets that are sent and received via the Internet and displays them to the user. Wireshark has many capabilities and you can use it to check packages sent and received on the Internet. In this article, we tried to teach you to step by step how to Use Wireshark in Nmap by giving an example.


