
Netwatch is an advanced monitoring tool that can be used to automatically apply various events to the router with the help of ICMP Ping packets and according to the response returned from the destination of Ping packets. Netwatch’s task is to monitor the status (Reachable or Unreachable) of hosts within the Internet or internal network. This tool checks the status of hosts by sending ping packets to IPs specified by the admin. This happens for all IPs specified in the Netwatch Table. Ping packets have a return message based on an event. This definition can be in the form of a script or command on a Mikrotik router. In this article, we try to Introducing and Tutorial Netwatch in MikroTik. You can visit the packages available in Eldernode if you need to purchase a Mikrotik VPS server.
Table of Contents
Tutorial Netwatch in MikroTik
What is the NETWATCH tool?
Netwatch is a Mikrotik tool for checking and testing the status of a network or system. This tool measures the stability of the connection between the user Mikrotik and a device connected to the network. It also gives the user information about being connected or disconnected from the network.
With this tool, which is one of the Mikrotik applications, it can be used to observe the connection status between two Mikrotiks in different networks, as well as to test the connection with a server. In other words, instead of troubleshooting and performing various tests, the user can be sure of the connection status and non-connection only by seeing its status in Netwatch.
How to use Netwatch in Mikrotik
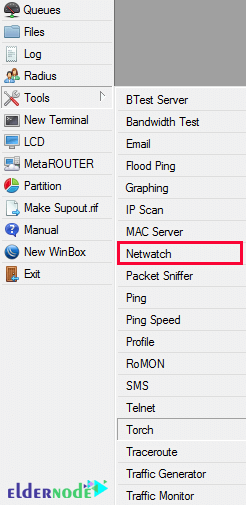
In the rest of this article, we will try to explain to you how to use the Netwatch tool in Mikrotik. Please join us. The first step to using Netwatch is to click on the Netwatch option from the Tools menu to open its window.
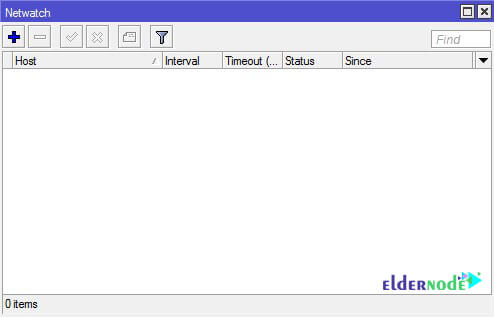
In the next step, after opening the Netwatch window, click on the Add option. Then you need to enter the required information to ensure the status of the connection between Mikrotik and your device.
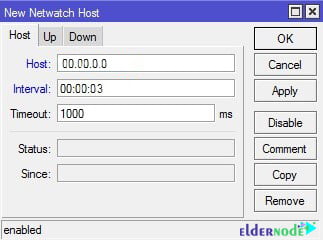
The required information mentioned above, which you must enter, is as follows:
A) Host: Enter the IP address of the desired destination in this field.
B) Interval: Set the time you want the microcontroller to check from this section.
C) Timeout: The length of time Mikrotik waits for disconnection is specified in this section.
After entering the information, click on Apply and then OK to display the network status.
*
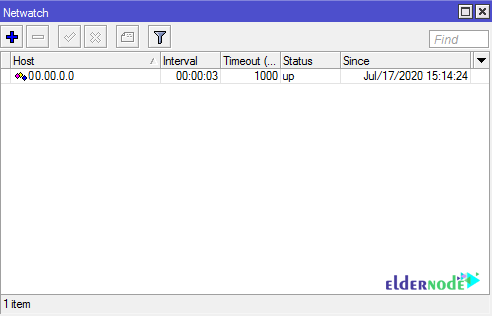
Once you are able to add the required Netwatch, you can see the status of the servers you have added on the same page. It should be note that closing the ICMP and Ping protocols has no effect on the use of this tool. Mikrotik can also test and check the network connection status without having to open it.
Conclusion
Netwatch monitors the status of hosts on the network by sending ICMP pings to the specified list of IP addresses. You can specify the IP address, ping distance and console scripts for each entry in the netwatch table. The main advantage of netwatch is the ability to issue arbitrary console commands in host mode changes. In this article, we tried to introduce you to Netwatch in MikroTik and explain how to use it. If you wish, you can visit the DNS Configuration Tutorial in Mikrotik and Static Route in MikroTik articles.

