[Updated on: 2021-01-05] Secure Shell is a UNIX-based command interface and protocol to help us a secure path on a network to connect to the server. While SSH commands are secure and encrypted, they act as a shell to provide a secure connection. Using a digital certification, the bother ends of client and server connections are authenticated. So, passwords are encrypted and protected. In this article, you will learn more about Tutorial Connect To SSH On Linux. Because of its high security, and depending on the operating system, the administrators manage their dedicated servers to use the SSH protocol. Or they protect their Remote Desktop Protocol with SSH. However, if you have not prepared your Linux VPS yet, our perfect packages could be helpful.
Connect SSH To Linux Server with Putty
While you are running Linux, you can use SSH for security reasons, generate an SSH key, and add a public key to the server. It lets you access your cloud server and run shell commands. In this way, you would easily identify trusted computers. The Secure Socket Layer encrypts SSH. So it will be really difficult for communications to be intercepted and read. Let’s see how you can connect to SSH and use its features.
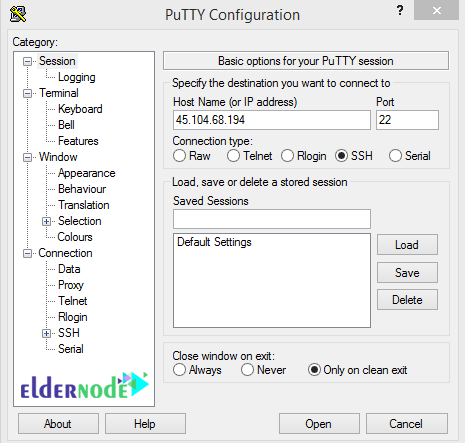
First, download Putty software on Windows to get started with an SSH connection. This software does not need to be installed and will be ready to run immediately after download. Once, the download is finished, open putty. Enter the IP address in the Host Name or IP Address box and the SSH connection port is the default port 22, in the Port box, and then click open to enter the software terminal.

If the “PuTTY Security Alert” security message is displayed to you, click yes to continue. Enter your username when the window opens, It is usually root. then, enter your password and press Enter to be connected to your server. Also, you can adjust your preferences using Linux commands.
Note: When entering a password, no characters can be seen on the software terminal page. So type in the characters safely and then press the Enter key. If you want to paste the password you copied elsewhere, just use the right mouse button. Right-click in this software plays the role of Paste.
If logged in successfully, the command line will be changed in the same way as username @ hostname [~] # and ssh will wait for your commands.
How to generate a new SSH key
As we mentioned, you can secure SSH access to your cloud server by generating an SSH key pair and prevent brute force password attacks. In this way, you will have a public key on the server and a matching private key on your local computer. If you wish to do not let anyone log in by using just a password, you should configure SSH Key-Based Authentication on your Linux Server.
To generate an SSH key pair, follow the below path:
Substitute your email address for the following command. It would generate your public-private RSA key pair when you receive the second command.
[email protected]ssh-keygen -t rsa -C "[email protected]"If you press Enter, the default location will be considered. Or enter a file in which the key could be saved and press Enter.
Note: If you do not prefer to use a password with the key pair, you should press Enter without setting one. But if you wish the additional security of a password for the key pair, enter a passphrase and then press Enter.
You can find your key without the need to specify its location every time that you connect. You just need to add your new ley to the local ssh-agent file to enable SSH.
ssh-add ~/.ssh/id_rsaNote: Instead of using ssh-agent, the SSH configuration could be used.
Conclusion
In this article, you learned bout Tutorial connect to ssh on Linux. If you faced an issue while SSH login, attempt to login through SSH while logged into the emergency console. It lets you watch the log to view the reason for failure. In case you are interested in reading more, follow our security tutorials.


