Fail2ban is software to prevent brute-force attacks. This software, written in Python, enables it to run on POSIX Fail2ban systems that have a locally installed user interface or firewall. Fail2ban is actually responsible for monitoring the log files for the selected content and executing a script based on the selected content. In this article, we are going to teach you to step by step How to Setup and Use Fail2ban on Rocky Linux. You can see the packages available in Eldernode if you need to purchase a Linux VPS server.
Table of Contents
How to Install and Use Fail2ban on Rocky Linux
Introduction to Fail2ban
Fail2ban is not a firewall, but an interface software to check your system logs. If an attempt is made to enter a successful name into your system several times, it will temporarily blacklist the IP in your Firewall.
The server administrator sets the time for each activity on the server. For example, each person can send a login request to the server up to 3 times with the wrong password. Fail2ban blocks people who have been raped since this time. This prevents the creation of multiple logs that involve the server processor.
With all these interpretations and many features that Fail2ban gives you in creating security on the server, this popular software still has three shortcomings. The first is that Fail2ban has no interaction with certain applications such as API and AGI. The second case is that this program does not support IPv6 and Fail2ban will not do anything if the malicious person uses this type of IP for brute-force attacks. But the third case is the main weakness. Fail2ban is its inability to protect the server in distributed attacks. This program will not be able to respond if the attacker uses several different sources to attack.
Follow us in the rest of this article on how to setup Fail2ban on Rocky Linux.
Setup Fail2ban on Rocky Linux
In this section, we are going to teach you how to setup Fail2ban on Rocky Linux. To do this, you must follow the steps below in order.
In the first step, we want to start Firewalld using the following command:
sudo systemctl start firewalldNow you need to enable Firewalld to start when booting:
sudo systemctl enable firewalldYou can check the status of Firewalld using the following command:
sudo systemctl status firewalldIt is interesting to know that you can use the following command to verify all running Firewalld rules:
sudo firewall-cmd --list-allThe next step is to install the EPEL repository using the following command. It should be noted that the EPEL repository offers high-quality packages for RHEL-based distributions:
sudo dnf install epel-releaseAfter you have installed the EPEL repository you now need to install the fail2ban and fail2ban-firewalld packages using the following command:
sudo dnf install fail2ban fail2ban-firewalldYou can then start fail2ban by running the following command:
sudo systemctl start fail2banYou can also enable fail2ban to start at boot time by running the following command:
sudo systemctl enable fail2banFinally, you can check the status of fail2ban using the following command:
sudo systemctl status fail2banHow to Configure Fail2ban on Rocky Linux
After you were able to setup Fail2ban according to the instructions in the previous section, we now want to teach you how to configure Fail2ban on Rocky Linux.
To do this you need to open the etc/fail2ban/jail.conf configuration file for editing. Then copy the contents of the jail.conf configuration file to the jail.local file as shown below:
sudo cp /etc/fail2ban/jail.conf /etc/fail2ban/jail.localThen open the jail.local file using a text editor file:
sudo vim /etc/fail2ban/jail.localYou should note that in the [DEFAULT] section, check the settings as follows:
bantime = 1h findtime = 1h maxretry = 5Now you need to configure fail2ban using the following command to work with firewalld instead of iptables:
sudo mv /etc/fail2ban/jail.d/00-firewalld.conf /etc/fail2ban/jail.d/00-firewalld.localFinally, after making the changes, restart fail2ban once using the following command:
sudo systemctl restart fail2banHow to Use Fail2ban on Rocky Linux
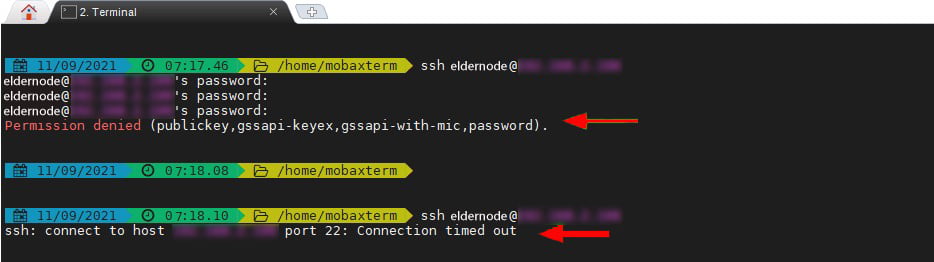
In the previous sections, we taught you how to setup and configure fail2ban. Now we want to show you how to use fail2ban. In the following example, we want to simulate 3 failed logins by setting an incorrect password for each of the passwords.
To perform this test you need to go to a remote Linux system and try to log in using the wrong password. You will notice that after 3 unsuccessful attempts, the connection will be disconnected. In other words, any attempt to enter will be blocked until the ban is lifted.
You can check the jail status of blocked client systems using the following command:
sudo fail2ban-client status sshdNote that you can use the following command to remove a client from jail:
sudo fail2ban-client unban 192.168.2.102Run the following command to review the jail status and ensure that the client is not included in the banned IP list:
sudo fail2ban-client status sshdConclusion
Hackers often use a variety of methods to attack servers. One of the common attacks that affect servers is “password attacks”. The fail2ban tool can be an effective way to deal with this type of attack. In this article, we tried to teach you how to setup and Use Fail2ban on Rocky Linux.


![Tutorial Install Docker CE on Debian 11 [Bullseye]](https://blog.eldernode.com/wp-content/uploads/2022/01/install-docker-ce-on-debian-11-300x164.png)