
The most commonly used protocol today is called Internet Key Exchange (IKE). The first version was released in 1998 and its common name is IKEv1. It should note that the first version of IKE was used by IPsec by default. IKEv1 features upgraded its hidden parts. To upgrade it in 2005, IKEv2 was created. With this update, the protocol became more reliable and more resilient to DOS attacks. IKEv2 is an IPsec-based protocol that stands for Internet Key Exchange Version 2. It is a joint product of Cisco and Microsoft and is compatible with multiple platforms. In this article, we want to introduce you to Tutorial Setup IKev2 on Ubuntu 20.04. It should note that you can visit the packages available in Eldernode if you wish to purchase an Ubuntu VPS server.
Table of Contents
How to Setup IKev2 on Ubuntu 20.04 step by step
The IKEv2 protocol is one of the protocols derived from the well-known IPsec protocol, which performs the tunneling process well. There are several versions of IKE for open-source platforms. One of the most important strengths of IKEv2 that distinguishes it from other VPN protocols is the ability to reconnect and reestablish a connection. This means that if a connection is disrupting, IKEv2 can continue the connection and continue the work process. Although many mobile devices prefer to use the L2TP/IPsec protocol combination, IKEv2 can also be a very good alternative.
Follow the tutorial on installing, configuring, and running IKEv2 on Ubuntu 20.04.
Setup IKev2 on Ubuntu 20.04 | Ubuntu 18.04
Installing IKEv2 on Ubuntu 20.04 is not complicated. In this article, we will teach you to step by step how to configure and setup the IKEv2 VPN server on Ubuntu. Stay with us.
Install StrongSwan on Ubuntu 20.04
The first step is to install StrongSwan. StrongSwan is a free IPSec resource daemon that must be configured as a VPN server. Then you need to install the public key infrastructure component. By doing this you can create a certification authority to validate your infrastructure. Update the local cache using the following commands and install the software:
sudo apt updatesudo apt install strongswan strongswan-pkiHow to Create a Certificate Authority (Setup IKev2 on Ubuntu 20.04)
Now that you have successfully installed StrongSwan, let’s move on to creating certificates. Note that an IKEv2 server needs a certificate to identify itself to the client. Now that you have successfully installed StrongSwan, let’s move on to creating certificates. The strongswan-pki package comes with a tool for generating a certification reference and server certifications to help users create certification.
You must first create multiple directories to save the assets you are working on. It should be noted that the directory structure is compatible with some of the directories in /etc/ipsec.d. So where we will eventually move all the created items. Here we decide to lock licenses to prevent private files from being seen by other users. To do this, use the following commands:
mkdir -p ~/pki/{cacerts,certs,private}chmod 700 ~/pkiNow you need to generate a root key. The root key is a 4096-bit RSA key using to sign the root certificate reference. So you can execute the following command to generate the key:
ipsec pki --gen --type rsa --size 4096 --outform pem > ~/pki/private/ca-key.pemAfter you have successfully created the key, you now need to run the following commands to create your root certificate reference using this key to sign the root certificate:
ipsec pki --self --ca --lifetime 3650 --in ~/pki/private/ca-key.pem \--type rsa --dn "CN=VPN root CA" --outform pem > ~/pki/cacerts/ca-cert.pemHow to Generate a Certificate for the VPN Server
After you were able to activate and set up your root certificate license in the previous section, you can now create a certificate that the VPN server can use. It should note that this certificate allows the client to verify the server using CA certification. To do this, first create a private key for the VPN server using the following command:
ipsec pki --gen --type rsa --size 4096 --outform pem > ~/pki/private/server-key.pemIn the next step, you need to create and sign the VPN server certificate with the certification reference key that you created in the previous step. Therefore, you must execute the following commands in order.
Note: You must change the Common Name (CN) and Subject Alternate Name (SAN) to the DNS or IP address of your VPN server in the following commands.
ipsec pki --pub --in ~/pki/private/server-key.pem --type rsa \| ipsec pki --issue --lifetime 1825 \--cacert ~/pki/cacerts/ca-cert.pem \--cakey ~/pki/private/ca-key.pem \--dn "CN=server_domain_or_IP" --san "server_domain_or_IP" \--flag serverAuth --flag ikeIntermediate --outform pem \~/pki/certs/server-cert.pemNow that you have created all the TLS/SSL files required by StrongSwan, you can move the files to /etc/ipsec.d:
sudo cp -r ~/pki/* /etc/ipsec.d/How to Configuring StrongSwan
Let’s back up the file for reference before starting from scratch with the following command:
sudo mv /etc/ipsec.conf{,.original}In the next step, you can create and open a new empty configuration file by typing the following command:
sudo nano /etc/ipsec.confYou first need to tell StrongSwan to record the daemon status and allow duplicate connections to fix the bug. So you need to add the following command to the /etc/ipsec.conf file:
config setup charondebug="ike 1, knl 1, cfg 0" uniqueids=noThe next step is to create a configuration section for the VPN. StrongSwan must also be notified to create the IKEv2 VPN Tunnel. It is then necessary to load this configuration section automatically at startup. Add the following lines to the file:
. . . conn ikev2-vpn auto=add compress=no type=tunnel keyexchange=ikev2 fragmentation=yes forceencaps=yesNote that if the client is unexpectedly disconnected, you must configure the dead-peer connection to clear the “dangling” connections:
. . . conn ikev2-vpn . . . dpdaction=clear dpddelay=300s rekey=noNext, you need to configure the IPSec server-side parameters:
conn ikev2-vpn . . . left=%any leftid=@server_domain_or_IP leftcert=server-cert.pem leftsendcert=always leftsubnet=0.0.0.0/0Here you need to configure client-side IPSec parameters such as the range of private IP addresses and DNS servers using the following commands:
. . . conn ikev2-vpn . . . right=%any rightid=%any rightauth=eap-mschapv2 rightsourceip=10.10.10.0/24 rightdns=8.8.8.8,8.8.4.4 rightsendcert=neverTo receive the credential when connecting from the customer, you must enter the following command:
. . . conn ikev2-vpn . . . eap_identity=%identityFinally, you need to save the file and exit it.
Configuring VPN Authentication
In the previous section, we successfully configured the VPN server. But since no credentials have configuring yet, here we need to configure a few items in a special configuration file ipsec.secrets. Open the secrets file using the editor you want:
sudo nano /etc/ipsec.secretsBy adding the following command to the configuration file, tell StrongSwan where to find your private key:
: RSA "server-key.pem"In the next step, you must define the user information using the following command:
your_username : EAP "your_password"Save the configuration file and exit it. Then, to apply the changes, you must restart the system using the following command:
sudo systemctl restart strongswanHow to Configure the Firewall and Kernel IP Forwarding
In this section, we intend to complete the StrongSwan configuration to configure the firewall to enable VPN traffic through it. To do this, you must execute the following commands:
sudo ufw allow OpenSSHsudo ufw enableAdd a rule using the following command to allow UDP traffic to standard IPSec, 500 and 4500 ports:
sudo ufw allow 500,4500/udpTo route and send IPSec packets you need to open one of the UFW configuration files and add some low-level policies. Note that you must first use the following command to find out which network interface is using on the server to access the Internet:
ip route | grep defaultThe important point here is that your public interface should follow the word “dev“. For example, the following output shows an interface called eth0:
default via 203.0.113.7 dev eth0 proto staticThe next step is to open the /etc/ufw/before.rules file in your text editor:
sudo nano /etc/ufw/before.rulesThe next step is to add the following configuration near the top of the file (before the *filter line):
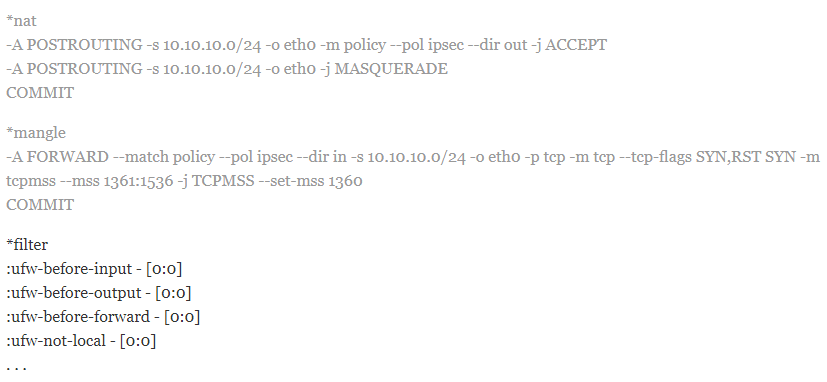
You must change each instance of eth0 in the above configuration to match the interface name you found with the IP path. Now It’s time to add another block of configuration using the following command after *filter and chain definition lines:
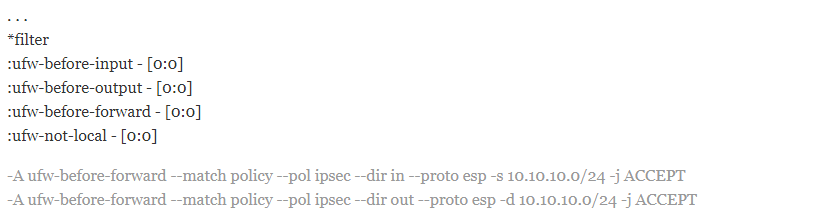
After making the above changes, save the file and exit it.
In order to be able to route from one interface to another, you need to open the UFW kernel configuration file using the following command and change some of the network kernel parameters:
sudo nano /etc/ufw/sysctl.confThe changes you need to make to the file are highlighting in the following code:
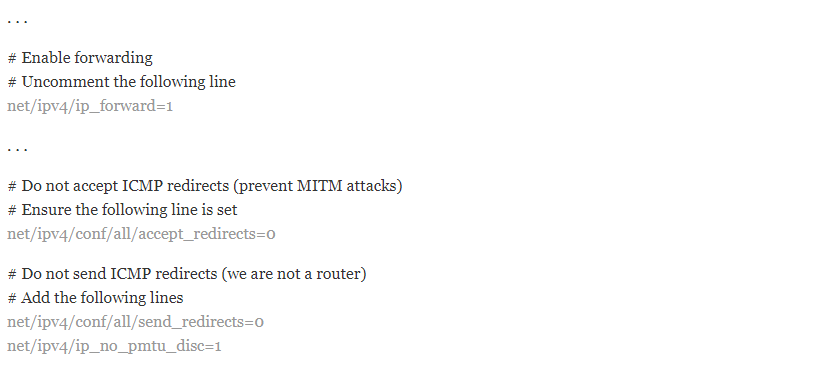
After making the changes, save the file and exit it. Finally, you can enable all your changes by disabling and re-enabling the firewall. To do this you must use the following commands.
Note: After executing the following commands, you will be asked to confirm the process. Type Y to re-enabling UFW with the new settings.
sudo ufw disablesudo ufw enableHow to Connect to IKEv2 from Ubuntu Linux
Here’s how to connect to IKEv2 via Ubuntu 20.04. You can follow the steps below to connect to IKEv2 using the Manage StrongSwan as a service method. You must first update your local package cache using the following command:
sudo apt updateThen you need to run the following command to install StrongSwan and related software:
sudo apt install strongswan libcharon-extra-pluginsNext, you need to copy the CA certificate to /etc/ipsec.d/cacerts:
sudo cp /tmp/ca-cert.pem /etc/ipsec.d/cacertsAnother important step is to disable StrongSwan so that the VPN does not start automatically. So to do this you need to get help from the following command:
sudo systemctl disable --now strongswanNow you need to configure your VPN username and password in the /etc/ipsec.secrets file:
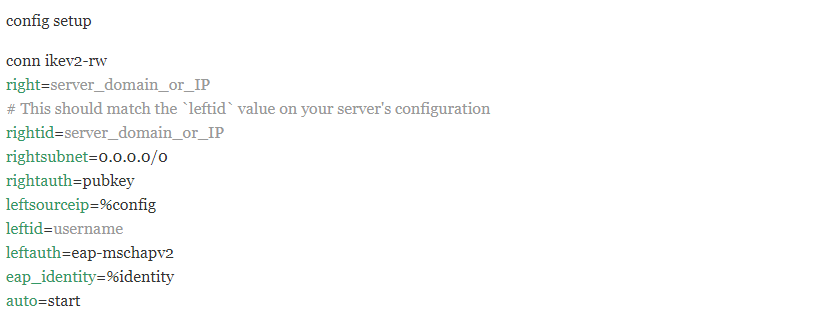
your_username : EAP "your_password"Finally, you need to edit the /etc/ipsec.conf file as follows to define your configuration:
You can use the following commands to connect and disconnect to a VPN, respectively:
sudo systemctl start strongswansudo systemctl stop strongswanConclusion
IKEv2, like any other VPN protocol, is responsible for creating a secure tunnel between the user and the VPN server. This process, it is first done by authenticating the user and the server. It is then agreed to which encryption method to use. In this article, we tried to acquaint you step by step with Tutorial Setup IKev2 on Ubuntu 20.04. If you wish, you can refer to the article How to setup IKev2 on centos 8.