The Lightweight Directory Access Protocol is a core protocol that was developed for directory services. It is designed to be used to distribute lists of information organized into directory information tress which is stored within an LDAP database. Users must first authenticate their identity to be able to access the information stored within an LDAP database. You may have been forced to tolerate a very unlovable classmate because he is very well at your common project! To reach a target, you accept this symbolic relationship. Also, there is a symbolic relationship between the LDAP client and server. In fact, the server needs the client to ask it questions such as usernames, home directory locations, group memberships, and so on. The client needs the server to feed it information and it will be responsible for delivering that information. In this article, you will learn How To Install LDAP Client On Ubuntu 20.04. If you need to buy a Dedicated Server, we will keep a real relationship with you and support you in any hours of day and night. Purchase your own Ubuntu VPS safely.
To let this tutorial work better, please consider the below Prerequisites:
A non-root user with sudo privileges.
To setup, follow our Initial server setup on Ubuntu 20.04.
Table of Contents
Tutorial Install LDAP Client On Ubuntu 20.04
LDAP is an open-source and cross-platform protocol to be used for directory service authentication. There are many different implementations available. It is used to store and retrieve data from a hierarchical directory structure.
Install and Configure LDAP Client on Ubuntu 20.4 | Ubuntu 18.04
You are ready to start to install and configure the LDAP client when you configure the LDAP server and add user accounts.
In case you have no active DNS server in your network, add the LDAP server address to /etc/hosts.
sudo vim /etc/hosts 192.168.18.50 ldap.example.comTo install LDAP client utilities on your Ubuntu system, run:
sudo apt -y install libnss-ldap libpam-ldap ldap-utilsLDAP Client configuration
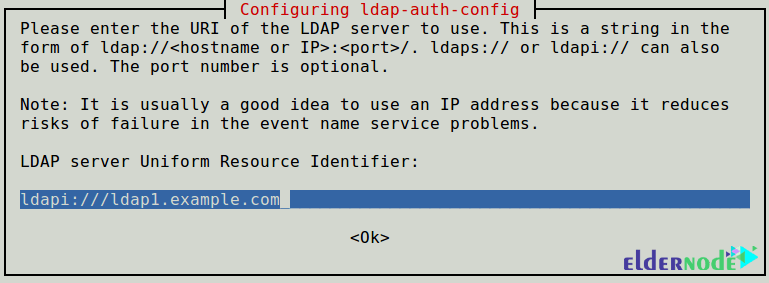
Step 1:
Now, you can set LDAP URL. It can be an IP address or hostname. You will be prompted for details of your LDAP server. The ldap-auth-config package is auto-installed will do most of the configuration based on the inputs you enter.
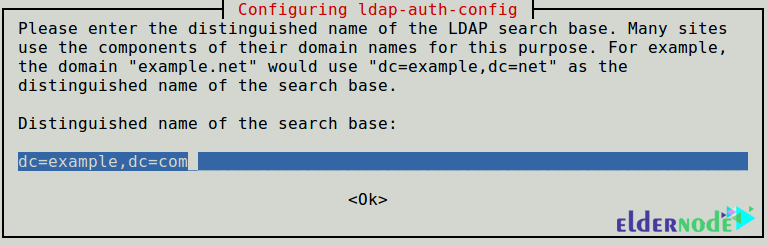
Step 2:
Then, you should enter the name of the LDAP search base, so set a distinguished name of the search base. You can use the components of their domain names.
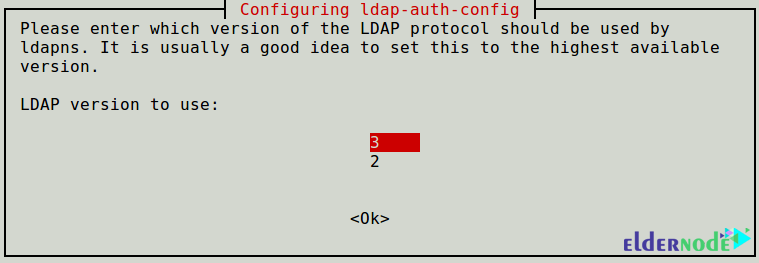
Step 3:
Select LDAP version 3 to use and click Ok.
Step 4:
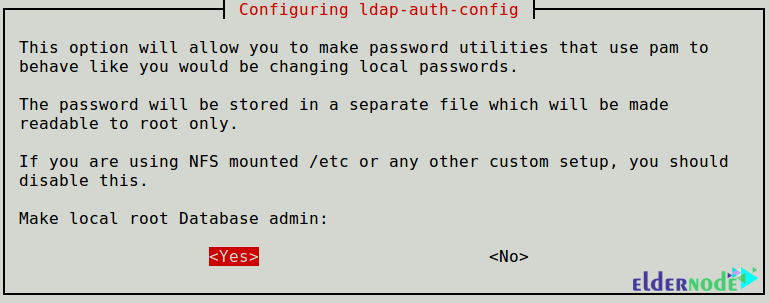
To be able to make password utilities that use Pam to behave like you would be changed local passwords. So, to Make local root Database admin, press Yes.
Step 5:
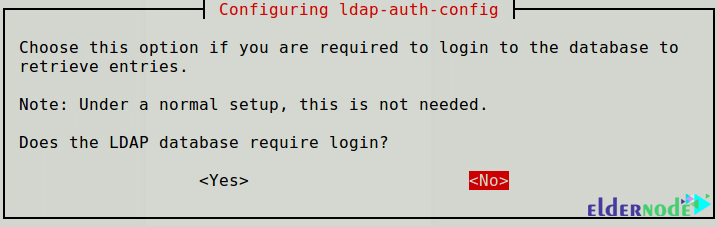
In this step, you will answer No for Does the LDAP database require login? to disable login requirements to the LDAP database.
Step 6:
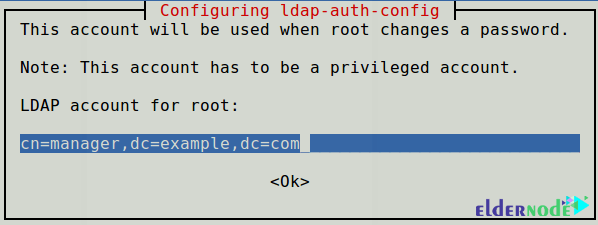
You need to set the LDAP account for root.
Step 7:
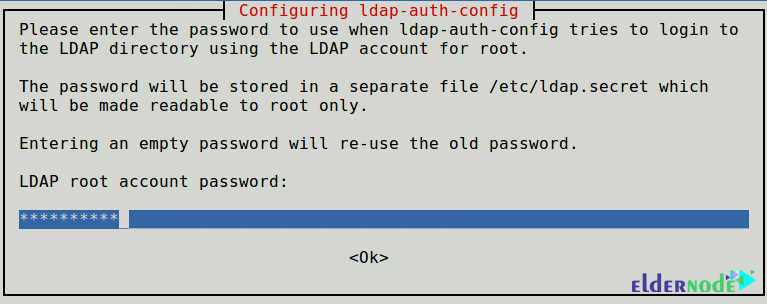
You need to consider a password to use when ldap-auth-config tries to log in to the LDAP directory using the LDAP account for root.
Step 8:
You can find the result of the dialog in the file /etc/ldap.config. If you need to make some changes, open and edit this file using your considered command-line editor.
Now, to configure the LDAP profile for NSS, type:
sudo auth-client-config -t nss -p lac_ldapStep 9:
Next, to use LDAP for authentication by updating PAM configurations, you must configure the system. Choose LDAP from the menu and log in using LDAP-based credentials.
sudo pam-auth-update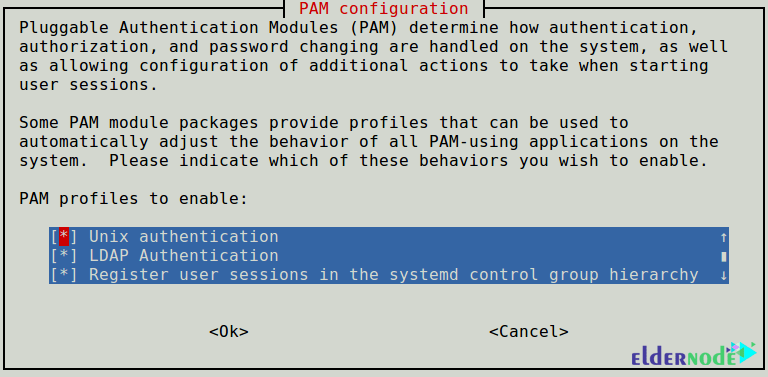
Step 10:
If you wish the home directory of the user to be created automatically, perform one more configuration in the common-session PAM file.
sudo vim /etc/pam.d/common-sessionAnd add the line below in it:
session required pam_mkhomedir.so skel=/etc/skel umask=077Step 11:
At this point, you can save the changes and close the file. Restart Name Service Cashe Daemon (NCSD) by running:
sudo systemctl restart nscdsudo systemctl enable nscdIn the case of using replication, LDAP clients will need to refer to multiple servers specified in /etc/ldap.conf. Specify all the servers in the following form:
uri ldap://ldap1.example.com ldap://ldap2.example.comIt implies that the request will time out and if the provider becomes unresponsive, the consumer will attempt to be reached to process it.
Consider the provider for ldap1.example.com and the consumer as ldap2.example.com
Finally, use the command below to check the LDAP entries for a particular user from the server.
getent passwd eldernodeThat’s that! Once you view the details of the specific user from the /etc/passwd file, it means your client machines are configured to authenticate with the LDAP server. So, you should be able to log in using LDAP-based credentials.
Conclusion
In this article, you learned How To Install LDAP Client On Ubuntu 20.04. Using LDAP helps you to have the communication language to communicate the applications with other directory services servers. The information of the users needs to be shared with other entities on the network and directory services store the users, passwords, and computer accounts.


I don’t find the auth-client-config command 🙁
Dear Tcherny, as we mentioned in the article, The ldap-auth-config package is auto-installed will do most of the configuration based on the inputs you enter. Also to configure the LDAP profile for NSS, you must run: sudo auth-client-config -t nss -p lac_ldap
But there is no auth-client-config package in 20.04
The ldap-auth-config package is auto-installed will do most of the configuration based on the inputs you enter. Also to configure the LDAP profile for NSS, you must run the following command:
sudo auth-client-config -t nss -p lac_ldapBut there is no ‘auth-client-config’ in 20.04. “auth-client-config: command not found”
You can install ldap-auth-config using the following commands:
sudo apt-get update
sudo apt-get -y install ldap-auth-config
As Tcherny mentioned above, auth-client-config is not part of Ubuntu 20.04, nor can it be installed using the apt-get command. Latest version is for 18.04.
As we mentioned in the article, The ldap-auth-config package is auto-installed will do most of the configuration based on the inputs you enter. Also to configure the LDAP profile for NSS, you must run:
sudo auth-client-config -t nss -p lac_ldapTried all the steps but not able to login with ldap username and password
What error do you see?
In Ubuntu 20.04, ldap-auth-config package is NOT auto-installed, and the command ‘auth-client-config’ does not work. I would like to know how you solved the problem. Thanks a lot !
You can install ldap-auth-config using the following commands:
sudo apt-get updatesudo apt-get -y install ldap-auth-config