You are probably one of those users who have a very high volume of information and do not want this information to enter the servers. Also, you are not willing to pay a fee. So you are looking for a practical solution. OwnCloud is an open-source, completely free platform whose services and features are similar to Dropbox and data storage services. It stores information on a cloud and you can access these files whenever you want. In this article, we are going to teach you How to Install and Use OwnCloud on AlmaLinux 8.4. You can see the packages available in Eldernode if you want to buy a Linux VPS server.
Table of Contents
How to Setup OwnCloud AlmaLinux 8.4
Introduction to OwnCloud
OwnCloud is an open-source web application written in PHP, javascript. This tool is using to sync files between mobile, computer, tablet, notebook, etc.
OwnCloud client-side software is also available for Linux, Windows, Android, iOS, Mac, and BlackBerry operating systems, with which you can easily connect to your personal cloud storage. You can also sync your files, access them via the web, or share them with others.
It should be noted that the server-side installation software of this application can be installed on Mac, Android, Windows, and Linux operating systems. Mysql, MariaDB, PostgreSQL, SQLite, and Oracle databases can also be used.
Follow us in this article by learning how to install and use OwnCloud on AlmaLinux 8.4.
Prerequisites for Installing OwnCloud AlmaLinux 8.4
To install OwnCloud on AlmaLinux, you need to install LAMP first. Therefore, it is necessary to perform the following steps in order.
How to Install Apache Web Server
First, we start by installing the Apache Web Server. To do this you can use the following command:
yum install httpd httpd-toolsThen you need to enable Apache using the following three commands, start the Web Server, and finally check the status:
systemctl enable httpdsystemctl start httpdsystemctl status httpdThe next step is to edit your firewall rules to allow HTTP and HTTPS requests on your web server. To do this you can use the following commands:
firewall-cmd --permanent --zone=public --add-service=httpfirewall-cmd --permanent --zone=public --add-service=httpsfirewall-cmd --reloadFinally, restart the Apache Web Server to complete the installation:
systemctl restart httpdHow to Install PHP on the Server
To install PHP on AlmaLinux you can use the following command:
yum install -y php-mysqlnd php-dom php-simplexml php-xml php-xmlreader php-curl php-exif php-ftp php-gd php-iconv php-json php-mbstring php-posix php-sockets php-tokenizerThen restart the web server by running the following command:
systemctl restart httpdHow to Install MariaDB Server
One thing to keep in mind before you start is that installing MariaDB involves several steps. To Install MariaDB, you must first run the following command:
yum install mariadb-server mariadbThen you need to enable MariaDB using the following three commands, start MariaDB, and finally confirm the status:
systemctl enable mariadbsystemctl start mariadbsystemctl status mariadbAfter completing the above steps, you should now secure your MariaDB installation using the following command:
mysql_secure_installationNote that for OwnCloud integration, you need to Install additional PHP modules using the following command:
yum install php-curl php-gd php-intl php-json php-ldap php-mbstring php-mysqlnd php-xml php-zip php-opcacheThen you have to create a database for OwnCloud in the next step. First, run the following command to enter the MariaDB database:
mysql -u root -pNow you need to use the following command to create a database for OwnCloud:
CREATE DATABASE owncloud_db;The next step is to create a user and authorize the nextcloud-db database. In the following command, you must replace Enter-A-Password-Here with the password you want:
GRANT ALL ON owncloud_db.* TO 'owncloud_user'@'localhost' IDENTIFIED BY 'Enter-A-Password-Here';Finally, by running the following commands, flush privileges and exit the MariaDB database:
FLUSH PRIVILEGES;EXIT;Install OwnCloud AlmaLinux 8.4
After installing the required prerequisites described in the section, we now want to teach you how to install OwnCloud on AlmaLinux 8.4. To do this, just follow the steps below.
You must first download OwnCloud using the following command:
wget https://download.owncloud.org/community/owncloud-complete-20201216.tar.bz2After you have downloaded the file, you should now extract it to /var/www/:
tar -jxf owncloud-complete-20201216.tar.bz2 -C /var/www/Now you need to use the following command to enable the Apache Web Server permission. This is required to access OwnCloud files.
chown -R apache: /var/www/owncloudCreate a configuration file for OwnCloud for the Apache Web Server by running the following command:
Vi /etc/httpd/conf.d/owncloud.confAdd the following commands to the configuration file:
Alias /owncloud "/var/www/owncloud/" <Directory /var/www/owncloud/> Options +FollowSymlinks AllowOverride All <IfModule mod_dav.c> Dav off </IfModule> SetEnv HOME /var/www/owncloud SetEnv HTTP_HOME /var/www/owncloud </Directory>After making changes to the configuration file, save it and exit. Then restart the apache Web Server:
systemctl restart httpdYou can use the following command to check the status of the Web Server:
systemctl status httpdNote that you should check that SELinux is enabled and running using the following command:
sestatusIf SELinux is enabled, you must allow the Apache Web Server to write in the OwnCloud directory:
setsebool -P httpd_unified 1How to Use OwnCloud AlmaLinux 8.4
In the previous section, you saw how to install OwnCloud on AlmaLinux 8.4. Now we want to teach you how to complete the task and use OwnCloud on AlmaLinux 8.4.
Open OwnCloud in the browser:
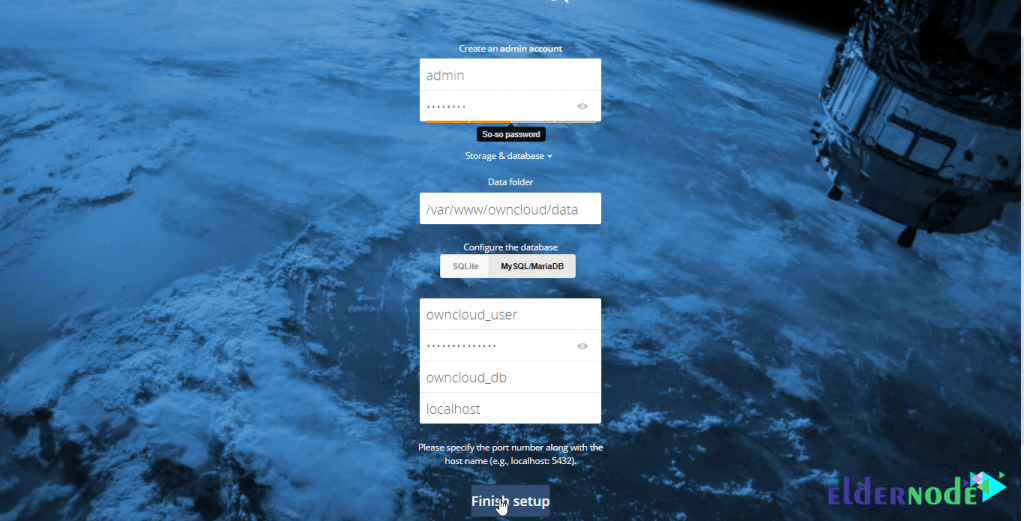
http://server-ip/owncloudOn the page that opens, enter the username and password to create an account, as shown below. Then click on Storage and Database and select MySQL/MariaDB. You also need to fill in all the database information, ie database user, password, and database name. Finally, click the Finish Setup button to complete the setup.
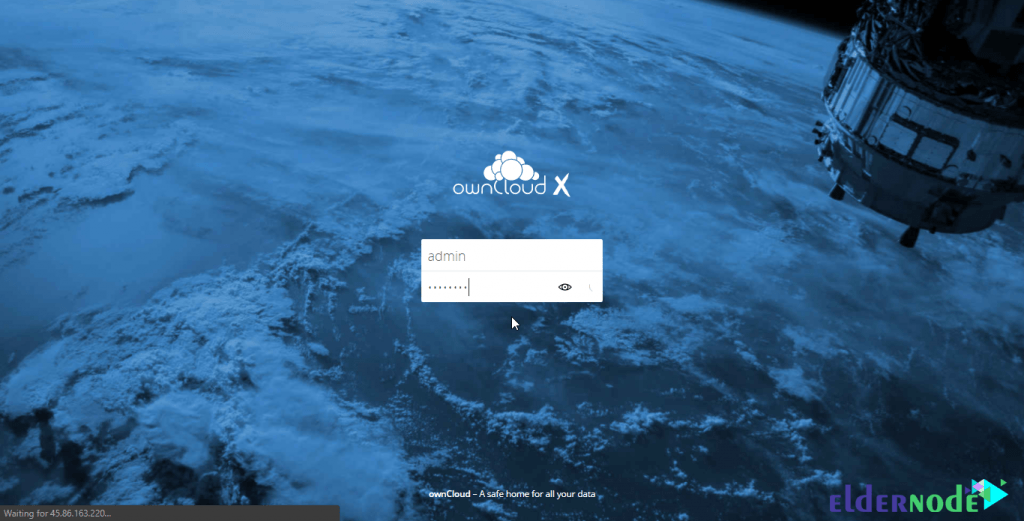
In the next step, enter the username and password you previously set for access, as shown below:
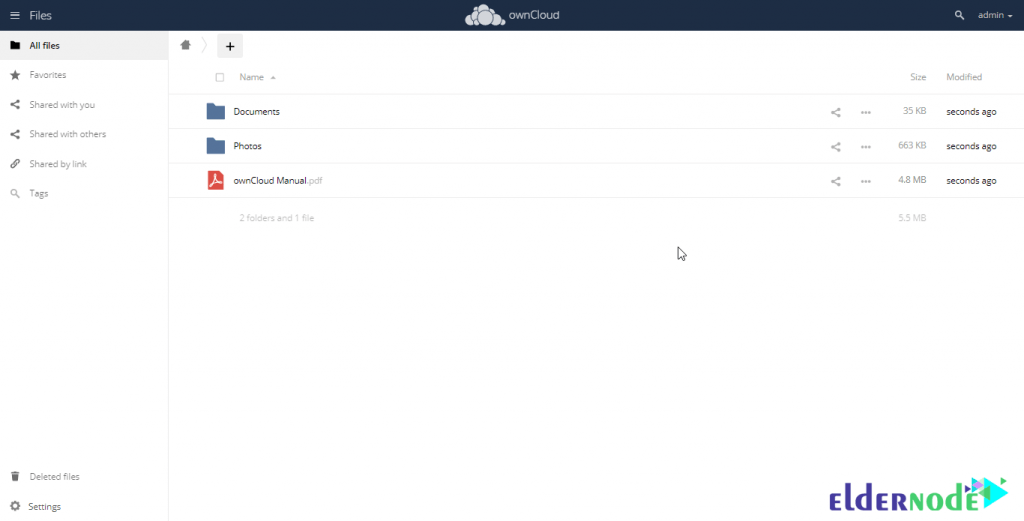
Once you have successfully logged in, you will be given options to install your OwnCloud application on different operating systems. You can see the dashboard in the image below:
Conclusion
One of the most important benefits of OwnCloud is that it is free and open-source. It also leaves you in control of the sensitive information you need. In this article, we tried to teach you how to install and use OwnCloud on AlmaLinux 8.4.
