IIS stands for Internet Information Services. It is a web server software package and has been designed for Windows Server. As a web administrator, you need IIS to create, configure, and publish sites on the web. Internet Information Services allows you to modify your website’s default pages, error pages, logging settings, and security settings. This article presents the Tutorial Install and Configure Reverse Proxy on IIS. Visiting Eldernode will fulfill your wishes to purchase your own Windows VPS Hosting.
Table of Contents
Install And Configure Reverse Proxy On IIS
IIS is mostly used to host ASP.NET web applications and static websites. Since IIS serves both standard HTML webpages and dynamic webpages, it is capable to send the HTML and associated images to the user’s browser. IIS is possible to run on Linux and Mac using Mono, but you are recommended to run IIS on Windows Server OS since it will be more versatile and stable.
While a forward proxy sits in front of a group of client machines, a reverse proxy is a server that sits in front of web servers and forwards client requests to those web servers. This guide will teach you how to install and configure Reverse Proxy with IIS on Windows Server.
How to Install Reverse Proxy on IIS
First, you need to learn to download and install the extension since IIS does not come with reverse proxy routing capability by default. Let’s go through the steps of this section and review the Routing Extension installation process.
Step 1:
Note: As you know, you must first enable IIS. Here are the Application Request Routing and URL Rewrite links that let you manually install certain extensions.
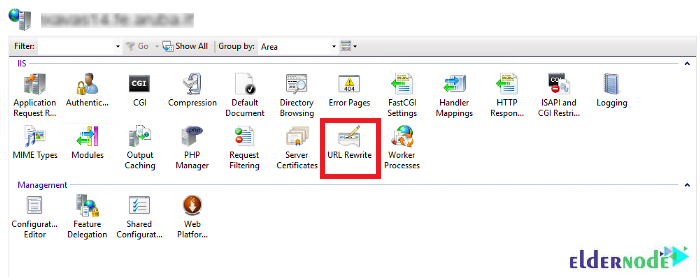
When you install the extensions, you will see the option URL Rewrite is adding to the IIS dashboard under Default Web Site. You must view something like below:
Step 2:
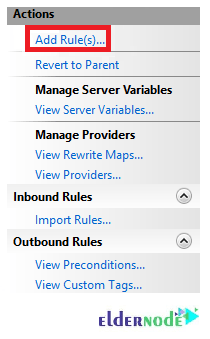
Now, you can add a reverse proxy rule. Click inside the URL Rewrite option and follow the below path to do this:
Right toolbar >> Select Actions >> Add Rule(s)… >> Inbound rules >> Blank rule or Reverse Proxy rule.
Then, you should see as below:
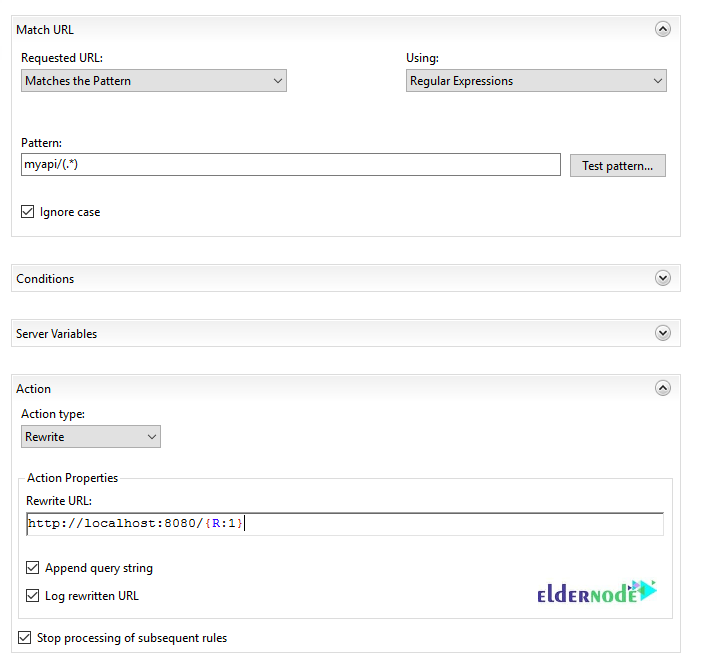
Let’s see what does the options of the above image means.
Pattern:
URL pattern in regex form to match for reverse proxy routing. It uses a regular expression format.
Conditions:
Extra conditions to complement Pattern. (Optional)
Server variables:
Add custom server variables if necessary. (Optional)
Action:
Action to perform if the URL is matching
Rewrite URL:
URL to route to if matched.
Pattern Note: In the field of pattern, you must check if the property of the URL for reverse routing matches or not. If yes, imply set pattern as (.*). Everything inside Pattern wrapped with parentheses can be referenced later in the Rewrite URL box in sequence ({R:1}, {R:2}, etc). {R:0} refers to the entire URL.
As you see in the above image, the request of http://api.myserver.com/myapi/auth/login is routing to http://localhost:8080 as http://localhost:8080/auth/login.
So, the {R:0} — myapi/api/login and {R:1} — auth/login variables will be created.
To apply the changes, click Apply after you modify the Pattern and Rewrite URL.
How to Configure Reverse Proxy on IIS
As you read earlier, IIS is not enabling by default. So, in this section, you will learn how to enable IIS proxy settings. Follow the below simple steps to proceed with the configuration of Reverse Proxy on IIS.
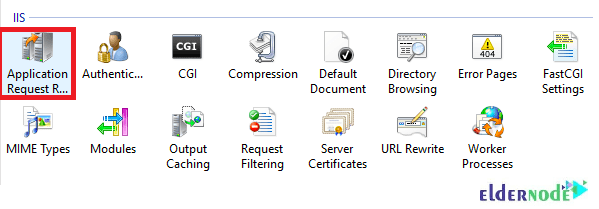
1- Open the IIS Manager and click on the server.
2- Double click on the Application Request Routing option.
3- At the right toolbar, select Server Proxy Settings…
4- Check Enable proxy.
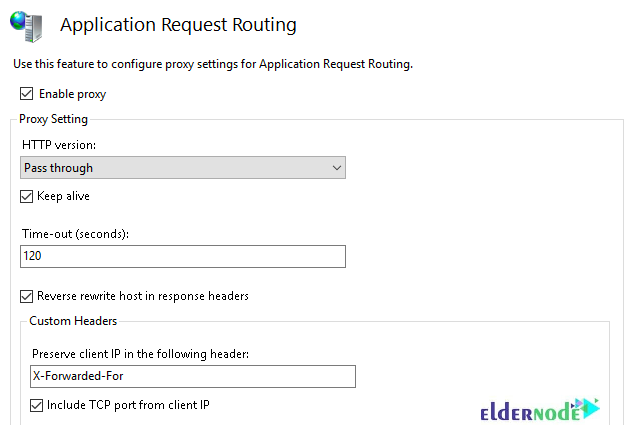
5- Click Apply and proceed with the URL Rewriting configuration.
Note: Enable Forward Proxy to not get 404 Not Found. It will happen if you only apply the URL Rewrite rule.
That’s that! You just reviewed all the required steps to enabling reverse proxy routing in Windows IIS. The reverse proxy setup is now completing.
Conclusion
In this article, you learned How to Install And Configure Reverse Proxy on IIS. We do not expect you to encounter serious issues. IIS will be able to capture incoming traffic and forward it to the backend server and inspect responses from the backend server and rewrite URL links inside the responses to match the host headers that IIS uses to publish the site.