[Updated] Minecraft is one of the most popular games of all time. Where players explore infinite worlds and build structures ranging from simple houses to tall skyscrapers. Minecraft is a sandbox game in which you can build your own 3D world. The first version of this game was made in 2009 and to date, more than 30 million copies of this game have been made and sold for various platforms. If you want to play Minecraft with your friends, you will need Minecraft Game Server. This server allows players to connect to a central system as a host for gaming software. In this article, you will learn How To Setup Minecraft Server. To buy a Virtual Private Server, visit Eldernode, contact our support team, and purchase your desired VPS Hosting Server.
Table of Contents
How To Make A Minecraft Server
Minecraft is a very simple 3D game based on pixels. This game has created a lot of popularity among Internet users and video game enthusiasts in a short period of time. Minecraft is a group game that allows users to play together on a server. Among the features of this game, we can mention the construction of 3D buildings. The whole game is adventurous and time-consuming. In this article, we teach you how to install the Minecraft game server on Ubuntu and Windows Operating System. If you are looking for better performance of your game server, it is better to use a server with high RAM and CPU power to respond to players’ commands better and faster.
Prerequisites to Install a Minecraft Server on Ubuntu
To let this tutorial work better, please consider the below Prerequisites:
_ A non-root user with Sudo privileges.
_ To setup, follow the Initial server setup on Ubuntu 21.04.
_ Linux VPS server
_ Ubuntu Operating System
_ 1024 MB RAM (at least 1024 MB but the recommended amount is 2048 MB. Of course, this depends on the amount of traffic and the number of players)
How To Install Minecraft Server On Ubuntu
In the first section of this guide, you will review the Minecraft installation process on Ubuntu. Let’s go through the required steps to finish it.
You must update the system. Use the commands below to do this:
apt-get updateapt-get upgrade -yNow, you must install OpenJDK.
Note: OpenJDK is an open-source program for implementing java and GNU and creating this environment on Ubuntu. Install OpenJDK with the following command:
apt-get install openjdk-8-jre-headless screenIt is the turn of creating a new user. Enter the following command to create a new user:
adduser minecraftThen, change the type of user from the current to the new user you created:
su - minecraftIt’s time to install Minecraft. Install the latest version by running the following command:
wget https://s3.amazonaws.com/Minecraft.Download/versions/1.11.2/minecraft_server.1.11.2.jarNote: You can find the latest versions of Minecraft from the Minecraft website.
Using the following command, you can run the script that runs Minecraft:
nano /home/minecraft/run.shEnter the following command in this file and then Save it:
#!/bin/sh BINDIR=$(dirname "$(readlink -fn "$0")") cd "$BINDIR" java -Xms1024M -Xmx1536M -jar minecraft_server.1.11.2.jar -o trueNote that the Xms and Xmx values are the minima and maximum amounts of RAM allocated to the Minecraft server. In this article, the minimum is 1024 MB and the maximum is 1536 MB. This value can vary depending on the volume of server usage.
Then define that the new script created by the following command is executable:
chmod +x /home/minecraft/run.shNow run Minecraft using the following command:
./run.shOpen the eula.txt file and change the EULA value to true:
nano /home/minecraft/eula.txtTo ensure that the Minecraft server uses a separate SSH, run the following command:
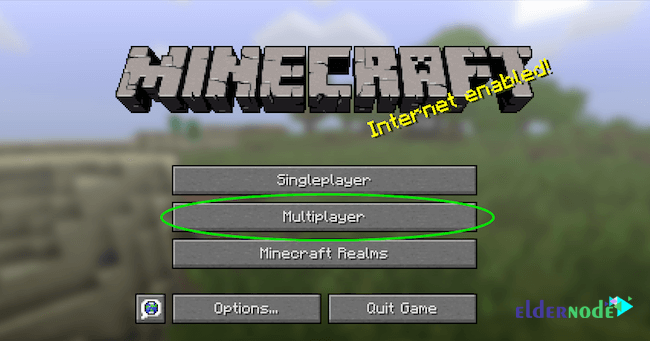
sudo screen /home/minecraft/run.shOpen the Minecraft client program and click on Multiplayer:
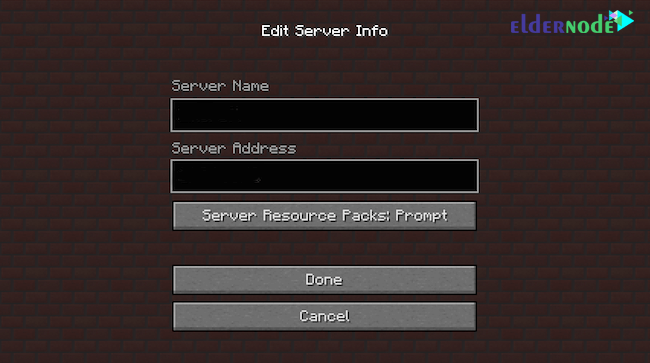
Finally, enter the server address, which is the IP of the server, and connect to the server:
You have launched a dedicated and personal Minecraft server on your Ubuntu server. Now you can share the IP address with your friends, all together on one server, and enjoy the game.
Prerequisites to Install a Minecraft Server on Windows
To setup a Minecraft game server in Windows, please consider the below Prerequisites:
_ Windows 10
_ At least 4G RAM
_ Connect to a reliable, high-bandwidth Internet because Minecraft consumes at least 100 MB of Internet per player per hour.
How To Install And Configure Minecraft Server On Windows
Walk through the steps of this guide and enjoy learning.
Open Windows 10 and download the latest version of Java; Then open the .exe file and click Install.
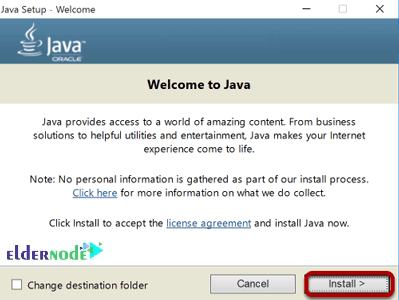
When the installation is complete, restart your system.
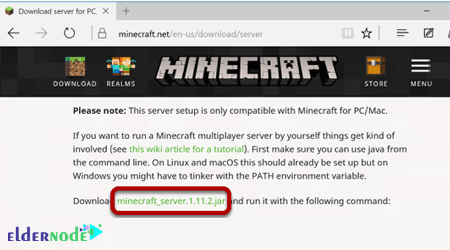
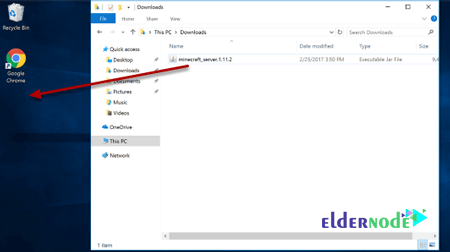
Go to minecraft.net and download the Minecraft Vanilla JAR game server file. When you download the Minecraft Server jar file, the file is automatically saved in the Downloads folder.
Move your Minecraft folder to your desired location. In the image below, we moved the folder to the desktop, but you are recommended to use a dedicated folder.
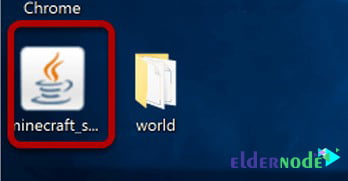
Double-click the Minecraft JAR file. This will decompress a series of files that we need to run the Minecraft game server.
Before using the server, you must configure the Minecraft server game configuration files. The first file you need to open is the Minecraft EULA file.
Note: EULA is a document that you agree to when running the server.
To accept the end-user license, open the EULA text file and change eula=false to eula=true. Save the file now.
To set the server setting, open the server properties file and save the file when the necessary changes are applied.
Note: In server settings, port 25565 is set by default.

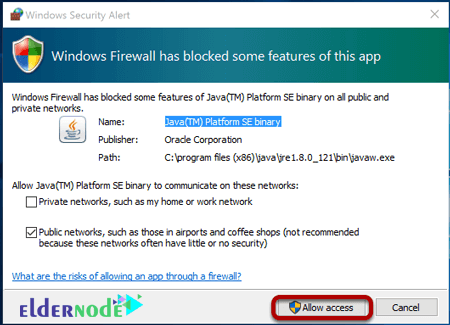
To run the java server file, open the Minecraft server file by double-clicking.
Issue access to the Minecraft game server in the firewall by hitting allow access.
Now the Minecraft game server has been installed and run and the statistics window has opened. Since the server is up and running, you can log in to the server through Minecraft.
Similar to installing Minecraft on Ubuntu, run Minecraft as mentioned above and select Multiplayer.
Click add server. Enter the server information and click done. Enter the IP of the server you purchased.
Your Minecraft game server is ready! Click the PLAY button and start the game.
Conclusion
In this article, you learned How To Setup Minecraft Server. You reviewed the complete process of Minecraft installation on Ubuntu and Windows. Once you create your own Minecraft, you can start playing with your friends. You are recommended to invite your friends and users you know for security reasons. If you are interested in learning more, find our related article on Tutorial Setup Minecraft Server on CentOS 8.


What are the features of Minecraft?
In this game, there are activities such as exploration, gathering resources, crafting and fighting for gamers.
Is Minecraft a multiplayer or individual game?
In Minecraft, it is also possible to play in groups and multiplayer with friends via Wi-Fi.
What are the graphics of the Minecraft game?
Minecraft game does not have high graphics, but its unique design will fascinate gamers.
How many modes are there in the commercial version of this game?
There are two main modes. One is Survival mode and the other is Creative mode.
In survival mode, players must gather resources and try to maintain their health and hunger.
In creative mode, players have an unlimited supply of resources and can fly freely wherever they want. Also, in this case, the degree of health and hunger is not considered for the gamer.
What is the generality of the Minecraft game?
The game is first person by default. The game world is in the form of three-dimensional roughness, and the cubes and liquids in the game represent a variety of materials such as soil, rock, tree trunk, water and lava. The essence of the game is to collect and place these objects on top of each other.