Tutorial How To Connect ISL online Remote Desktop On RDP Admin. Time is the most important factor in communications. Companies try to make it easy for their clients to join the support session. To save your time, buy your own RDP Admin to enjoy using your admin access and our 24 hours supports.
Table of Contents
How To Connect ISL Online Remote Desktop On RDP
Since 2001, ISL (Internet Service Layer) was found and still working as one of the most technologically advanced remote desktop solutions for Windows, Mac, Linux, iOS, Android, and Windows 10 Mobile. Join us with this article to review ways of connecting with ISL online RDP on windows.
How To Connect ISL Online Remote Computer Via Web
First, let’s see how you can connect via the web. Have a look at the below steps to be an expert.
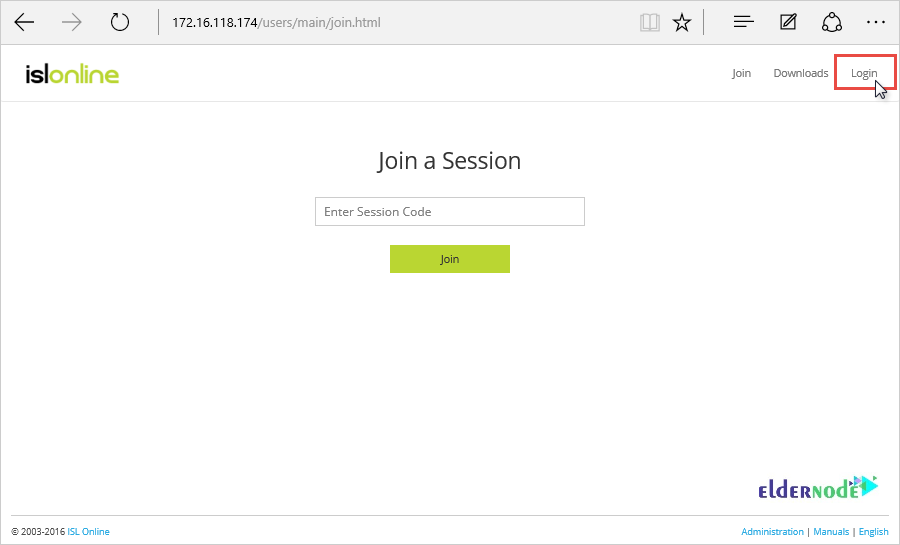
Step 1: Log in
You will be able to log in with your ISL Conference Proxy account when you press the ”Login” button in the top right corner as you see below.
Note: Remember to replace your appropriate server address with localhost while accessing the login page at http://localhost/ address.
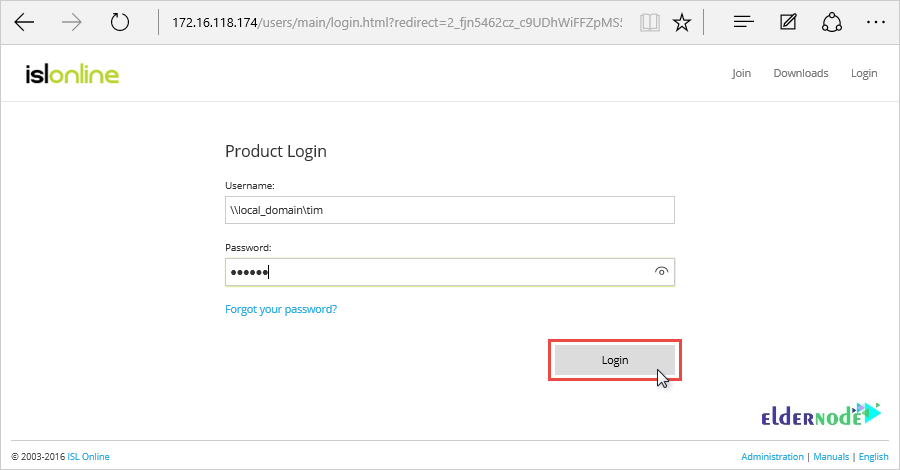
Step 2: Username And Password
As you see in the image below, it is time to enter your username and password provided to you by your ISL Conference Proxy administrator. Then, click “Login”.
Recommended Article: VPS vs VPN: Making an Informed Decision
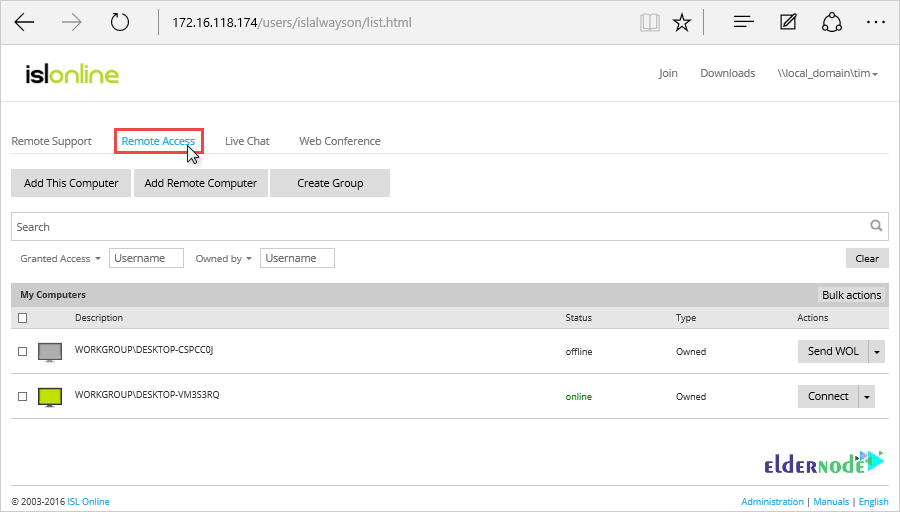
Step 3: Remote Access Page
Once you are logged in, click the “Remote Access” tab.
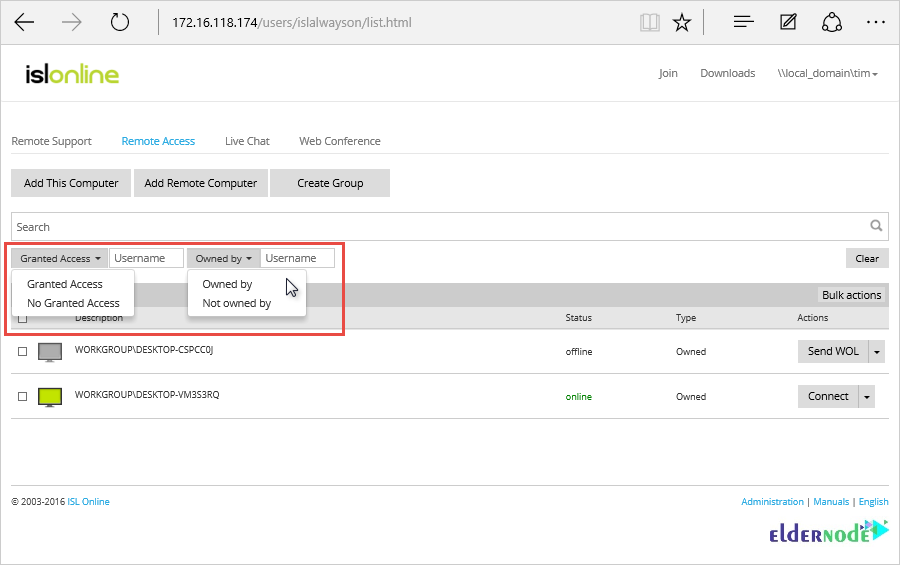
Step 4: Filter your computers
To find the desired computer faster, you can filter your computer by which the user has access to them and who they are owned by.
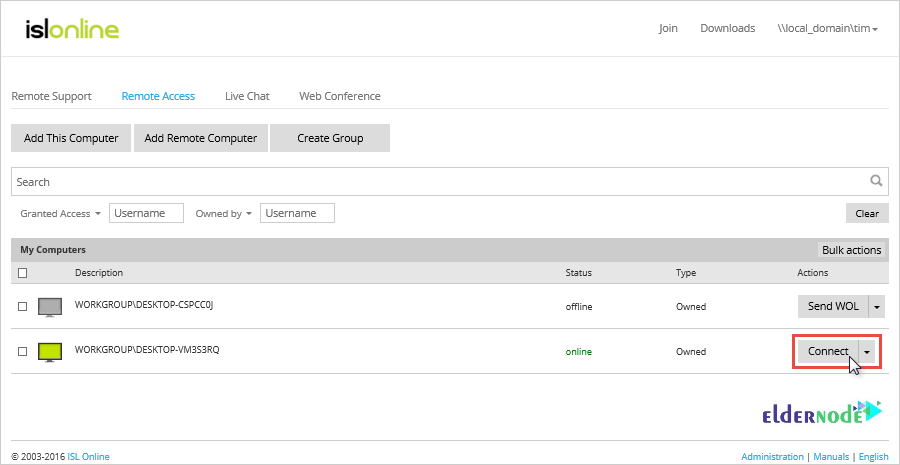
Step 5: Connect to computer
In this step, you need to click the “Connect” button, next to the computer you wish to connect to.
Note: You can also choose Save and save the executable for later use – e.g. place it on your desktop and rename it to a more friendly name
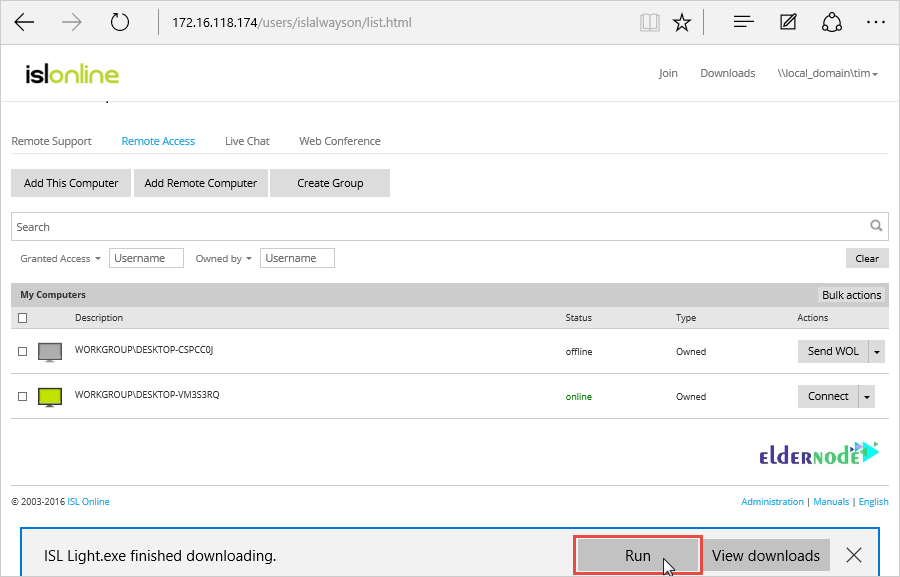
Step 6: Start The ISL Light
And, to start the ISL Light executable click “Run”.
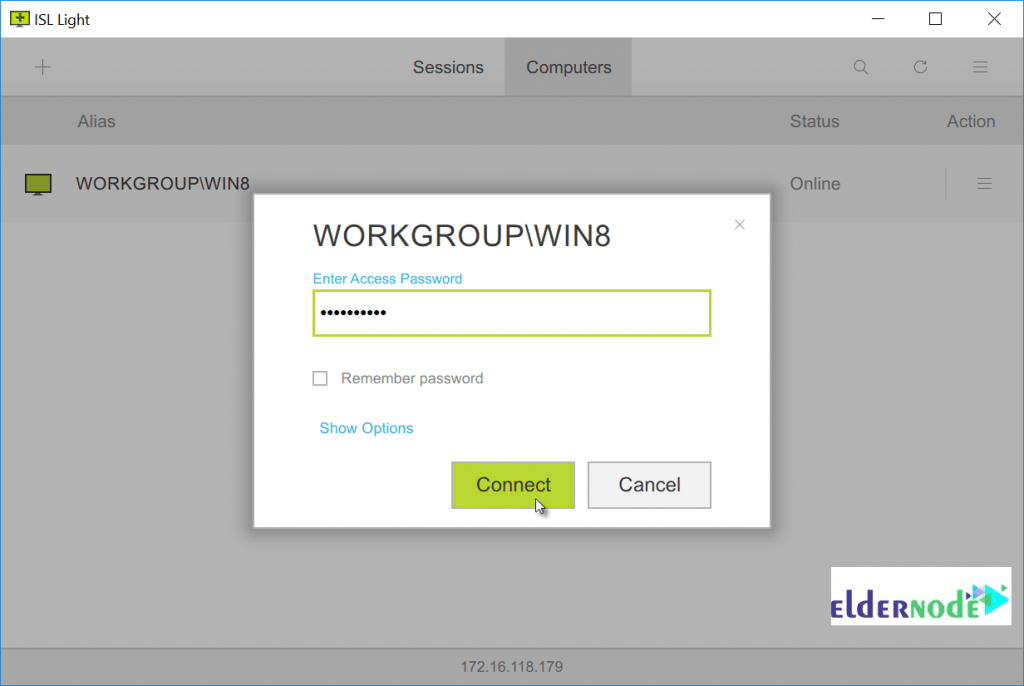
Step 7: Start the Session
Finally, at the latest step, you are prompted to enter the Access Password for the computer and click “Connect”. The session will automatically start if the password is correct.

When you wish to access that remote computer, simply double-click the executable on your desktop, enter the appropriate username and password when prompted, then the computer access password and you will be connected – no need to visit the product pages of your ISL Conference Proxy each time.
If you specify a username, password, and a computer password you will get a single-click solution that connects to a certain ISL AlwaysOn machine without having to enter any credentials or login to your user beforehand.
How To Use Command-lines for ISL Connect
It is possible to use command-line arguments for ISL AlwaysOn Connect, allowing you to skip the password entry form. Available parameters are:
1- connect-uid
You can use this to pass the desired unique id of the target machine if needed
2- username
You can use it to provide your ISL Online username, e.g. \\local_domain\tim
3- password
you can use it to provide your ISL Online password
4- computer-password
You can use it to provide the computer access password
5- computer-password-MD5
You can use it to provide the raw computer access password as written in the registry – check HKEY_LOCAL_MACHINE\SOFTWARE\ISL Online\ISL AlwaysOn\password
6- stream-options
You can use it to enable the desired checkboxes [separate them with a semicolon] in the list, e.g. small_foot;leave_background;
How To Connect ISL Online Remote With RDP
In this part, you will review six steps to learn how to connect ISL online remote desktop with RDP. But please consider that step 1 and step 2 show a global setting that will allow RDP connections to all ISL AlwaysOn computers connected to your ISL Conference Proxy. So, if you wish to enable RDP connection only for a specific computer continue directly to step 3.
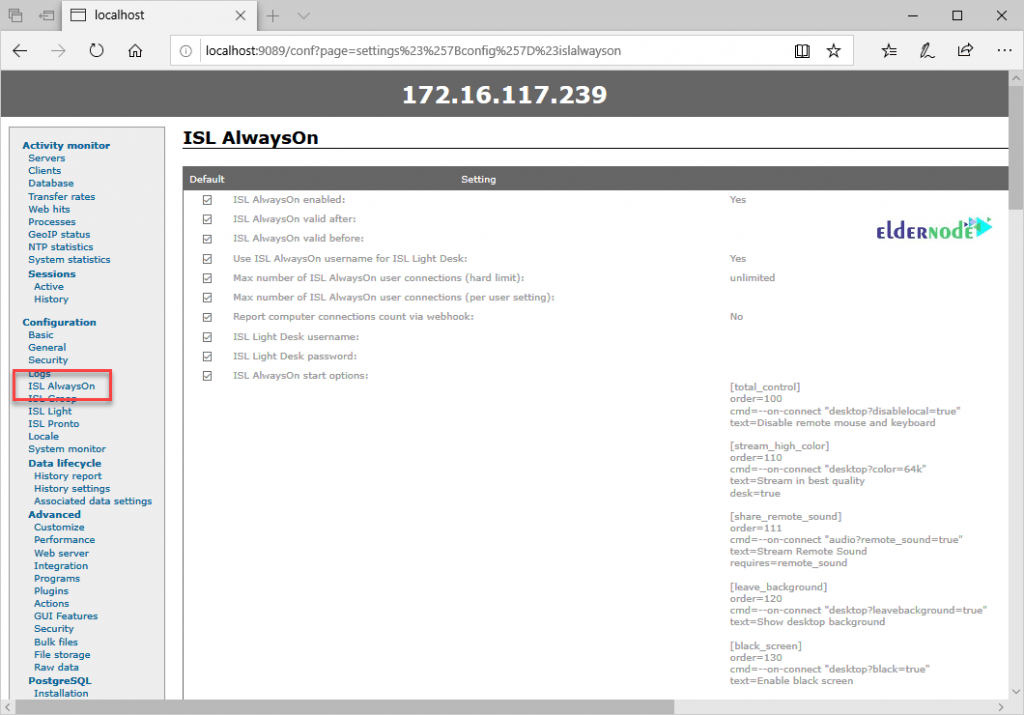
Step 1: Login To ISL (Server-Side)
First, you need to open ISL AlwaysOn settings under configuration, so, log in to your ISL Conference Proxy configuration page to do this.
Step 2: Allow Tunnel Connections (Server-Side)
As you see in the below image, find the following setting: Allow tunnel connections (reconnect required) and set it to Yes. Click “Save” at the bottom of the page to apply the change.
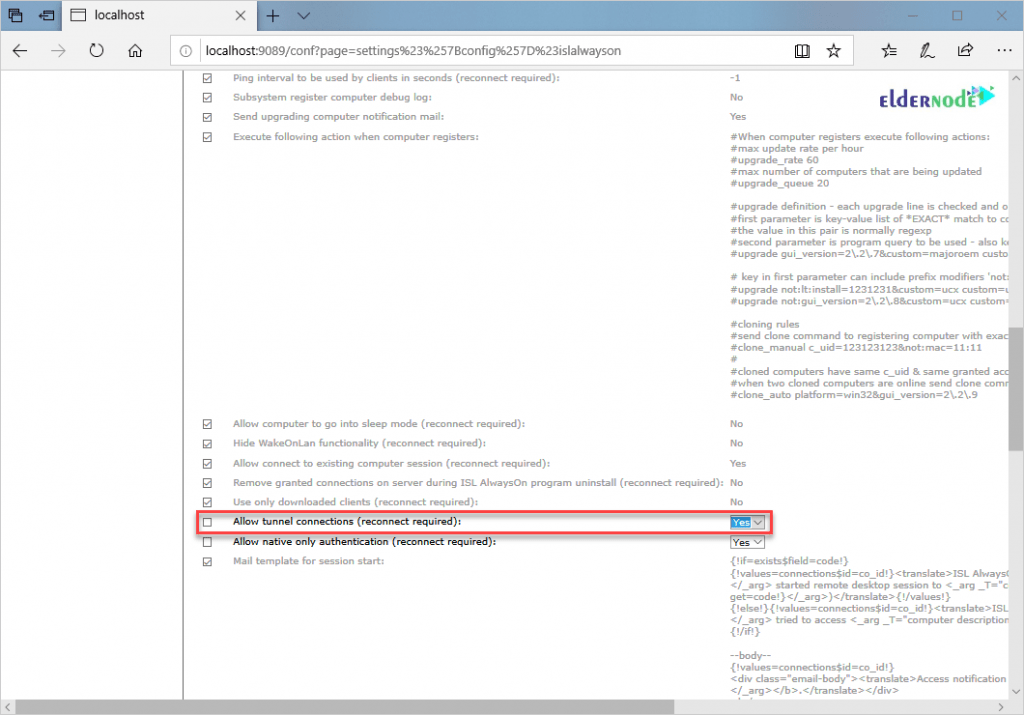
Note: Reconnect required notice means the ISL AlwaysOn clients will need to reconnect to the ISL Conference Proxy server in order for the change to become visible. The quickest way to restart the service is trough the administrative command prompt on the client-side with the following commands:
net stop isl_always_on followed by net start isl_always_on
Recommended Article: Tutorial Connect ISL online Remote Desktop On RDP
Step 3: Tunnel Connection
In this step, you should open Tunnel Connection under Advanced settings in ISL AlwaysOn and make sure that the “Allow Tunnel Connections (RDP, SSH)” checkbox is ticked.
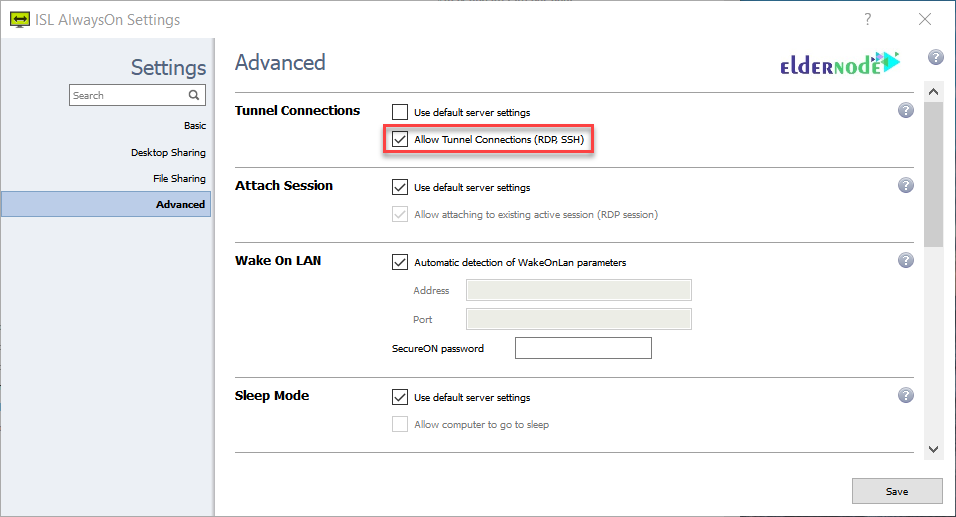
Note: In the example above the “Allow Tunnel Connections (RDP, SSH)” checkbox is not ticked, since we did not allow tunnel connections in ISL Conference Proxy (Steps 1 and 2). To enable tunnel connections for this specific computer you have to uncheck the “Use default server settings“ and then tick the “Allow Tunnel Connections (RDP, SSH)” checkbox.
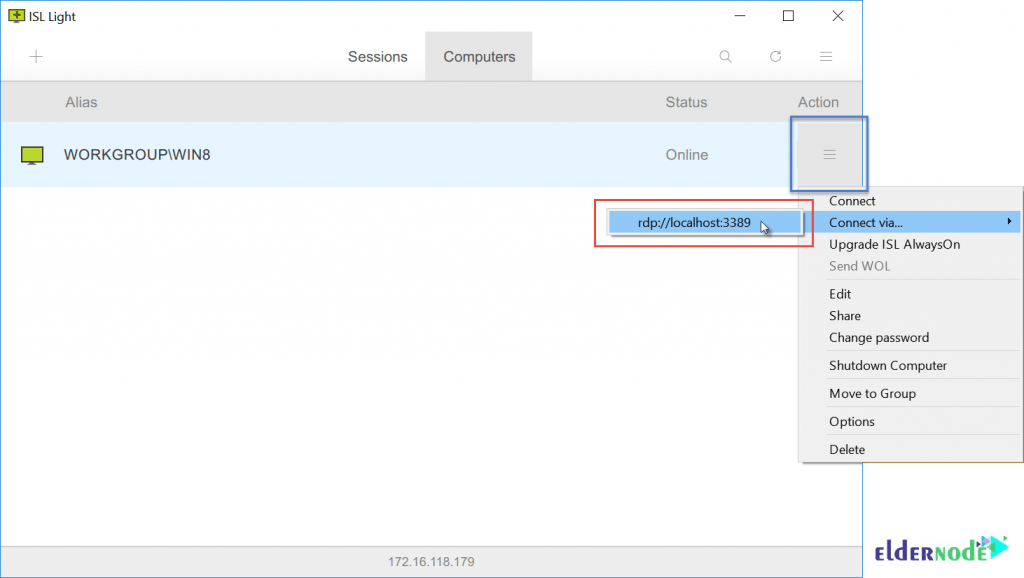
Step 4: Select RDP
To select the rdp option, click on the “Action” button then “Connect via…”
Step 5: Headless And Automate Connection
To pass this step successfully, enter the computer access password and click “Connect”. First, the connection to the remote computers will be established in headless mode meaning without any interface on the local or remote side, as the connection is only serving as a tunnel for RDP. Then the RDP session will start automatically.
Note: For this functionality to work the RDP connection on the remote computer has to be enabled.
Step 6: Use The Remote Computer
Conclusion
In this article, you learned two ways of connecting ISL online Remote Desktop via web and RDP. Now you are ready to configure your office computer for telework in less than a minute. Securely access your office computer from home or from a mobile device. Also, you can read more on 4 Ways to enable remote desktop in windows 10.


Hi, I cannot connect to a remote Windows XP-based or Windows Server.
To connect to a remote computer, when you click start and click Remote Desktop Connection, you should type the name of the Windows XP-based computer that has Remote Desktop enabled, and then click Connect. After that type your user name and password, and then click OK.
How can I end the Remote Desktop session?
You can end it when you finished using the Remote Desktop connection by following the below path:
1-Click Start in the Remote Desktop Connection window, and then click Shut Down.
2-Click Log Off, and then click OK.
Is ISL Always On?
Yes! ISL is Always On and is easy to use remote access software
Good tutorial, is it possible to copy the finder to a client?
Yes, sure. You can copy files or folders directly from the Finder on your administrator computer to a control window.
In Remote Desktop , select a computer list in the sidebar of the main window, then select one or more computers
Thank you, how can I connect with Windows user password?
First, Log into your ISL Conference Proxy configuration page and open ISL Always On settings under Configuration. Then, Find the following setting: “Allow native only authentication (reconnect required)” and set it to Yes. Click “Save” at the bottom of the page to apply the change. And finally on the remote computer enable Windows user password authentication in ISL Always On Basic settings.