WAF stands for Web Application Firewall. It is a popular tool to counter web application attacks. WAF protects web applications from various application-layer attacks such as cross-site scripting (XSS), SQL injection, and cookie poisoning. So, using WAF helps you to protect a company’s web applications by inspecting and filtering traffic between each web application and the internet. This article presents Introduction And Install Bypass WAF On Burp Suite. To purchase a fully managed VPS, you can count on our technical team and order your considered package in Eldernode Hosting.
Table of Contents
Introduction to Bypass WAF
WAF protects your online business since it is able to securely handle private customer data. If you are preparing to have a company to provide a commerce site, online financial services, or any other type of web-based product it is vital to understand the threats you may face. Since WAFs protect against different types of threats, it is important to choose the right one.
A WAF can be especially beneficial for service involving interactions with customers or business partners. Because it adds some protections that help you to safeguard your company’s reputation and position in the market. As an administrator, you need WAf to provide the application visibility necessary to demonstrate compliance with regulatory standards like PCI, HIPAA, and GDPR. WAF adds an essential extra layer of defense to an already-robust application security program. Also, as a security professional, you can leverage a web application firewall to monitor a possible attack-in-progress by receiving alerts for activity that violates pre-determined guidelines and rules. You can use WAF as a trusted line of defense for applications. Here is a list of the most seen application vulnerabilities:
1- Injection attacks
2- Broken Authentication
3- Sensitive data exposure
4- XML External Entities (XXE)
5- Broken Access control
6- Security misconfiguration
7- Cross-Site Scripting (XSS)
8- Insecure Deserialization
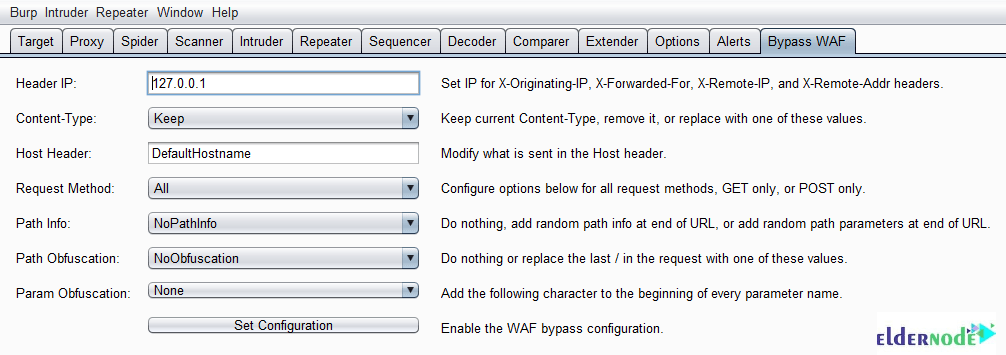
Also, you can add headers to all Burp requests to bypass some WAF products. This extension adds automatically the following headers to all requests. Let’s see a list of them below:
X-Originating-IP: 127.0.0.1X-Forwarded-For: 127.0.0.1X-Remote-IP: 127.0.0.1X-Remote-Addr: 127.0.0.1X-Client-IP: 127.0.0.1WAF Deployment
Depending on where your applications are deployed, the services needed, how you want to manage them, and the level of architectural flexibility and performance you require, A WAF can be deployed in several ways. There are four modes for WAF deployment:
1- Cloud-based + Fully Managed as a Service
2- Cloud-based + Self Managed
3- Cloud-based + Auto-Provisioned
4- On-premises Advanced WAF (virtual or hardware appliance)
How To Install Bypass WAF On Burp Suite
Previously, you have learned about Burp Suite. In this article, you will review the installation of Bypass WAF on it. An open-source Burp Suite extension can be used to assess or bypass a WAF solution using some of the techniques discussed in this talk. Web Application Firewall solutions are very useful to prevent common or automated attacks. WAF is trusted since many WAF devices can be tricked into believing a request is from itself if specific headers are present.
WAF Bypass Techniques
Let’s see what is WAF Bypass Techniques Using HTTP Standard and Web Servers’ Behavior. In this section, you will learn about a number of creative techniques to smuggle and reshape HTTP requests using the strange behavior of web servers and features such as to request encoding or HTTP pipelining. These methods show why developers should not solely rely on WAFs as the defense mechanism, but when can you use these methods?
1- As a penetration tester, you can use it to test a website behind a WAF to avoid drama and pain.
2- Defence teams can use this method to design appropriate mitigation techniques.
How to Bypass Some WAF Devices using Burp Plugin
Download the Python version of the plugin, the Java version of the plugin, or the Java source and compile. Then, you can use this plugin to add the necessary headers. Follow the below path after you installed the plugin:
1- Startup Burp.
2- Navigate to ”Extender >> Extensions”.
3- Click the ”Add” button.
4- Choose an extension type of ”Java”.
Note: Choose an extension type of ”Java”, if using the Java Plugin, or ”Python”, if using the Python version, and then navigate to the extension path.

As shown below, the plugin will be added:
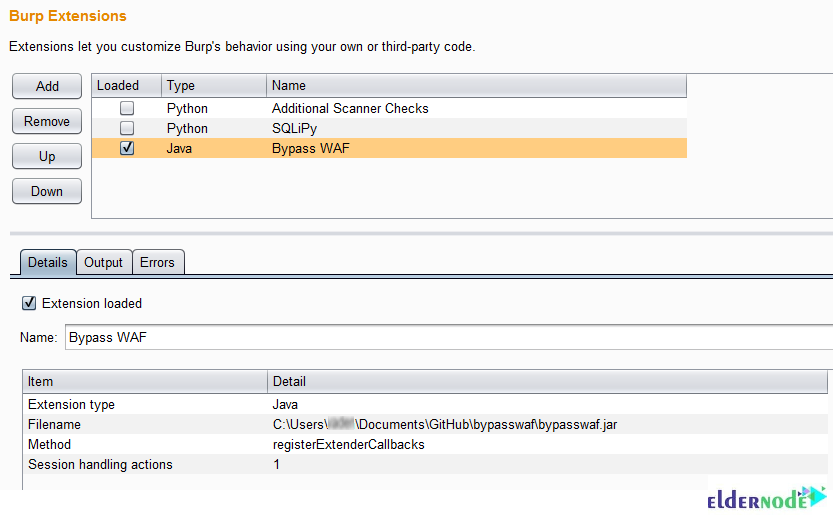
To continue, follow the below path again:
1- Navigate to ”Options >> Sessions”.
2- Click on the ”Add” button for the ”Session Handling Rules”.
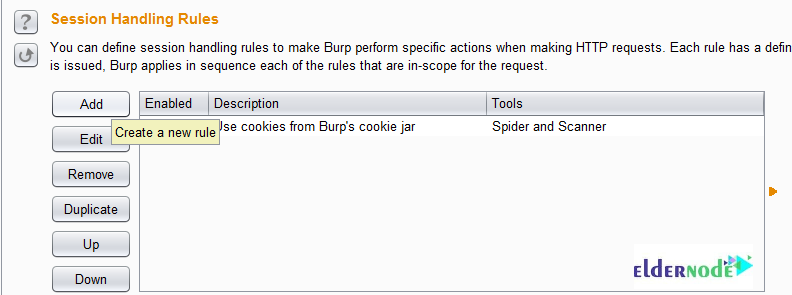
Next, you need to give the rule a name. Click the ”Add” button in the ”Rule Actions” section. Finally, choose ”Invoke a Burp extension”.
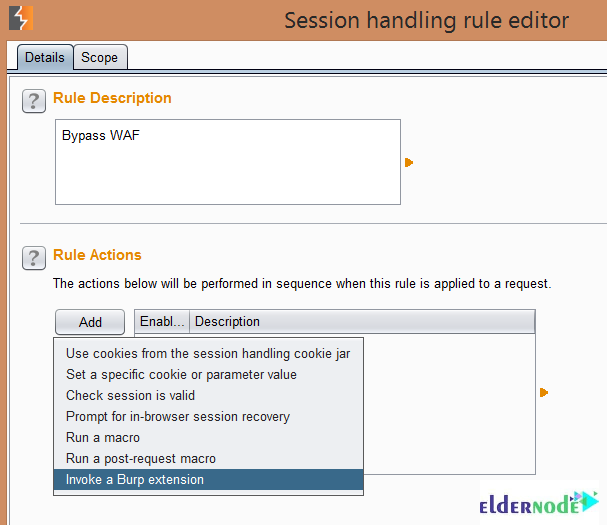
As you can see below, you should be able to select ”Bypass WAF” in the drop-down box:

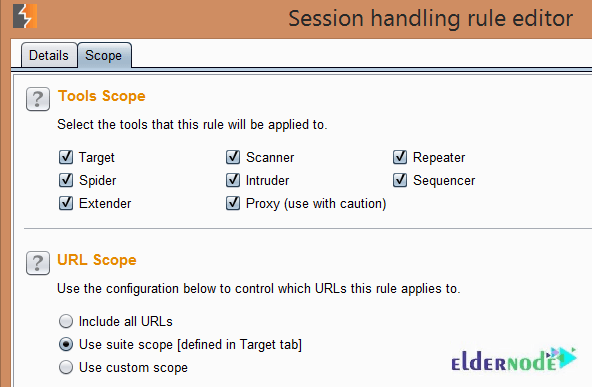
In this step, you must click ”Ok” and select the ”Scope” tab. Now you can enable all the tools that you want to be in scope for the extension and then set the scope. To enable all tools and limit the scope on requests to those that have been added to the suite scope, do as shown below:
Bypass WAF contains the following features:
Conclusion
In this article, Bypass WAF was introduced to you and you learned How to Install Bypass WAF on Burp Suite.
