Frameworks are not absolutely necessary but to develop better and faster, you can use these tools. Symfony is a set of PHP Components. A Web Application framework, a Philosophy, and a Community work in harmony altogether. Symfony Framework is the leading PHP framework to create websites and web applications. Built on top of the Symfony Components. It is a top choice for developing an enterprise application because of its flexibility and high performance. If you have a developed application, you can interoperable it with market standards using a framework. So, join us with this article to review the Tutorial Setup Symfony Framework On CentOS 7 or 8. By visiting Eldernode, you can choose a perfect CentOS VPS to purchase your own one to continue this guide.
Table of Contents
Introduction to Symfony Framework
Symfony is a free, open-source, and popular web application framework written in PHP. Since Symfony is compatible with other database systems, it gives you full control over configuration. You may have seen Vogue magazine or even be its subscription. Ok! Symfony framework is also used by the massively multiplayer online browser game eRepublik, and by the content management framework eZ. Stay with us to review the process of install and Setup the Symfony framework on CentOS 7.
Prerequisites to Install Symfony Framework on CentOS 7
To let this tutorial work better, please consider the below Prerequisites:
_ A non-root user with Sudo privileges.
_ A valid domain name pointed to your IP address
Also, you need some packages:
_ PHP 5.4 or above
_ Apache 2.0 or above
_ MariaDB 5.6 or above
How To Install Symfony Framework On CentOS 7
Symfony Framework comes with a set of reusable components and a user-friendly web interface. Let’s go through the steps of this guide and review all the required ones to finish this section.
Step 1:
First of all, use the following command to add REMI and EPEL rpm repositories to your system:
rpm -Uvh http://free.nchc.org.tw/fedora-epel/7/x86_64/e/epel-release-7-5.noarch.rpmrpm -Uvh http://rpms.famillecollet.com/enterprise/remi-release-7.rpmStep 2:
Then, you need to setup a running LAMP server to start with Symfony installation. Skip this step if you have already run the LAMP stack. If not, run the commands below to setup the LAMP stack.
1- Install Apache
yum --enablerepo=remi,epel install httpd 2- Install MySQL
yum --enablerepo=remi,epel install mysql-serverservice mysqld start/usr/bin/mysql_secure_installation3- Install PHP
yum --enablerepo=remi,epel install php php-mysql php-intlservice httpd restartStep 3:
Since Symfony provides its own installer for creating new projects, you need to setup a Symfony installer on your system. So, run:
curl -LsS https://symfony.com/installer -o /usr/local/bin/symfonychmod a+x /usr/local/bin/symfonyStep 4:
Once the Symfony installer is setup on your system, create a New Symfony Application. To start with your new Symfony application, navigate to your web document root:
cd /var/www/htmlsymfony new myprojThen, run the below command to change to the newly created directory and check if all requirements are properly installed on your system:
php myproj/bin/symfony_requirementsNote: If everything is fine you will get the ” Your system is ready to run Symfony projects” message.
Step 5:
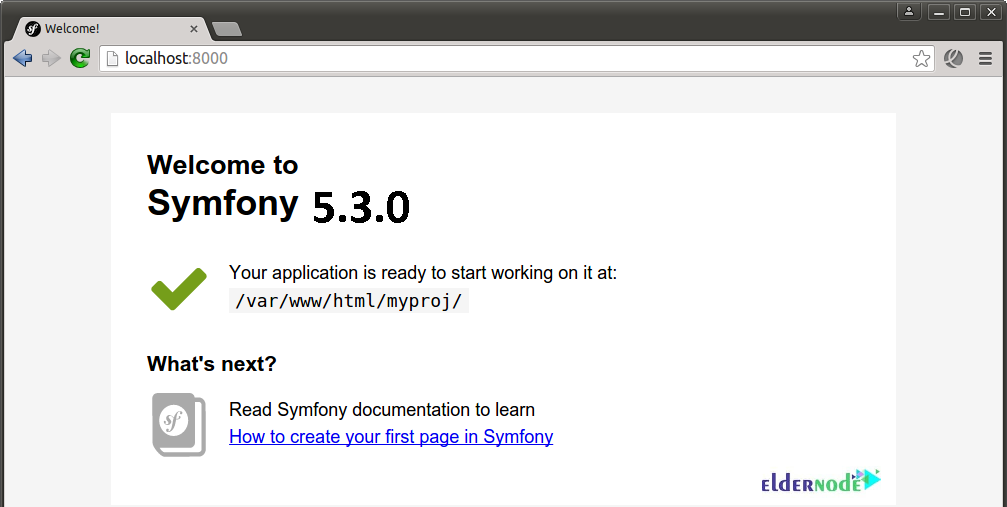
It is time to Start the Application in Development Mode. So, run the command below to view changes in the browser you can start Symfony development web server:
php bin/console server:runNote: By default, the webserver will start on port 8000.
How to Configure Firewall
If the firewalld service is enabled in your system, you will need to allow HTTP/HTTPS port through firewalld.
To check the firewalld service, run the following command:
systemctl status firewalldTo start the firewalld service and enable it to start after system reboot, run:
systemctl start firewalld systemctl enable firewalldNext, use the commands below to allow HTTP and HTTPS port through firewalld:
firewall-cmd --permanent --add-service=httpfirewall-cmd --permanent --add-service=httpsAnd finally, run the following command to reload the firewalld and apply the changes:
firewall-cmd --reloadHow to Access new Symfony Application on CentOS 7
After a successful installation, you can access the new Symfony application in your browser. So, you can now access the new Symfony application in your browser by accessing http://127.0.0.1:8000 or http://localhost:8000.
How to Create Apache VirtualHost on CentOS 7
To configure Symfony with a subdomain, you need to create a new Apache configuration file under directory /etc/httpd/cond.d/ and add Virtual Host for your Symfony application:
vim /etc/http/conf.d/symfony5.example.com.confThen, add the below content to the directory:
<VirtualHost *:80> ServerName symfony5.example.com DocumentRoot /var/www/html/myproj/web <Directory /var/www/html/myproj/web> AllowOverride All Order Allow,Deny Allow from All <IfModule mod_rewrite.c> Options -MultiViews RewriteEngine On RewriteCond %{REQUEST_FILENAME} !-f RewriteRule ^(.*)$ app.php [QSA,L] </IfModule> </Directory> ErrorLog /var/log/httpd/myproj_error.log CustomLog /var/log/httpd/myproj_access.log combined </VirtualHost>When the changes are finished, restart the apache server to changes take effect:
service httpd restartTo access the new Symfony 5 application, you can make a host file entry in your browser with your domain name like http://symfony5.example.com. Just change symfony5.example.com and 127.0.0.1 as per your setup:
echo "127.0.0.1 symfony5.example.com" >> /etc/hostsNow, you should be redirected to the Symfony default dashboard.
Conclusion
In this article, you learned How To Setup Symfony Framework On CentOS 7. First, you reviewed how to setup Symfony with Symfony installer, and then you learned to create a new Symfony application. You can now enjoy your Symfony 5 installed on CentOS 7 and start building brilliant applications with Symfony. If you have used another method to install Symfony Framework, let your friends know on Community and compare.