Nowadays, slow loading speed is mostly related to the service provider or server. For this reason, today companies use CDN technology to deliver information, web pages, and thousands of other information to your monitor screen at high speed. This article will teach you How to Setup CDN on Dedicated Server.
Table of Contents
Tutorial Setup CDN on Dedicated Server
CDN stands for Content Delivery Network and is a distributed network of servers that work together to deliver content to users quickly and efficiently. It allows for the quick transfer of assets needed for loading Internet content, including HTML pages, JavaScript files, stylesheets, images, and videos. Generally, it allows you to improve the performance and reliability of your website, reduce server load, and improve the user experience for your visitors.
Prerequisites
You can build your own CDN using the requirements below:
– Subdomain or Domain Name
– At Least two Dedicated Server in Different Regions
– GeoDNS Tool to Direct Domain Requests to the Nearest Server
How to Register Domain and Order Servers
First, choose desired domain zone. Also, you can use a subdomain for CDN such as cdn.domainname.com.
Remember that you should rent your servers in regions and countries where your target audience is located. If your project is intercontinental, choose your servers from among hosting providers that provide servers across the world.
How to Configure GeoDNS on Dedicated Server
You will need a DNS server with geoDNS functionality to ensure the clients are directed to the closest servers upon sending requests to your domain or subdomain.
Let’s see how geoDNS works:
– If the clients sent the DNS request, GeoDNS gets the IP of the client or the IP of the recursive DNS server that is used for processing the request. Recursive servers are usually the DNSs of Internet providers.
– GeoDNS identifies the client’s country or region with the client’s IP. This needs the use of the GeoIP database.
– GeoDNS returns the client IP address of the closest CDN server depending on the location of the client.
When you order geoDNS you should pay attention to the number of requests in the package. Note that the actual number of requests may far exceed your expectations. There are millions of web crawlers, scanners, spammers, and other devils at work at any given time.
Almost all DNS services have a useful feature for building a CDN, one of which is DNS Failover. This allows you to configure activity monitoring so that if a server goes down, the system automatically redirects clients to active servers.
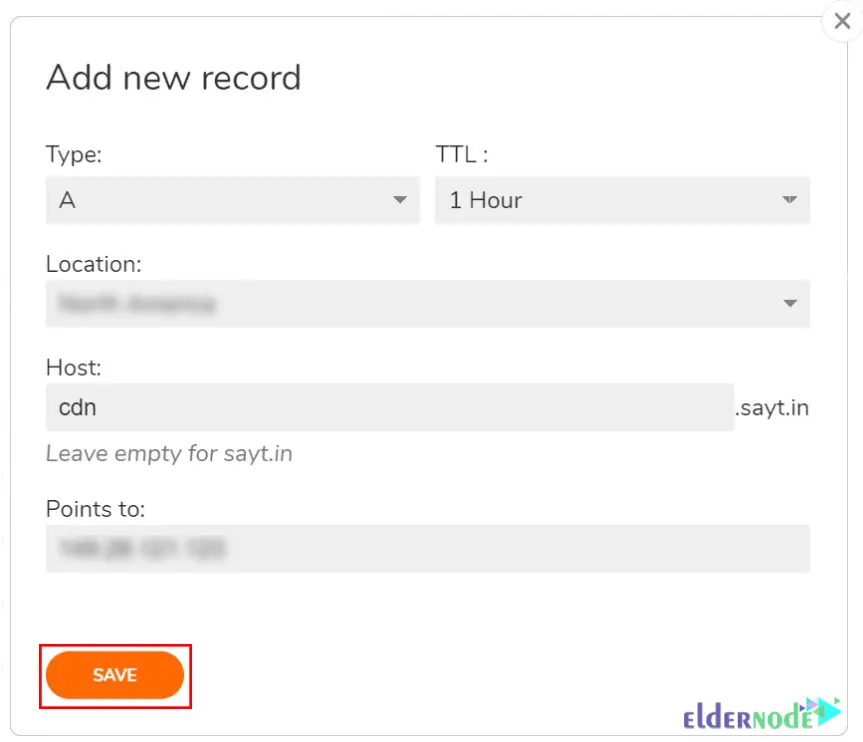
Now add a new DNS zone in the profile and specify your domain name. If the main domain is in use and you are using a subdomain, you must add the existing DNS records immediately after adding the zone. Next, create multiple A records for the CDN domain/subdomain, each of which will be used for the specified region as shown below:
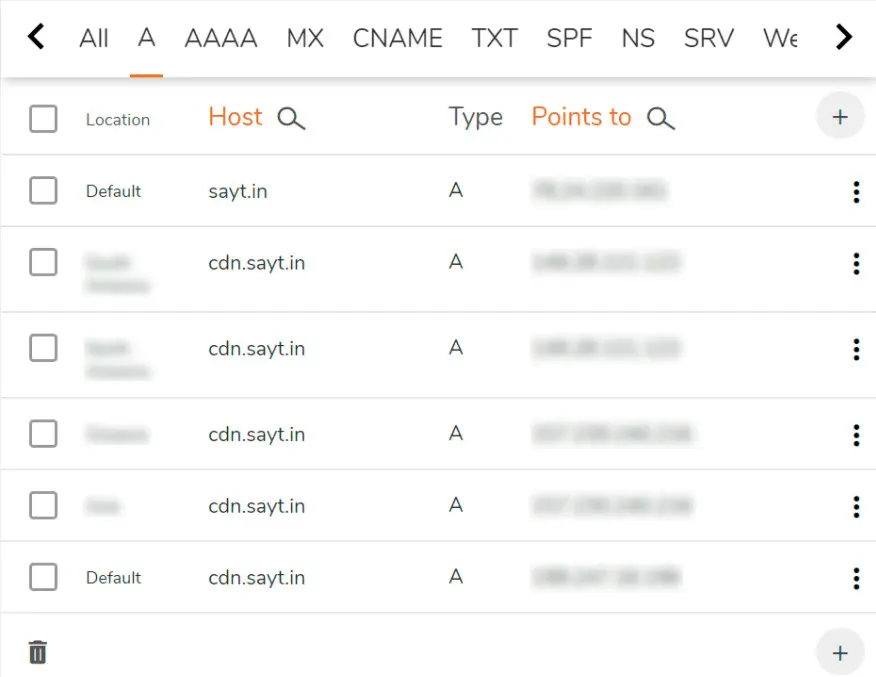
Repeat the above step for other regions and create a record for default regions. The final result is as follows:
How to Install SSL Certificates on Dedicated Server
CDN operates using HTTPS. If you already have SSL certificates for the domain or the subdomain, you should upload them to all the servers. But if you don’t have any certificates, get them for free from Let’s Encrypt. ACME Shell script is a great option that has a user-friendly client and allows to perform validation of the domain/subdomain via DNS using API by ClouDNS.
If you install the certificate on only one server, the certificates will be copied to all the others. You can install it using the following command:
wget -O - https://get.acme.sh | bash; source ~/.bashrcDuring installation, a CRON task is created to automatically update certificates.
After the certificate is issued, domain verification is done through DNS using the API. So in the profile, in the Reseller API section, create a new API user and set a password for it. Open the following file with your desired text editor and enter the resulting auth-id along with the password in it:
~/.acme.sh/dnsapi/dns_eldernode.shThen edit and uncomment the following lines:
ELDERNODE_AUTH_ID=<auth-id> ELDERNODE_AUTH_PASSWORD="<password>"And request the issuance of the SSL certificate for cdn.sayt.in as shown below:
acme.sh --issue --dns dns_eldernode -d .sayt.in --reloadcmd "service nginx reload"Wait for the certification process to finish. If a domain validation error occurs, run the command again.
Make sure to specify the above paths when copying the certificates to other servers and also specify them in the server settings.
Copy the SSL certificate to the other two servers that save the certificate paths. Next, you need to create the same directories on each server and then copy the certificate files as shown below:
mkdir -p /root/.acme.sh/cdn.sayt.in/ scp -r root@IP_Address:/root/.acme.sh/cdn.sayt.in/* /root/.acme.sh/cdn.sayt.in/You can automate the certificate renewal by creating a daily CRON task on both servers. Add the following command to CRON jobs:
scp -r root@IP_Address:/root/.acme.sh/cdn.sayt.in/* /root/.acme.sh/cdn.sayt.in/ && service nginx reload</pre>In order to connect to the origin server remotely, you need to access the key without entering a password. Remember to create it.
How to Install and Configure Nginx
To deliver static content, you can use Nginx configured as a cache proxy server. Run the following commands to update the list of packages and install it on all three servers:
apt update apt install nginxUse the following configure instead of the default configure:
nginx.confNow you should edit the following config:
– max_size: The cache size does not exceed the available disk space.
– inactive: Retention time is not requested for cached data.
– ssl_certificate and ssl_certificate_key: Paths to SSL certificate and key.
– proxy_cache_valid: Retention time for cached data.
– proxy_pass: The origin server address from which the CDN requests data for caching.
The inactive and proxy_cache_valid parameters are similar, which makes it difficult to configure the retention time. Here’s what happens with inactive=7d and proxy_cache_valid=90d. If the request is not repeated within 7 days, the data will be deleted from the cache. If the request is repeated within 7 days, the cache will be considered stale after 90 days and the next request will cause Nginx to update it from the origin server.
Once finished, reload the configuration using the command below:
service nginx reloadThat’s it!
Conclusion
CDN has multiple servers in different geographic locations that ensure content is delivered from the server closest to the user. In this article, we taught you how to setup CDN on Dedicated Server. I hope this tutorial was useful for you and that it helps you to setup CDN on your Dedicated Server. If you face any issues during the installation process, you can contact us in the Comments section.


![Tutorial Install and Use PIP on Centos 7 [Best]](https://blog.eldernode.com/wp-content/uploads/2022/04/install-and-use-pip-on-centos-300x164.png)
