
Airodump-ng is included in the Aircrack-ng package, and raw 802.11 frames are used to capture the package. Airodump-ng for WEP IV collection is suitable for use with Aircrack-ng. This tool can record the coordinates of the access points discovered through a GPS receiver connected to the computer. In this article, we try to learn How to Install and run Airodump-ng on Kali Linux. You can visit the packages available in Eldernode to purchase a Linux VPS server.
Table of Contents
Tutorial Install and run Airodump-ng on Kali Linux
Airodump-ng is a wireless packet recording tool for aircrack-ng. As mentioned, airodump-ng is using to record packages of raw 802.11 frames in order to use them using aircrack-ng. Also, if you have a GPS receiver connected to a computer, airodump-ng can record the coordinates of access points. Airodump-ng writes a text file that contains details of all access points and clients seen. In addition to the explanations given, airodump-ng writes several files that include details of all access points and clients seen. Follow us in the continuation of this tutorial.
Install and run Airodump-ng on Kali Linux
Interestingly, this program is already installed on Kali Linux but the Airodump-ng tool is located inside the aircrack-ng service. For this reason, the prerequisite for using Airodump-ng is the installation of aircrack-ng. After you have successfully installed aircrack-ng, you can use the following command to get acquainted with the features of the Airodump-ng tool.
root@kali:~# airodump-ng --helpBy executing the above command, you will see the following output. You can execute the tasks you want by executing any of the following commands in the Airodump-ng tool.
Use Airodump-ng on Kali Linux:
usage: airodump-ng <options> <interface>[,<interface>,…]
Options:
–ivs: Save only captured IVs
–gpsd: Use GPSd
–write <prefix> : Dump file prefix
-w: same as –write
–beacons: Record all beacons in dump file
–update <secs> : Display update delay in seconds
–showack: Prints ack/cts/rts statistics
-h: Hides known stations for –showack
-f <msecs> : Time in ms between hopping channels
–berlin <secs>: Time before removing the AP/client from the screen when no more packets are received (Default: 120 seconds)
-r <file> : Read packets from that file
-x <msecs> : Active Scanning Simulation
–manufacturer: Display manufacturer from IEEE OUI list
–uptime: Display AP Uptime from Beacon Timestamp
–wps: Display WPS information (if any)
–output-format
<formats> : Output format. Possible values: pcap, ivs, csv, gps, kismet, netxml, logcsv
–ignore-negative-one: Removes the message that says
fixed channel <interface>: -1
–write-interval
<seconds> : Output file(s) write interval in seconds
–background <enable> : Override background detection.
Filter options:
–encrypt <suite> : Filter APs by cipher suite
–netmask <netmask> : Filter APs by mask
–bssid <bssid> : Filter APs by BSSID
–essid <essid> : Filter APs by ESSID
–essid-regex <regex> : Filter APs by ESSID using a regular expression
-a : Filter unassociated clients
By default, airodump-ng hopps on 2.4 GHz channels. So you can record it in other channels using the options below:
–ht20: Set channel to HT20 (802.11n)
–ht40- : Set channel to HT40- (802.11n)
–ht40+ : Set channel to HT40+ (802.11n)
–channel <channels> : Capture on specific channels
–band <abg> : Band on which airodump-ng should hop
-C <frequencies>: Uses these frequencies in MHz to hop
–cswitch <method> : Set channel switching method
0: FIFO (default)
1: Round Robin
2: Hop on last
-s: same as –cswitch
–help : Displays this usage screen
What are the fields displayed when running Airodump-ng?
In this section, we intend to explain the fields displayed in this section by providing an example of running airodump-ng. Look at the picture below:
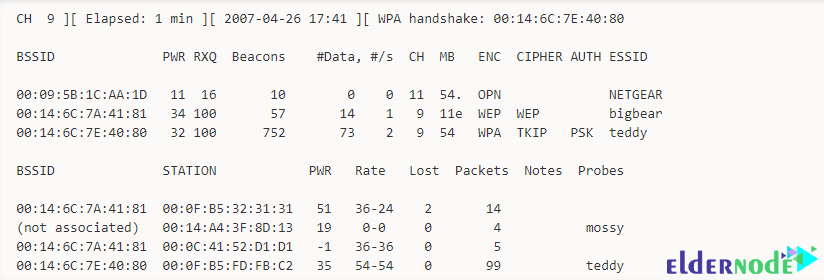
The first line shows the current channel, elapsed running time, current date, and optionally if a WPA/WPA2 handshake was detected. It should also be noted that “WPA handshake: 00:14:6C:7E:40:80” indicates that a WPA/WPA2 handshake was successfully captured for the BSSID. The following is an explanation of each of these fields:
BSSID: MAC address of the access point. In the Client section, a BSSID of “(not associated)” means that the client is not associated with any AP.
PWR: Signal level reported by the card.
RXQ: Using this command, you can receive Quality as measured by the percentage of packets (management and data frames) successfully received over the last 10 seconds.
Beacons: Number of announcements packets sent by the AP.
# Data: Number of captured data packets, including data broadcast packets.
#/s: Number of data packets per second measure over the last 10 seconds.
CH: Channel number taken from beacon packets.
MB: Maximum speed supported by the AP.
ENC: Encryption algorithm in use.
CIPHER: The cipher detected.
AUTH: The authentication protocol used.
ESSID: This shows the wireless network name.
STATION: MAC address of each associated station searching for an AP to connect with.
Rate: Station’s receive rate, followed by transmitting rate.
Lost: The number of data packets lost over the last 10 seconds based on the sequence number.
Packets: The number of data packets sent by the client.
Notes: Additional information about the client, such as captured EAPOL or PMKID.
Probes: These are the networks the client is trying to connect to if it is not currently connected.
Conclusion
Airodump-ng is a tool for storing packages in the form of “.IVS” and “.PCAP” files to display information about wireless networks. In this article, we tried to learn How to Install and run Airodump-ng on Kali Linux. We also explained the fields available when executing Airodump-ng tool commands.


aircrack is installed (Kali Linux)still airodump-ng command not found wtf?
Airodump-ng tool is located inside the aircrack-ng service. For this reason, the prerequisite for using Airodump-ng is the installation of aircrack-ng.
Where do i download it i want to hack into my dads Wifi
launch the Terminal and execute the commands below.
sudo apt updatesudo apt install aircrack-ng