The DVWA package contains a PHP/MySQL web application that is highly vulnerable. DVWA aims to practice some of the most common web vulnerabilities, with varying levels of difficulty. In this article, we tried to teach you 4 steps to install and configure DVWA on Kali Linux. It should be noted that if you want to Linux VPS, you can visit the packages offered on the Eldernode website.
Follow us in the rest of this article to teach you how to install DVWA on Kali Linux in 4 steps.
Table of Contents
1) How to Download DVWA On Kali Linux
You can clone DVWA GitHub in the /var/www/html folder by running the following command in the first step:
cd /var/www/htmlThen you should clone the DVWA GitHub repository using the following command:
sudo git clone https://github.com/digininja/DVWA2) How to Configure DVWA On Kali Linux
To configure DVWA, you first need to set read, write, and execute permissions using the following command:
chmod -R 777 dvwa/In the next step, you need to change the directory to set the user and password. Be careful that by doing this you will point to the config directory. It is also better to know that setting the user and password to access the database is done:
cd dvwa/configBy running the ls command, you will see the config.inc.php.dist file where the default DVWA settings are located.
lsHere it is enough to create a copy called config.inc.php:
sudo cp config.inc.php.dist config.inc.phpUsing your desired text editor, open the configuration file like the following command:
sudo nano config.inc.phpIt should be noted that we will set db_user as user and db_password as password. After applying the changes, press ctrl+o to save the file and exit.
$_DVWA[ 'db_server' ] = '127.0.0.1';$_DVWA[ 'db_database' ] = 'DVWA';$_DVWA[ 'db_user' ] = 'user';$_DVWA[ 'db_password' ] = 'pass';$_DVWA[ 'db_port'] = '3306';3) How to Install MySQL and PHP on Kali Linux
In this section, we are going to install and configure MySQL, PHP and Apache respectively. It should be noted that by default, MySQL is installed on Kali Linux. But you can install it using the following command:
sudo apt install default-mysql-serverNow you need to start MySQL by running the following command:
sudo service mysql startCheck the MySQL installation status by running the following command:
systemctl mysql statusNow you can login to MySQL database by running the following command:
sudo mysql -u root -pIn the next step, you will see a message to enter the password, you just have to press Enter.
As you saw a little earlier, we created a new user with a username and password in the configuration file of the DVWA application. Note that the server we are using is Localhost (127.0.0.1). You can use the following command to perform these steps again:
create user 'user'@'127.0.0.1' identified by 'pass';After creating a new user, you can now grant the new user privileges to the dvwa database using the following command:
grant all privileges on dvwa.* to 'user'@'127.0.0.1' identified by 'pass';Finally, run the following command to exit Mysql:
exitPHP is also available in Kali Linux like Mysql, but you can install it by running the following commands in case of problems:
sudo apt updatesudo apt -y install lsb-release apt-transport-https ca-certificatessudo wget -O /etc/apt/trusted.gpg.d/php.gpg https://packages.sury.org/php/apt.gpgecho "deb https://packages.sury.org/php/ buster main" | sudo tee /etc/apt/sources.list.d/php.listsudo apt install php7.4 -yYou can also install additional PHP extensions by running the following command:
sudo apt install php7.4-{cli,json,imap,bcmath,bz2,intl,gd,mbstring,mysql,zip}In this section, to configure the Apache server, you must first point to the desired directory as in the following command:
cd /etc/php/7.4/apache2Run the following command using your favorite text editor and open the configuration file:
sudo nano php.iniFind the following commands in the configuration file and set them as follows. After applying the changes, save the configuration file and exit.
allow_url_fopen = onallow_url_include = onFinally, start Apache by running the following commands and then check its installation status:
sudo service apache2 startsystemctl status apache24) How to Access DVWA On Kali Linux
After you have carefully followed all the steps mentioned in this tutorial, you can now enter the following address in the browser to access DVWA:
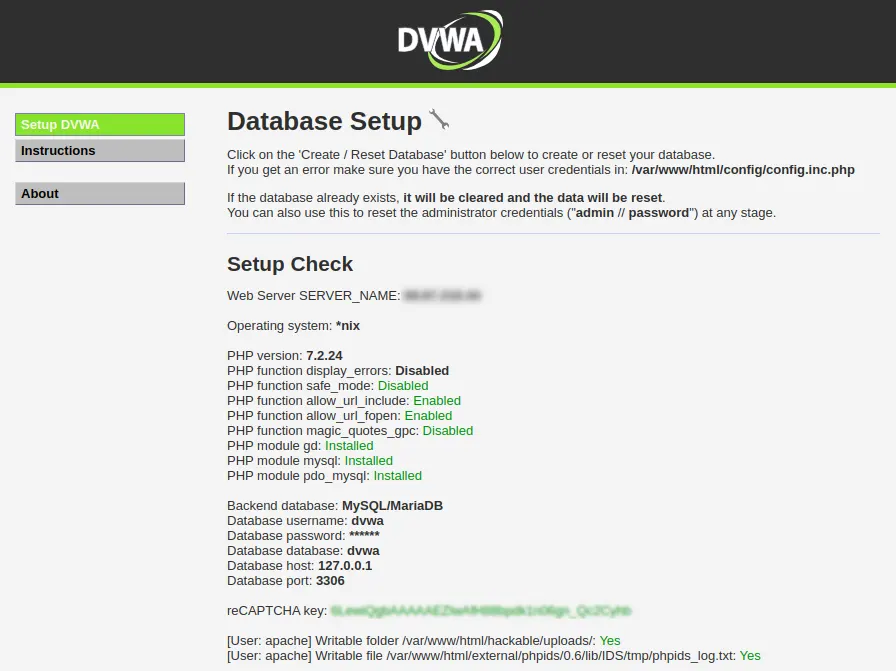
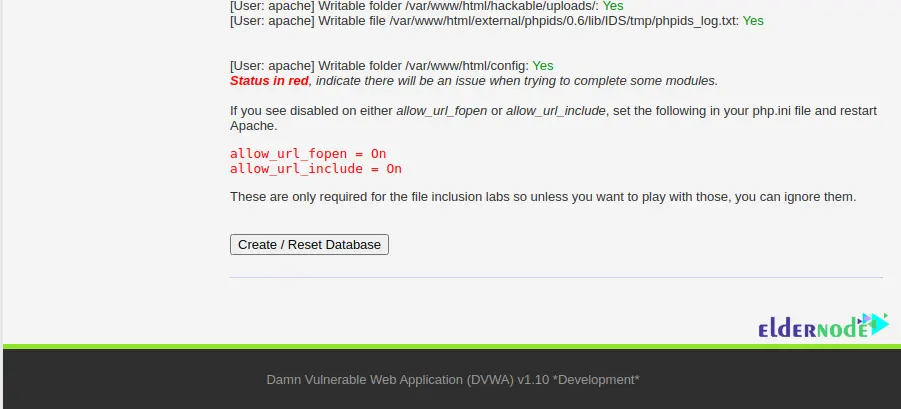
http://127.0.0.1/dvwa/In the picture below, you can see the DVWA setup page. Click on Create/Reset Database:
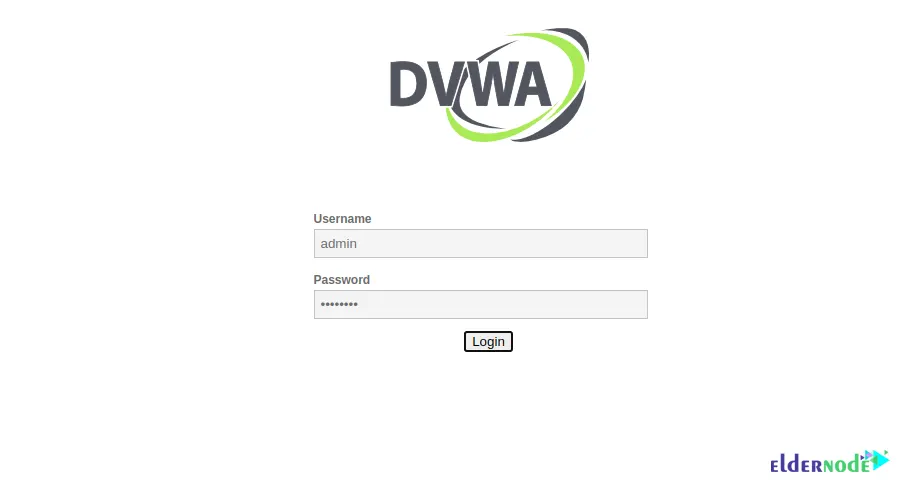
Enter the following information on the DVWA login page
Username: admin
Password: password
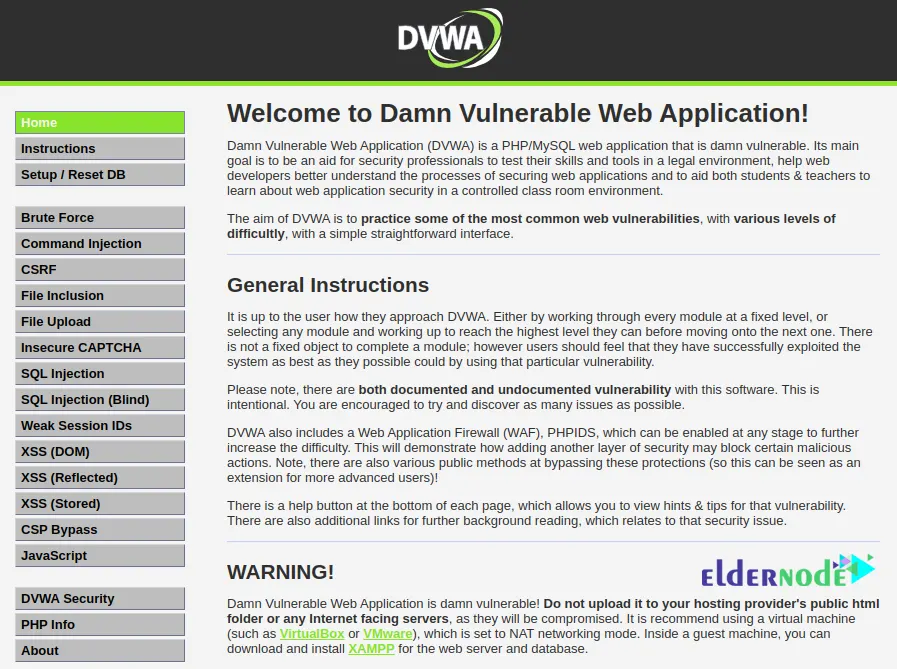
Finally, after logging in, you will see the main page of DVWA as shown below:
Conclusion
In this article, we tried to teach you How to Install and Configure DVWA On Kali Linux. We recommend that you do not upload DVWA to your hosting provider’s public html folder. If you have any question, you can share it with us in the comments section.