How to Improve Security for RDP Connection. One of the main problems with Windows Server, which causes hackers and crackers to hack into your server, is that the remote desktop is active.
When Remote Desktop is enabled on your Windows server with default settings on the main and default ports, you allow hackers to more easily carry out Brute Force attacks on your Windows server and hack your server faster.
Remote Desktop Protocol (RDP) is the easiest and most common method for managing a Windows server.
There are free applications available for Windows, Macintosh, and Linux based desktops.
Because it is so widely used, RDP is also the target of a large number of brute force attacks on the server. Malicious users will use compromised computers to attempt to connect to your server using RDP. Even if the attack is unsuccessful in guessing your administrator password, just the flood of attempted connections can cause instability and other performance issues on your server.
Fortunately, there are some approaches you can use to minimize your exposure to these types of attacks.
In this article, we will teach you how to improve the security of your remote desktop connection.
How to Improve Security for RDP Connection.
Table of Contents
The first way: Using a VPN
Using a Virtual Private Network (VPN) is one of the best ways to protect your server from malicious attacks over RDP.
Using a VPN connection means that before attempting to reach your server, a connection must first be made to the secure private network. This private network is encrypted and hosted outside of your server, so the secure connection itself does not require any of your server’s resources.
Once connected to the private network, your workstation is assigned a private IP address that is then used to open the RDP connection to the server.
When using a VPN, the server is configured only to allow connections from the VPN address, rejecting any attempts from outside IP addresses.
The VPN not only protects the server from malicious connections, but it also protects the data transmitted between your local workstation and the server over the VPN connection.
The second way: Using a Hardware Firewall
Hardware firewalls are installed on the network platform and in the router path or on it. Hardware firewalls perform very well in the basic layers and, if they have the necessary performance, cause healthy traffic to reach software systems and firewalls.
It should be noted that the hardware firewall is not able to fully examine the details of packets on the network.
Therefore, the existence and use of hardware and software combinations at the network level in order to ensure network security seems necessary.
Like using a VPN, adding a hardware firewall to your server infrastructure further protects your server from malicious attacks.
You can add a Web firewall to your account to allow only RDP connection from a trusted location. If you have the ability to restrict IP on the hardware firewall, only open the remote desktop for your specified and trusted IPs. Also change the default port from 3389 to another port.
The third way: Scoping the RDP Firewall Rule
You can use your Windows firewall to limit access to your RDP port (by default, port 3389).
The process of restricting access to a port to a single IP address or group of IP addresses is known as “scoping” the port.
When you scope the RDP port, your server will no longer accept connection attempts from any IP address not included in the scope. Scoping frees up server resources because the server doesn’t need to process malicious connection attempts, the rejected unauthorized user is denied at the firewall before ever reaching the RDP system.
Here are the steps necessary to scope your RDP port:
Steps required to restrict the RDP port
1. Log in to the server.
Click on the Windows icon, and type Windows Firewall into the search bar.
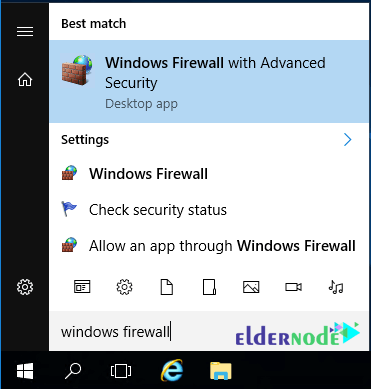
2. Click on Windows Firewall with Advanced Security.
3. Click on Inbound Rules.
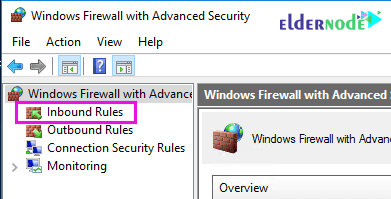
4. Scroll down to find a rule labeled RDP (or using port 3389).
5. Double-click on the rule.
6. Click the Scope tab.
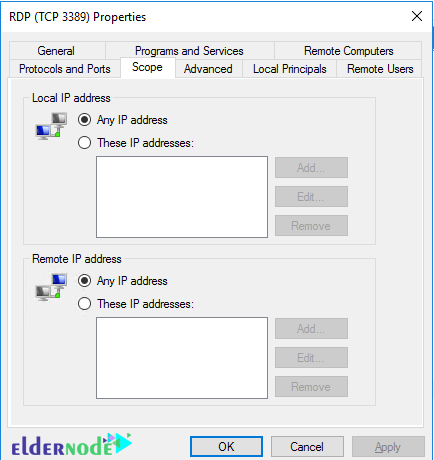
7. Make sure to include your current IP address in the list of allowed Remote IPs.
8. Click on the radio button for These IP Addresses. (under Remote IP addresses.)
9. Click OK to save the changes.
The fourth way: Changing the RDP Port
While scoping the RDP port is a great way to protect your server from malicious attempts using the Remote Desktop Protocol, sometimes it is not possible to scope the port.
For instance, if you or your developer must use a dynamic IP address connection, it may not be practical to limit access based on IP address.
There are still steps you can take to improve performance and security for RDP connections.
Most brute force attacks on RDP use the default port of 3389.
How to Improve Security for RDP Connection
If there are numerous failed attempts to login via RDP, you can change the port that RDP uses for connections.
1. Before changing the RDP port, make sure the new port you want to use is open in the firewall to prevent being locked out of your server.
Learn how to open a port on a Windows firewall
2. Login to your server and open the Registry editor by entering regedit.exe in the search bar.
3. Once in the registry navigate to the following:
HKEY_LOCAL_MACHINE\SYSTEM\CurrentControlSet\Control\Terminal Server\WinStations\RDP-Tcp
4. Once there scroll down the list till you find “PortNumber”.
5. Double-clicking on this will bring up the editor box.
6. Change it from HEX to DEC so it’s in numbers.
7. Set the port number here and hit OK.
Note: You can use whatever port number you wish, but you should pick a port that already isn’t in use for another service.
A list of commonly used port numbers can be found on MIT’s website.
8. Close the registry editor and reboot the server.
9. Be sure to reconnect to the server with the new RDP port number.
Dear user, we hope you would enjoy this tutorial, you can ask questions about this training in the comments section, or to solve other problems in the field of Eldernode training, refer to the Ask page section and raise your problem in it as soon as possible. Make time for other users and experts to answer your questions.
Goodluck.