[Updated on Date: 2021-1-10] Remote Desktop Protocol (RDP) allows the client computer to view the computer screen as a remote console connection (exists for most versions of Microsoft Windows). The RDP protocol uses the TCP protocol port number 3389 for communication by default. The RDP protocol is a proprietary protocol for Microsoft. You would easily use it for Unix and OS X as RDP servers which are built into Windows operating systems. In this article, you will learn How To Install And Configure Antivirus On RDP Admin. Choose one of the provided packages of Eldernode to buy your own RDP Admin.
Table of Contents
Tutorial Install And Configure Antivirus On RDP Admin
RDP Admin includes the version of Windows 2012, 2016, 2019, and 10. The firewall is installed by default on Windows 2016, 2019, and 10. But you can increase the security of your RDP admin by using more powerful Antiviruses. The remote control allows for quick and safe connection to machines so as to resolve issues in real-time, which in turn saves you time, money, and stress. While you have an RDP Admin Server with your admin access, you need to secure it, so prepare to learn how to install an Antivirus. To protect RDP traffic on a broadband connection, make sure to use a firewall-to-firewall VPN too.
RDP Vulnerability
The fact is that version 5.2 of the RDP in its default configuration is vulnerable to a man-in-the-middle attack. RDP sessions are also susceptible to in-memory credential harvesting, which can be used to launch pass the hash attacks. Also, Microsoft released an update for a critical security vulnerability in the RDP. The vulnerability allowed a Windows computer to be compromised by unauthenticated clients and computer worms. You may face attacks when the RDP access is opened to the whole internet (specifically, port 3389). So it is essential to close all doorways for interceptors not to find and hack into the targeted machine.
How to protect RPD
RDP protection is not very hard but vital.
First, you need to check if your RDP connection is open to the internet or not and try to keep it close by configuring the settings and let it be accessible only through an internal network. Remember that you could block the traffic in the default ports at the firewall level.
You do not need to keep your RDP enable all the time. Once you are finished with your business, disable RDP. You are recommended to use Remote Desktop Gateway to do this.
As an administrator or even a user, you clearly know that a strong password should be chosen.
Consider using two-factor authentication.
It is okay to forget to call your partner, but never neglect to Back up! To make sure you are protecting the RPD, Back up, back up, and… BACK UP!
You may face ransomware. Keep in mind to not pay the ransom because ransomers never deliver the decryption key. Just find free decryption tools and get rid of it.
Update your software regularly. The components are updated automatically with the latest security fixes in the standard Microsoft patch cycle. But always check to use the latest versions of both the client and server software by enabling and auditing automatic Microsoft Updates
You are recommended to restrict access using firewalls. Use an RDP Gateway to do this, or use the campus VPN software to get a campus IP address and add the campus VPN network address pool to your RDP firewall exception rule.
Limit users who can log in using Remote Desktop. While all administrators are allowed to access the remote desktop, you should limit remote access only to those accounts that need it to increase security.
Until this point, you reviewed some most recommended tips to protect RDP.
Top Antivirus with Remote Control Management
Bitdefender
With Bitdefender’s GravityZone tool, you get full visibility into your overall security posture, security threats on a global scale, and control over security services that protect virtual or physical desktops, servers, and mobile devices.
BullGuard
All BullGuard products in its comprehensive security suite are designed with your business in mind. One of the most striking things is its effective and pleasing design, with a simple to navigate and use dashboard interface, and clearly marked features and actions.
Panda
Panda Remote Control is a tool developed by Panda Security to let you access your computer(s) on your network remotely from a web console. With this tool, you can troubleshoot issues without being physically present, or, if you’re an agency, you can resolve your clients’ security problems without them having to intervene, and with little if any impact on their activity.
Avast
Avast is a leading antivirus with remote control management for smooth running and troubleshooting issues without leaving the comfort of your desk.
Comodo’s Remote Control (CRC) delivers faster and easier remote desktop connections for managed service providers, so as to bring core services needed by these providers under a single umbrella and login of the Comodo console. Through the latest innovation and technologies, Comodo delivers tools that outperform most third-party software currently in use today.
AVG
AVG’s Managed Workplace 10 comes with integrated advanced security features including expanded remote control functions. The Premium Remote Control has been enhanced to include ad hoc and on-demand sessions to offer remote support to anyone on the internet without deploying Managed Workplace. It also has an end-user consent feature that respects the privacy of your clients by requesting access to initiate remote control to their devices.
Best Antivirus For Windows 10
1- Bitdefender
2- Norton
3- BullGuard
4- McAfee
5- Kaspersky
Learn Install And Configure Antivirus On RDP
How to activate Windows 10 built-in Antivirus
when you install a new operating system on your computer, your main concern should be viruses and malware. After installing the new operating system, each of us seeks to protect our computer against viruses and malware. But in Windows 10, there is no need to install a powerful and compatible external antivirus. One of the built-in tools used in the design of Windows 10 is the built-in Windows 10 antivirus. In the following, we will introduce and activate the built-in antivirus of Windows 10.
The built-in Windows 10 antivirus, like its Windows 8 counterpart, comes with the operating system default. This is because everyone who installs the operating system has minimal protection and security by default. Security against viruses and malware that may destroy your information is very important.
This no longer requires the antivirus to be installed separately. It also prevents the operating system from issuing repeated antivirus installation warnings. This built-in tool for Windows 10 is similar to the Microsoft Security Essentials software that you used in other Windows.
Automatic scanning and updating of Windows 10 built-in Antivirus
Windows Defender, like other security software, runs in the background and has automatic updates to prevent viruses and malware. No special work is required to use this tool. Windows Defender automatically quarantines an infected file when it finds it. It will then send you a message informing you of what it has done.
If you do not update the antivirus frequently, it will lose its effectiveness and may not do its job well. Windows 10 automatically downloads and updates antivirus and anti-malware updates via Windows Update.
Settings and Exceptions
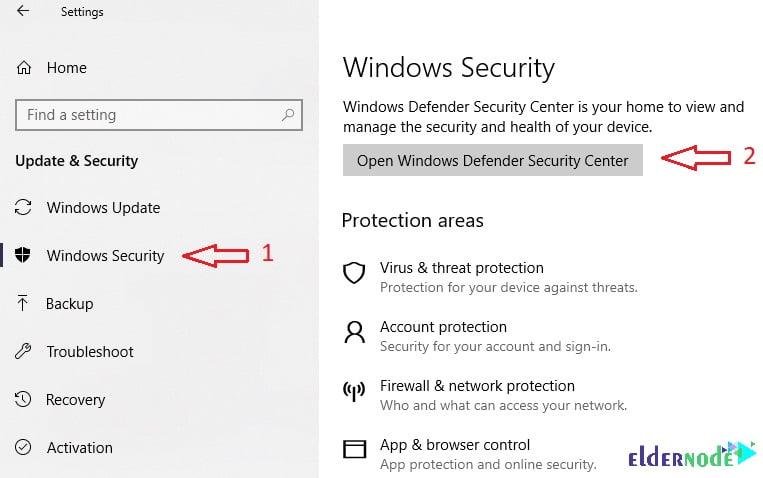
Antivirus and anti-malware do not always work properly! They may sometimes quarantine our required files. To prevent this from happening in most security software, there is a feature called Exclusion. Exceptions can be used for antiviruses using Exclusion. This feature is located in the program settings section of Windows 10. To enable it, go to the Start menu and from there go to Setting. Select the Update & Security option. Now select Windows Defender Security Center and click on it to open its settings.
Some of the settings in this section are cloud protection settings, disabling temporary scanning, as well as defining exceptions for scanning files, and more. You have to be very careful to define an exception. Because by defining an exception, the antivirus will no longer scan those files, and it is possible that the same defined definition will infect your computer. Exception files can be as a file, folder, or file type.
Manual scan
Scanning files in this tool is done automatically. But if you need a manual scan, you can do this in Windows Defender in three ways. The three methods of manual scanning are fast scanning, custom scanning, and full scanning. Custom scans can be used to find malware and viruses at a specific address. Custom scans allow you to scan for viruses and malware at a specific address. Open Windows Defender by clicking the Start button. In the search box, type Defender, and then, in the list of results, click Windows Defender to access the Windows Defender interface. If you already used SCEP, you will recognize the interface.

Quarantine (Install And Configure Antivirus On RDP)
If an infected file is detected in the system, Windows Defender will quarantine that file and notify you. To see the quarantined files, go to the Windows Defender window and open the History tab. In this section, the history of finding the infected file and quarantining it will be displayed as a list. At this location and through the list can be returned to the previous quarantine lists.
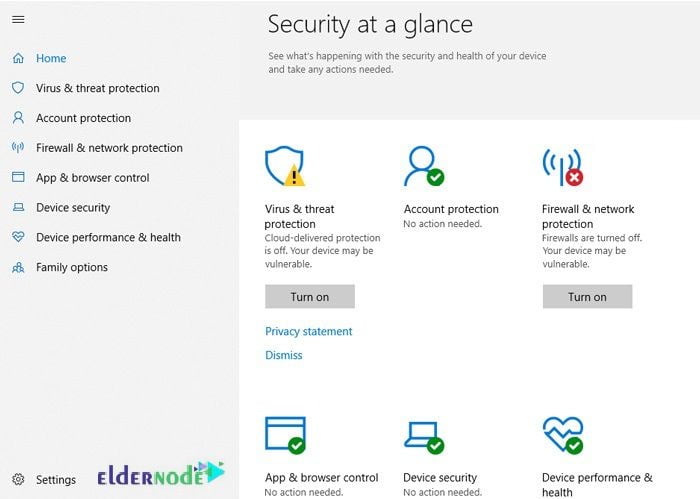
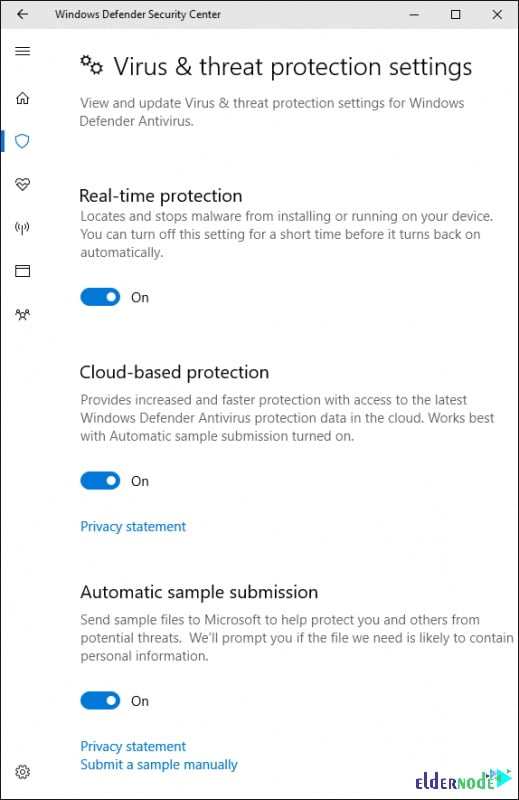
Configuration settings protect against viruses and security threats
By default, Windows Defender automatically performs real-time protection, cloud-based protection, and sampling; Uninterrupted protection assures you that this security software automatically scans the system permanently and detects malware. Tries not to pose a threat to the system.
Cloud-based protection and sampling allow Windows Defender to share information about malicious files and malware with Microsoft. To enable or disable any of these settings, click on the “Virus & threat protection settings” link in the main Windows Defender tab.
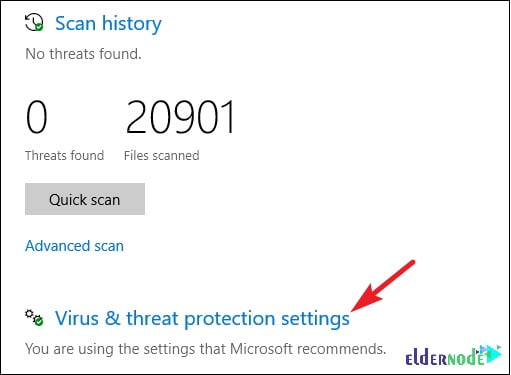
Then, select the settings as shown in the image.
How to replace Windows Defender with External Antivirus
If you install external antivirus, you will not have any problems in performing new antivirus tasks. Because Windows Defender is automatically disabled by the operating system itself. If you install external antivirus and go to Windows Defender settings, you will see that all of them are disabled and gray. If you remove external antivirus, Windows 10 Internal Antivirus will be activated automatically again and will continue its work process.
What happens if you install another Antivirus?
If you install another antivirus, Windows 10 will automatically disable Windows Defender. It also no longer provides real-time protection and scanning so as not to interfere with the installed antivirus. Of course, you can still run this software manually or offline and have the original antivirus backup.
If you remove the installed antivirus, Windows Defender will be reactivated to protect the system. Also, note that anti-malware software such as Malwarebytes can be installed alongside the default Windows security software and provide real-time protection together.
Install any antivirus you choose, but be aware that Windows 10 comes with a default antivirus. You may think that this software is not good enough, but it is the least annoying, and when combined with other security principles of computer use and Internet browsing, it may be enough to protect your system alone.
Conclusion
in this article, you learned How To Install And Configure Antivirus On RDP Admin. In case you are interested to read more, find the related articles on How to troubleshoot Remote Desktop AND How to Set the RDP limit on Windows Server.


Is it possible to block all RDP connections?
– Yes, sure. Follow the below path to do this.
1- Scroll down and double click on the Allow Remote Desktop rule.
2- Click on Next till you reach the last window i.e Select Action
3- Here change the action from Allow to Deny and click on Finish.
I faced a problem while installing remote desktop web connections
Please consider the two below notes and then send me a message again if you could not fix it.
1- You must be logged on as an administrator or a member of the Administrators group in order to complete this procedure. If your computer is connected to a network, network policy settings may also prevent you from completing this procedure.
2- To open a Control Panel item, click Start, click Control Panel, and then double-click the appropriate icon.
thank you. Is it good to change the listening port for Remote Desktop?
Yes, of course. After connecting to computer the Remote Desktop feature on your computer “hears” the connection request through a defined listening port (3389 by default) and you can change that listening port on Windows computers by modifying the registry. Attention to the below phrase to do this well:
After Starting the registry editor, Navigate to the following registry subkey:
HKEY_LOCAL_MACHINE\System\CurrentControlSet\Control\Terminal Server\WinStations\RDP-Tcp.
Then, try to find port number and Click Edit > Modify, and then click Decimal.
All you need to do next is to type the new port number, and then click OK and close the registry editor, and restart your computer.
How to set an account lockout policy?
To prevent hackers from using automated password guessing tools from gaining access to your system, follow the path below:
1- Go to Start–>Programs–> Administrative Tools–> Local Security Policy
2- Under Account Policies–> Account Lockout Policies, set values for all three options. Three invalid attempts with 3-minute lockout durations are reasonable choices.
Hi, Could you please explain in details how to limit users to not log to use remote desktop?
Follow the below path to do this.
1- Click Start–>Programs–>Administrative Tools–>Local Security Policy
2- Under Local Policies–>User Rights Assignment, go to “Allow logon through Terminal Services.” Or “Allow logon through Remote Desktop Services”
3- Remove the Administrators group and leave the Remote Desktop Users group.
4- Use the System control panel to add users to the Remote Desktop Users group.