Virtualizor is a powerful web-based VPS control panel that allows users to deploy and manage VPS servers with one click. Virtualizor supports KVM virtualization technology among several other technologies. In this article, we are going to teach you How to Create Backup Service with Virtualizor. It should note that if you want to buy a dedicated server, you can visit the plans and locations provided on the Eldernode website.
Table of Contents
Introduction to Virtualizor
Virtualizor is a convenient and easy control panel developed by Softaculous. It also has a powerful API and real-time statistics, plus many other features. Admins can create a VPS with the click of a button. VPS users can start, stop, restart and manage their VPS using a highly advanced web-based GUI. You can manage backups, media, formats from your management panel by Virtualizor. Stay with us in the continuation of this article with How to Create Backup Service with Virtualizor.
How to Add Backup Server with Virtualizor
After getting familiar with the Virtualizor control panel, in this section, we want to learn how to add a backup server. As you may know, Virtualizor supports three types of backup: LOCAL, SSH and FTP.
One thing you should pay attention to is that in case of local backup, the VPS image is backed up in the node server’s own directory. It should also be noted that for remote backup, you need to add the details of the backup servers, which can be done using the Add Backup Server API.
To add a Backup server, you need to go to Virtualizor admin panel >> Servers >> Add Backup Server.
After you have successfully added the backup server, you need to make sure that it is added to the backup plan for the VPS files that need to be backed up. Alternatively, you should use the Test Backup Connectivity API to test connectivity to the backup server after it is added.
Finally, when you pass gen_key when adding a backup server, you will receive the public key and private key in the API response, as in the following commands:
[keys] => Array ( [public_key] => ssh-rsa AAAAB3NzaC1yc2EAAAADAQABAAABAQDFvWP35.... root@lxc [private_key] => -----BEGIN RSA PRIVATE KEY----- MIIEowIBAAKCAQEAxb1j9+b66jRBBPRtVq+znA9nlqiGtW1WgcDN+0T0PTBb8Py5 CuWiUFQ4spQyqkRXi9Y1JT4g3+tAFHEpyCjZttoZivWE5gF/sL8IpG4pUmcVOwut yjiWW7yglPSVLsqIyCP4ooFJGQ8Bokx7k+zORlrLfAJC+F6fwIe/RyxjZOdD88S9...... [path] => /var/virtualizor/ssh-keys/ )In the next step, you need to add the public key to the backup server in /root/.ssh/authorized_keys like the following commands:
<?php require_once('/usr/local/virtualizor/sdk/admin.php'); $key = 'your_api_key'; $pass = 'your_api_pass'; $ip = 'your_server_ip'; $admin = new Virtualizor_Admin_API($ip, $key, $pass); $post = array(); $post['hostname'] = 'testhost'; $post['name'] = 'backupstest'; $post['type'] = 'SSH'; $post['username'] = 'test'; $post['password'] = 'test123'; $post['gen_key'] = 1; //pass only if you want to generate new keys $post['ssh_key'] = 1; //pass only if you want to use keys to authenticate $post['sshpub_key'] = 'YOUR PUBLIC KEY'; //pass only if ssh_key is set $post['sshpri_key'] = 'YOUR PRIVATE KEY'; //pass only if ssh_key is set $post['port'] = 22; $output = $admin->addbackupserver($post); print_r(json_encode($output)); ?>Create the Backup Service in virtualizor
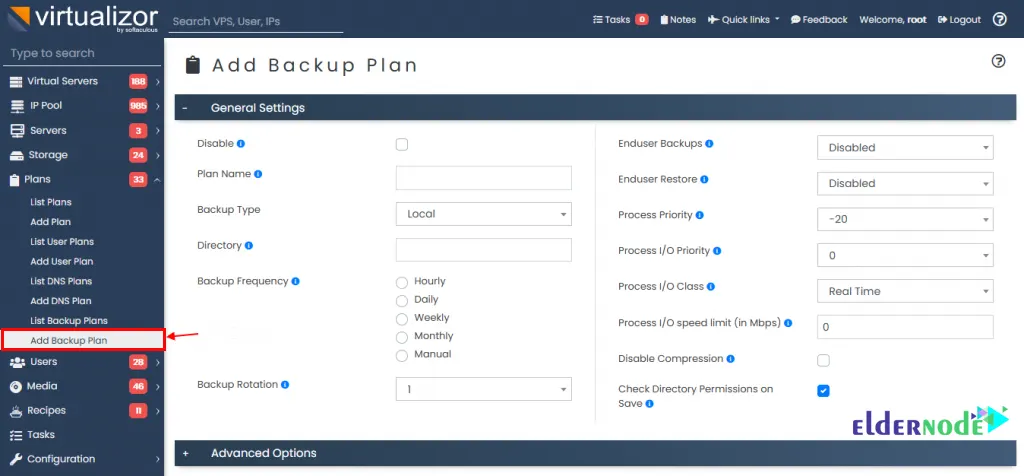
As you can see in the following image, after adding the backup server, you need to create a backup plan.
Virtualizor Admin Panel >> Plans (Menu) >> Add Backup Plan
In the next step, you need to assign the backup plan to a VPS. It is interesting to know that it is possible to assign a backup plan to individual VPSs or to VPS plans.
To assign a backup program to a specific VPS, you can edit the VPS by referring to the following path:
Virtualizor Admin Panel >> Virtual Servers (Menu) >> List All ->> Edit
As shown below, open the advanced options block and then select the previously created backup plan:

Be careful that in order to assign a backup plan to the VPS plan, you must edit the VPS plan by referring to the following path:
Virtualizor Admin Panel >> Plans (Menu) >> List Plans >> Edit

How to Configure Backup Service with Virtualizor
In this section, we will explain the backup settings in Virtualizor. This description is based on the first image of this post.
– Disable: To disable the backup program. Note that disabling the backup program will not run it from cron. Also endusers cannot backup/restore all VPS assigned to this plan.
– Backup Server: The name of the backup server where the VPS backups are uploaded.
– Directory: This is the directory where VPS backups are storing on the backup server.
– Backup Frequency: By choosing one of the options in this section, the backup process can be set hourly, daily, weekly, monthly or manually.
– Backup Rotation: Set a rotation for backup. For example, if rotation is set to 2, the last 2 backups of the VPS are kept on the server.
– Enduser Backups: Creating as many backups as you like. You can set a limit for the number of backup copies.
– Enduser Restores: Creating as many restore copies as desired by the user. You can set a limit for the number of recovery copies.
– Process Priority: Determine the priority of the backup process. A higher value means a low priority and a lower negative value means a high priority.
– Process I/O Priority: The higher the priority, the longer the disk time.
– Disable Compression: This reduces CPU usage, but increases IO usage in the backup process. The important thing to note is that choosing this option will increase the size of the VPS backup.
Finally, you can search for troubleshooting/reports of the log file for the backup process from the following paths:
/var/virtualizor/log/backup/VPSID.log
/var/virtualizor/log/restore/VPSID.log
How to Start Backup
To start the backup process, you must follow all the steps mentioned in the previous sections carefully. Then run the following command from the console so that the backup process is done immediately:
/usr/local/emps/bin/php /usr/local/virtualizor/scripts/vpsbackups_plan.php -b<backup-plan-id> [options]Options:
-f Force backup even if backup plan is disabled
Conclusion
Note that Virtualizor itself is not a virtualizer. Virtualizor is just a control panel. That is, it uses virtualization technologies to create a virtual machine or VPS and performs the steps of assigning it automatically. Due to the importance of working with this control panel, it is necessary to learn how to backup by Virtualizor. In this article, we tried to teach you How to Create Backup Service with Virtualizor. If you have any question, you can share it with us in the comments section.