Pleroma is a social networking microblogging server based on the open OStatus and ActivityPub standards. Servers that use Pleroma server software can exchange user messages and posts with other servers in accordance with these standards. In this article, we are going to teach you about Tutorial Install Pleroma on Ubuntu 20.04, step by step. You can visit the packages available in Eldernode if you wish to purchase an Ubuntu VPS server.
Table of Contents
How to Install Pleroma on Ubuntu 20.04
Pleroma is a federal social networking platform that is compatible with Mastodon and other ActivityPub implementations. In the first part of this article, we are going to mention the prerequisites for Install Pleroma on Ubuntu 20.04. Then we want to teach you how to configure the firewall. After performing these steps, we will reach the main part, that is, how to Install Pleroma. After you have completed Install Pleroma, we will configure it and in the final step, we will teach you how to setup Pleroma step by step. Please stay tuned for the rest of this article.
Prerequisites to Install Pleroma on Ubuntu 20.04
Before installing Pleroma on Ubuntu 20.04 you need to provide the following prerequisites:
_ Ubuntu VPS Server
_ A non-root Sudo user
Then you need to use the following commands to make sure everything is up to date:
sudo apt updatesudo apt upgradeYou also need to use the following commands and install some packages and dependencies:
sudo apt install wget curl gnupg2 ca-certificates lsb-release gnupg zip libncurses5 libmagic-dev -yIn the next step, you need to install PostgreSQL. So you can add the official PostgreSQL repository to the Ubuntu resource list by running the following command:
sudo sh -c 'echo "deb http://apt.postgresql.org/pub/repos/apt $(lsb_release -cs)-pgdg main" > /etc/apt/sources.list.d/pgdg.list'Then you need to add the repository GPG key:
wget --quiet -O - https://www.postgresql.org/media/keys/ACCC4CF8.asc | sudo apt-key add -Now you need to update the list of system packages by running the following command:
sudo apt updateThe last prerequisite that must be installed before installing Pleroma is Nginx. You can install Nginx using the following command:
sudo apt install nginxHow to Configure Firewall to Install Pleroma on Ubuntu 20.04
After preparing the Preroma installation prerequisites, the second step is to configure the firewall. It should be noted that Ubuntu comes with UFW by default. So you should run the following command to check if the firewall is running:
sudo ufw statusOutput:
Status: inactiveThe next step is to run the following command to allow the SSH port so that the firewall doesn’t break the current connection by enabling it:
sudo ufw allow OpenSSHYou also need to do the same for the HTTP and HTTPS ports:
sudo ufw allow 80sudo ufw allow 443Finally, you can enable the firewall using the following command:
sudo ufw enableCommand may disrupt existing ssh connections. Proceed with operation (y|n)? yYou can now check the status of the firewall by running the following command:
sudo ufw statusInstall Pleroma on Ubuntu 20.04 | Ubuntu 18.04
After successfully completing the previous steps, now we come to how to install Pleroma. Just follow the steps below step by step. In this article, we are going to install Pleroma from the OTP version. So in the first step, you have to create a Pleroma user without the ability to log in. It should also be noted that the following command creates a home directory in /opt/pleroma.
sudo adduser --system --shell /bin/false --home /opt/pleroma pleromaBefore going to the Pleroma user, you need to go to the root user by executing the following commands:
sudo susu pleroma -s $SHELL -lNow it’s time to download Pleroma to a temporary location using the following command
curl "https://git.pleroma.social/api/v4/projects/2/jobs/artifacts/stable/download?job=amd64" -o /tmp/pleroma_amd64.zipThen you have to extract the downloaded file with the following command:
unzip /tmp/pleroma_amd64.zip -d /tmp/Now you can easily install Pleroma:
mv /tmp/release/* /opt/pleromaIn the next step after installing Pleroma, you need to delete the temporary files:
rm -rf /tmp/pleroma_amd64.zip /tmp/releaseYou can now switch to the root user by executing the exit command:
exitAnother important point is that in the next step you need to create a directory for the uploads and public files:
mkdir -p /var/lib/pleroma/{uploads,static}You can create a Pleroma configuration list using the following command:
mkdir -p /etc/pleromaFinally, you can change the ownership of Pleroma directories to Pleroma users by running the following command:
chown -R pleroma /var/lib/pleroma /etc/pleromaHow to Configure Pleroma on Ubuntu 20.04
After you are fully acquainted with how to install Pleroma in the previous section, we now want to configure it. You must first return to the Pleroma user using the following command:
su pleroma -s /bin/bash -lUse the following command to generate a Pleroma sample configuration file:
./bin/pleroma_ctl instance gen --output /etc/pleroma/config.exs --output-psql /tmp/setup_db.psqlYou will be asked questions. You can ignore these questions if no error occurs. Note that you need to choose a strong password for your database. If you want to configure your instance from the admin panel, select “y” for the configuration storage question in the database.
In this step, you must go to the default PostgreSQL user created when installing PostgreSQL by executing the following commands:
exitsu postgres -s /bin/bash -lYou can then create a database using the SQL file:
psql -f /tmp/setup_db.psqlAfter you have successfully created the database, you need to return to the Pleroma user by executing the following commands:
exitsu pleroma -s /bin/bash -lFinally, you can run the following commands to initialize the database we just created and go to the root user:
./bin/pleroma_ctl migrateexitHow to Setup roma on Linux Ubuntu 20.04
In this section, you need to configure Nginx before launching Pleroma. You can install Nginx by moving it to the /etc/nginx/sites-available directory.
mv /opt/pleroma/installation/pleroma.nginx /etc/nginx/sites-available/pleroma.confThen you need to replace all the example.tld events with your domain in the next step using the following command:
sed -i 's/example\.tld/example.com/g' /etc/nginx/sites-available/pleroma.confNow you need to open the configuration file for editing using a text editor like nano:
nano /etc/nginx/sites-available/pleroma.confNow you should uncomment the location ~ /\.well-known/acme-challenge block. The server block of your configuration file should look like the following:
server { server_name example.com; listen 80; listen [::]:80; location ~ /\.well-known/acme-challenge { root /var/lib/letsencrypt/; } location / { return 301 https://$server_name$request_uri; } }After making the changes, you can use the Ctrl+X key combination to save the file and exit it.
It’s time to enable the Pleroma Nginx configuration by running the following command:
ln -s /etc/nginx/sites-available/pleroma.conf /etc/nginx/sites-enabled/pleroma.confYou must also enable the Nginx server with the following command to start it at boot time:
systemctl enable nginxsystemctl start nginxNote that you need to install the Pleroma systemd service unit file in the distribution. To do this, use the following command:
mv /opt/pleroma/installation/pleroma.service /etc/systemd/system/pleroma.serviceFinally, you can enable and start the Pleroma service by executing the following commands:
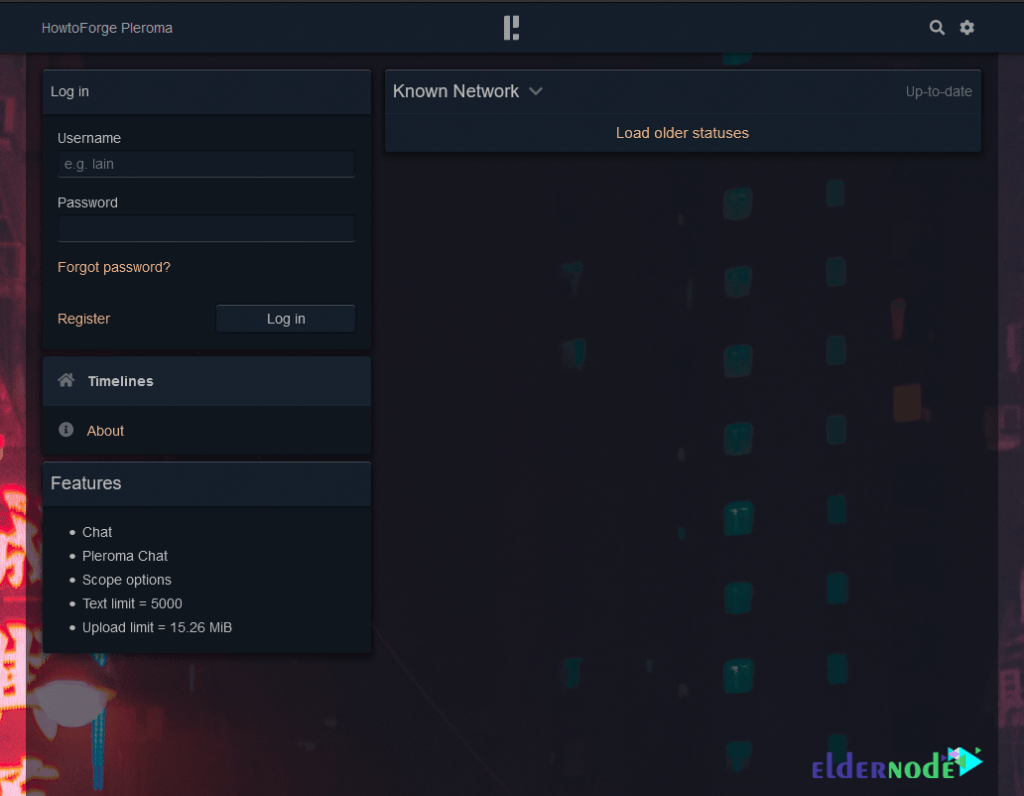
systemctl enable pleromasystemctl start pleromaAfter completing all the steps mentioned in this tutorial, you can now open https://example.com in your web browser to visit Pleroma.
Conclusion
In this article, we tried to introduce you to Pleroma first. Then we mentioned the prerequisites for installing Pleroma. We also configured the firewall. After completing all these steps, we taught you to step by step how to Install Pleroma on Ubuntu 20.04. Finally, how to configure and setup Pleroma was taught. If you have any questions about this training, you can leave a comment below this post or in the community section.
![How to Install Node.js on Fedora [PPA way]](https://blog.eldernode.com/wp-content/uploads/2021/07/How-to-Install-Node.js-on-Fedora-PPA-way-300x164.png)