As an Administrator, Engineer, or Technician you should be able to watch your systems and applications and check the status of the elements of them. Pandora FMS is open-source and fully featured monitoring software. Using Pandora allows you to view your network infrastructure, detect down interfaces and defacement of your website. Also, you can present critical information to managers in a graphical layout that is presented in an easy-to-read manner. Two versions of Open source and Enterprise are available. If you are looking for a fully-featured monitoring and management platform for your business, undoubtedly the Enterprise version is more useful. However, join us with this article to learn How To Install And Use Pandora FMS On Centos 8. Also, if you need to purchase a fully managed VPS, order your considered CentOS VPS with the best price and support in Eldernode.
Table of Contents
Tutorial Install And Use Pandora FMS On Centos 8
You may need to control all your IT infrastructure. The web application of Pandora helps you monitor multiple Operating Systems. In the following, you will review the process of Pandora installation on CentOS 8. Pandora Flexible Monitoring System has four components such as Pandora FMS Servers, Pandora FMS Agents, Pandora FMS Web Management System, and Pandora Database. Pandora FMS uses TCP, UDP, ICMP, SNMP, and HTTP protocol and agents to collect metrics from the client system. It is cross-platform and supports Windows and Linux Operating Systems.
Prerequisites to Install and use Pandora FMS On CentOS 8
To let this tutorial work better, please consider the below Prerequisites:
_ A non-root user with Sudo privileges.
_To set up, follow our Initial server setup on CentOS 8.
_ At least 2GB RAM
_ Installing MySQL on a standalone server and installing Percona XTraDB instead of standard MySQL.
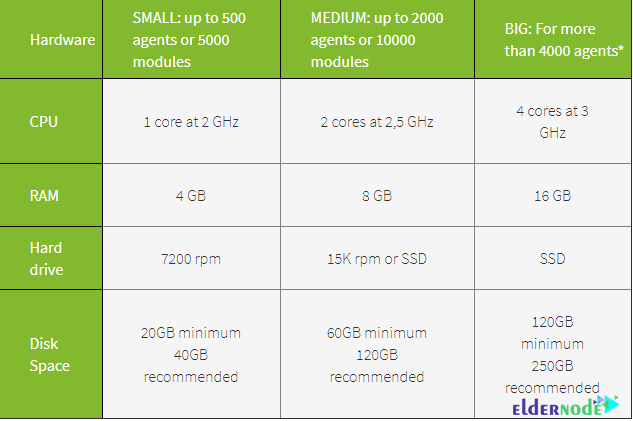
To see the additional requirements, have a look at minimum recommendations for different installations in the below table. If 80% of the modules have historical data and the average sampling time is 5 minutes, you can check with its information. However, these recommendations are specified for an environment where they are installed in the same database server, server, and console.
Install Pandora FMS Server on CentOS 8 | Centos 7
Let’s go through the steps of this guide and learn how to install and use Pandora FMS on CentOS 8.
Step 1:
First, run the following command to update your system with the latest available packages:
dnf update -yStep 2:
Since Pandora FMS runs on a web server, it uses MariaDB as a database backend. So, you must install Apache and MariaDB servers in your system. To install them, type:
dnf install httpd mariadb-server -yTo start Apache and MariaDB service after installing, use the commands below:
systemctl start httpdsystemctl start mariadbsystemctl enable httpdsystemctl enable mariadbStep 3:
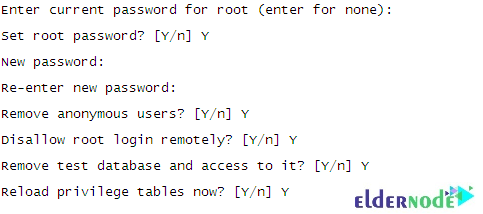
In this step, you can use the following command to set the MariaDB root password:
mysql_secure_installationThen, you will be prompt to answer the below questions. Answer them and continue:
Then, to log in to MariaDB run the following command:
mysql -u root -pTherefore, you can provide your root password and create a database and user for Pandora FMS. So, type:
CREATE DATABASE pandora;GRANT ALL PRIVILEGES ON pandora.* to pandora@'localhost' IDENTIFIED BY 'password';Now, to exit from MariaDB use the command below:
FLUSH PRIVILEGES;EXIT;Step 4:
Since Pandora is not available in the CentOS default repository, to install it on your CentOS server, you must add the Pandora repository to your system. Use the following command to create a Pandora repo:
nano /etc/yum.repos.d/pandorafms.repoAnd then add the following lines:
[artica_pandorafms]name=CentOS6 - PandoraFMS official repobaseurl=http://firefly.artica.es/centos7gpgcheck=0enabled=1When you are finished, you can save and close the file. Run the following command to install the Pandora FMS:
dnf install pandorafms_console -yNext, give proper permissions and ownership to the pandora directory:
chown -R apache:apache /var/www/html/pandora_console/chmod -R 775 /var/www/html/pandora_console/Then, restart the Apache service to apply the changes:
systemctl restart httpdHow to install Pandora FMS Agent on CentOS 8
In UNIX environments, the following must also be installed:
Perl 5.8 or aboveIt will be necessary to install the following dependencies:
perl-YAML-Tiny-1.73-2perl-Sys-SyslogunzipNow, you can use the following command to install the dependency:
yum install dnf-plugins-core -yyum config-manager --set-enabled powertools -yyum install -y perl-YAML-Tiny perl-Sys-Syslog unzipAnd finally, to install agents, type:
yum install -y http://firefly.artica.es/pandorafms/latest/RHEL_CentOS/pandorafms_agent_unix-7.0NG.noarch.rpmHow to access Pandora FMS on CentOS 8
To access the Pandor FMS web interface, open your web browser and enter the URL http://your-server-ip/pandora_console.
How To Monitor CentOS 8 With Pandora FMS
When you successfully pass all the required steps of installation Pandora FMS on CentOS 8, you can start using this software.
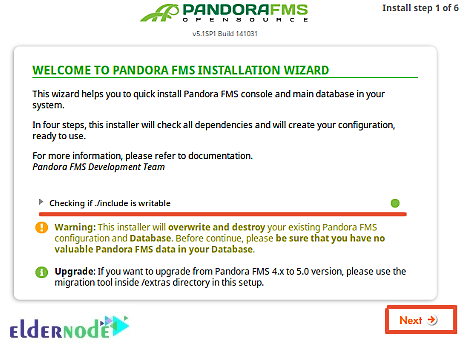
1- Once you use the above URL, you can view the following screen:
2- To view the license agreement page, click Yes, I accept license terms.
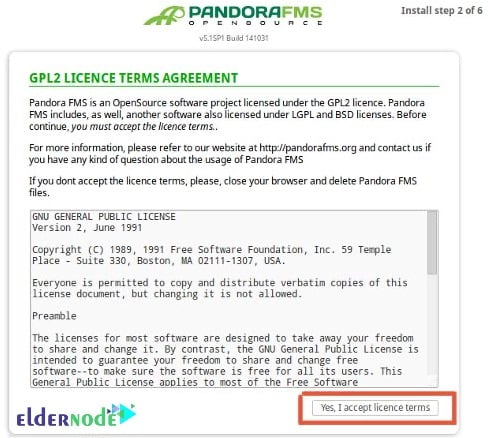
3- Now, accept the license agreement. Then, you can see the page below:
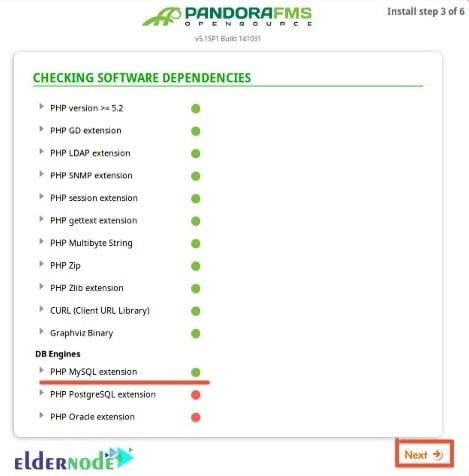
4- Now, click on the Next button. If you have installed all the dependencies, you can see the following page:
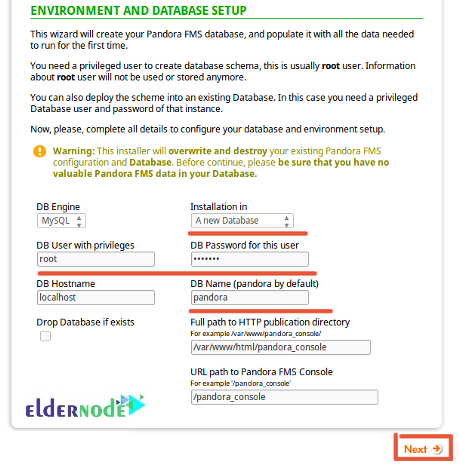
5- In this section, you must provide your root username, MariaDB root password, database name, and the path of the application and click on the Next button. If you can see the below page, you are all done till now.
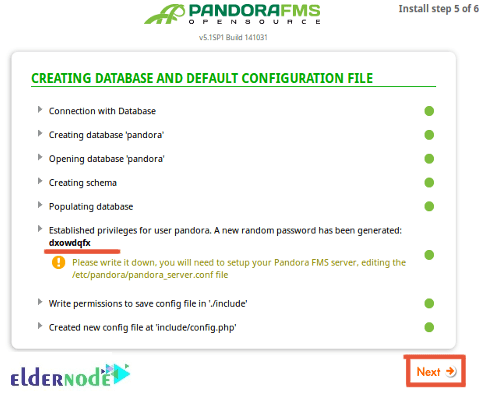
6- Again click on the Next button to view the page below.
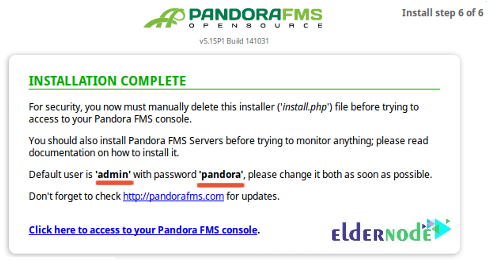
7- Next, open your terminal and delete the install.php file:
rm -rf /var/www/html/pandora_console/install.phpNow, you must edit the config.php file and define your database details:
nano /var/www/html/pandora_console/include/config.phpAt this point, change the following lines as per your database settings:
// Begin of automatic config file$config["dbtype"] = "mysql"; //DB type (mysql, postgresql...in future others)$config["mysqli"] = true;$config["dbname"]="pandora"; // MySQL DataBase name$config["dbuser"]="pandora"; // DB User$config["dbpass"]="password"; // DB Password$config["dbhost"]="localhost"; // DB Host8- Now, you can save and close the file and go to the Pandora web installation screen. Click on the Click here to access your Pandora FMS console. So, the Pandora login page will be displayed.
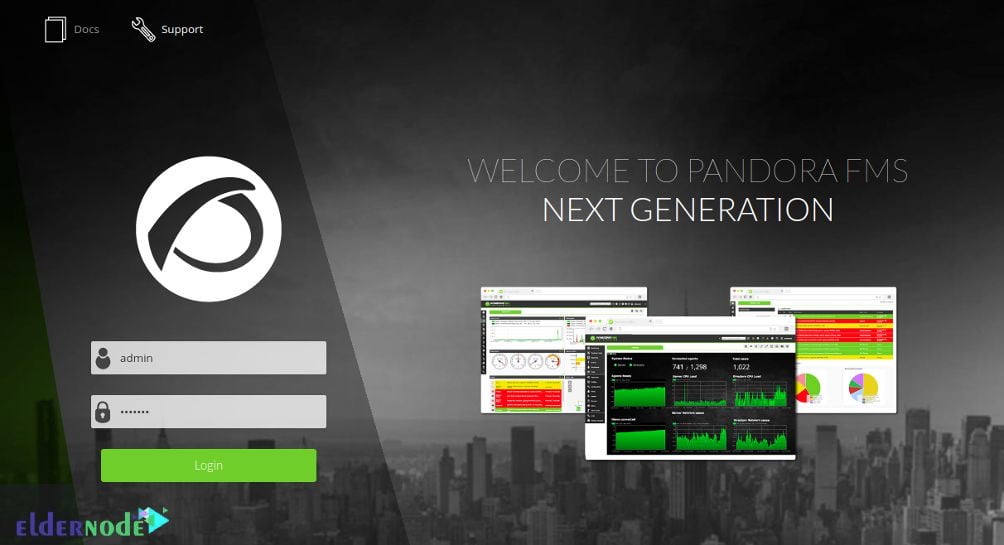
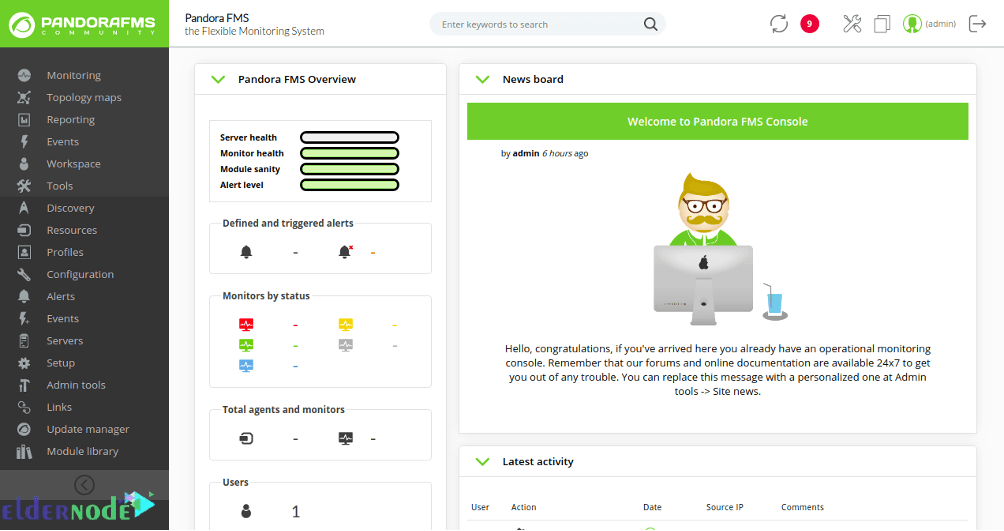
9- At the final step, you just need to provide the default user as admin and password as pandora and click on the Login button. You should see the Pandora FMS dashboard on the following page:
How to Uninstall Pandora on CentOS 8
When you decided to remove this program, you just need to run the following command:
yum remove pandorafms_console pandorafms_serverIf MySQL is installed but is no longer needed, it can also be deleted with the same command:
yum remove Percona-Server*Conclusion
In this article, you learned How To Install And Use Pandora FMS On CentOS 8. To start monitoring from the pandora dashboard, install an agent package on the client system. All user interaction with Pandora FMS is done through the WEB console. The console allows access through a browser without the need to install heavy applications, allowing management from any computer as long as said software is supported by HTML5. After a few days of using Pandora FMS, please go to the Eldernode community and let your friends know about your experience.