Recently, you learned about Nginx on Ubuntu 20.04. Follow us with the tutorial WordPress installation with Nginx in Ubuntu 20.04. As the WordPress platform, is an open-source content management system, In this article we are going to let you get more familiar with this widely used software to create a website or blog using its powerful features, beautiful designs, and above all, the freedom to build anything you want.
To install WordPress, you must have a LEMP stack installed on your Ubuntu 20.04 server.
Installing WordPress in Ubuntu 20.04
1- While you have a LEMP stack on your server, you need to use the wget command to download and set up WordPress from its official site.
wget -c http://wordpress.org/latest.tar.gz
2- When you passed the previous step, extract the archived file using the tar command.
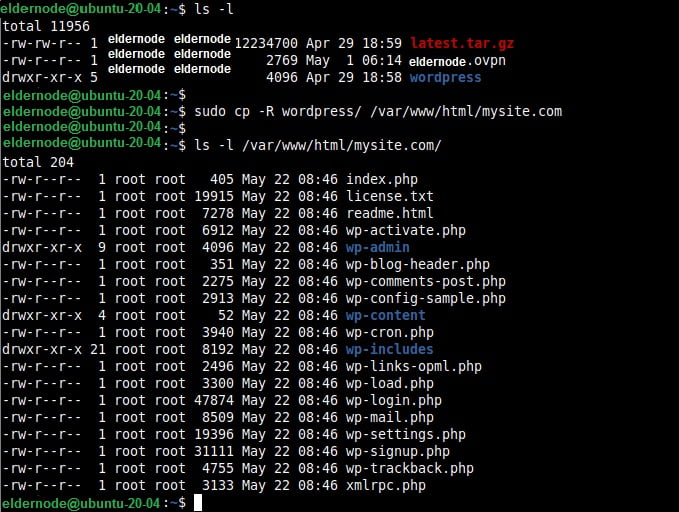
3- At this point, copy the content of the WordPress folder into your website’s folder (e.g mysite.com) which should be stored under the webserver’s web document root (/var/www/html/).
Please note: While using the cp command, the mysite.com directory doesn’t have to exist before, it will be automatically created.
ls -l sudo cp -R wordpress/ /var/www/html/mysite.com ls -l /var/www/html/mysite.com/ 
4- As the webserver user and group www-data should own it with reading, write, and execute permissions, set correct permissions on the website directory /var/www/html/mysite.com.
sudo chown -R www-data:www-data /var/www/html/mysite.com sudo chmod -R 775 /var/www/html/mysite.com
Creating a WordPress Database for Website
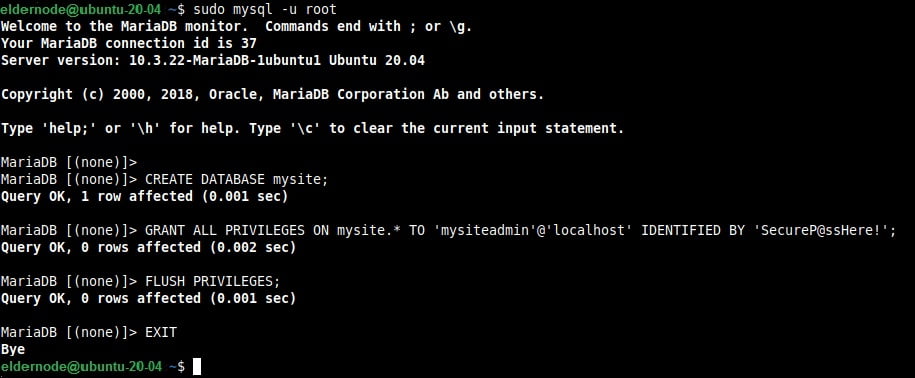
5- Now, WordPress needs a database for website data storage. To provide it, create one for your site, log into the MariaDB shell using the MySQL command using the -u option to provide the username and -p for the password and also use sudo if you are accessing as the root database user
sudo mysql -u root -p OR sudo mysql -u root #this also works for root database user
6- To create your website’s database, use the following commands when you accessed the database shell. Database user and a password.
MariaDB [(none)]> CREATE DATABASE mysite; MariaDB [(none)]> GRANT ALL PRIVILEGES ON mysite.* TO 'mysiteadmin'@'localhost' IDENTIFIED BY 'SecureP@ssHere!'; MariaDB [(none)]> FLUSH PRIVILEGES; MariaDB [(none)]> EXIT;
7- Create a wp-config.php file for your new WordPress installation. There you will define the database connection and some other parameters as well. Then, into the website’s document root /var/www/html/mysite.com and create a wp-config.php file from the sample file provided by default.
cd /var/www/html/mysite.com sudo mv wp-config-sample.php wp-config.php
8- Open the wp-config.php file after creating.
Now, you need your WordPress site to connect to the database you created for it. So, modify the database connection settings.
Creating an NGINX Virtual Server Block (VirtualHost) for WordPress Website
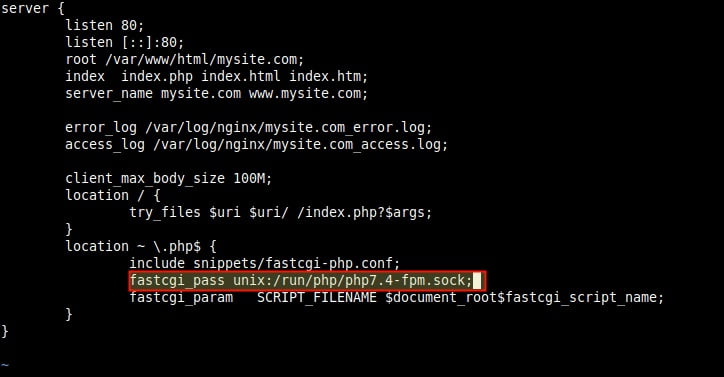
9- At this point, to configure a virtual server block for your site in the NGINX configuration, for NGINX to serve your website to clients using your domain name. So, Create a file called mysite.com.conf under the /etc/nginx/conf.d/ directory.
sudo vim /etc/nginx/conf.d/mysite.com.conf
Therefore, copy and paste the following configuration in the file. Do not forget to
replace the mysite.com and www.mysite.com with your domain name.
server { listen 80; listen [::]:80; root /var/www/html/mysite.com; index index.php index.html index.htm; server_name mysite.com www.mysite.com; error_log /var/log/nginx/mysite.com_error.log; access_log /var/log/nginx/mysite.com_access.log; client_max_body_size 100M; location / { try_files $uri $uri/ /index.php?$args; } location ~ \.php$ { include snippets/fastcgi-php.conf; fastcgi_pass unix:/run/php/php7.4-fpm.sock; fastcgi_param SCRIPT_FILENAME $document_root$fastcgi_script_name; } }
In addition to the above configuration:
the value of fastcgi_pass parameter should point to the socket PHP-FPM is listening on, as defined by the value of the listen parameter in the /etc/php/7.4/fpm/pool.d/www.conf pool configuration file. The default is a UNIX socket /run/php/php7.4-fpm.sock.
10- You should consider that NGINX normally routes all requests to the default server, so to enable your new site and other sites you intend to set up on the same server to load well, remove the default server block file.
sudo rm /etc/nginx/sites-enabled/default sudo rm /etc/nginx/sites-available/default
11- Before you can restart the Nginx service to apply the above changes, check the NGINX configuration syntax for any errors
sudo nginx -t sudo systemctl restart nginx
Completing the WordPress Installation via the Web Installer
12- Open a web browser and use your domain name to navigate. Do this to complete the WordPress installation using the web installer.
http://mysite.com/ OR http://SERVER_IP/
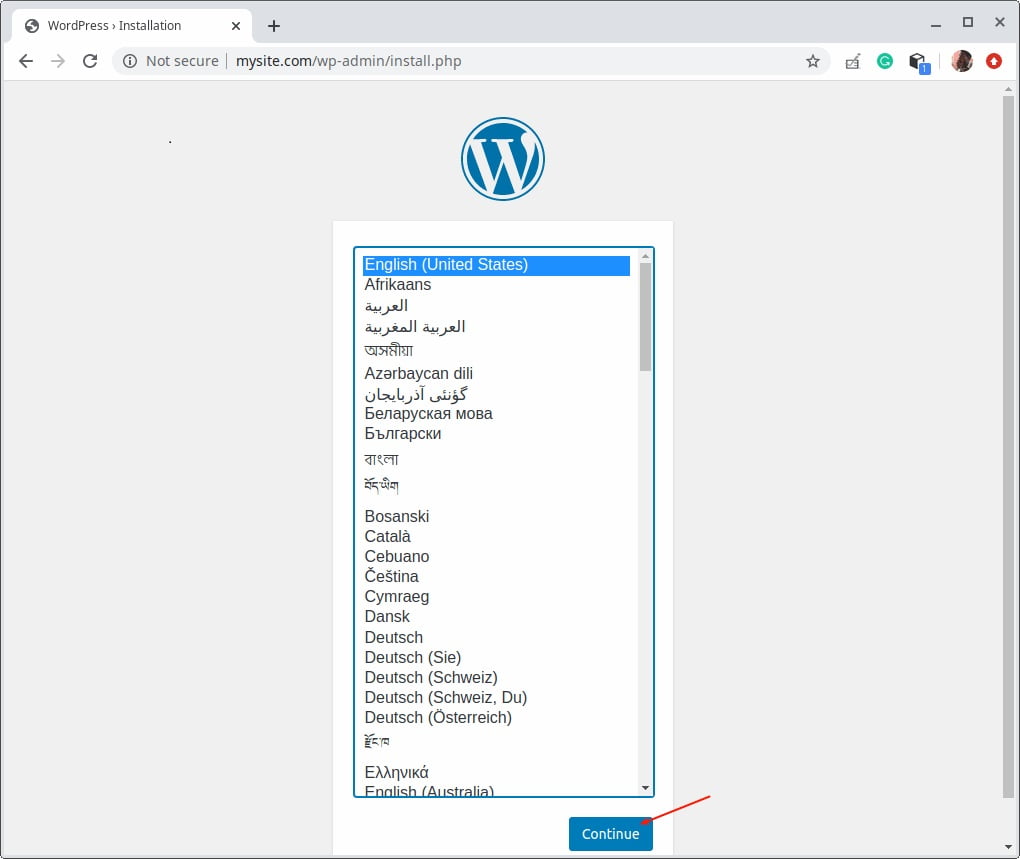
Choose the language you prefer for the installation process and click Continue after the web installer loads.
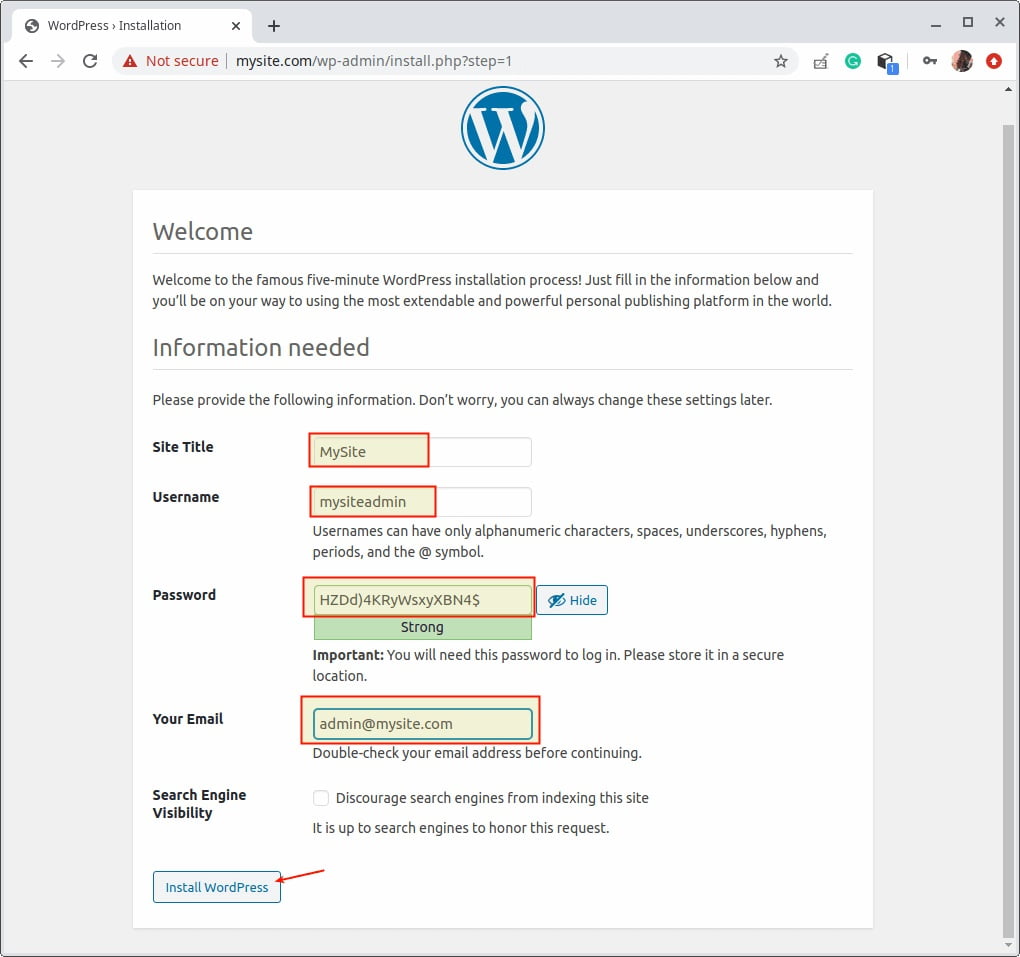
13- As you see below, it is time to fill in the required information about your new website. Then click Install WordPress. Note that you can always edit this information later on.
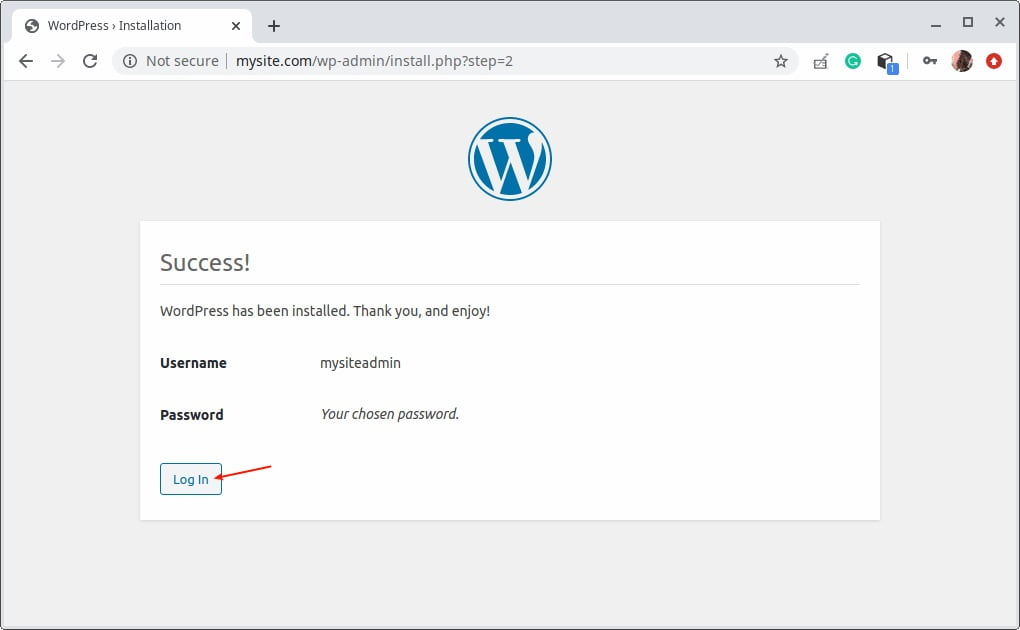
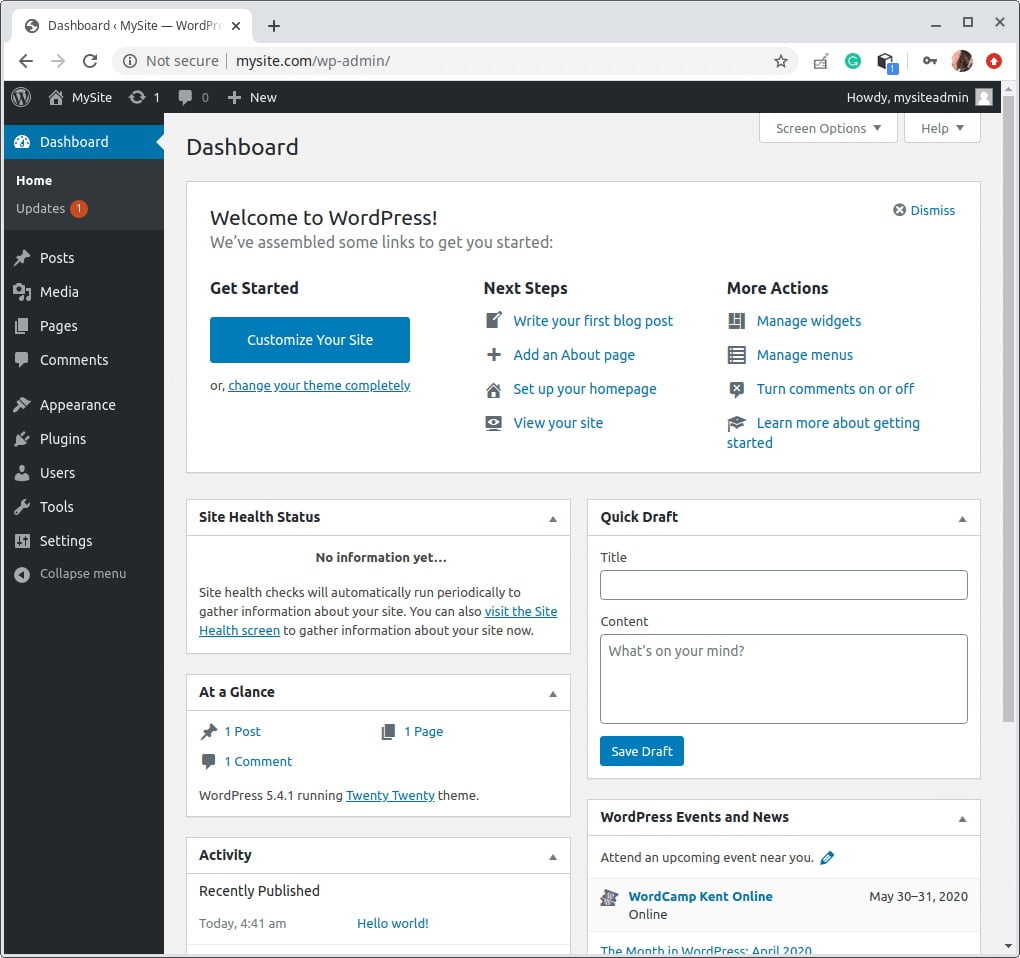
14- Proceed to access the website administrator’s dashboard by clicking on the login button, after WordPress is successfully installed.
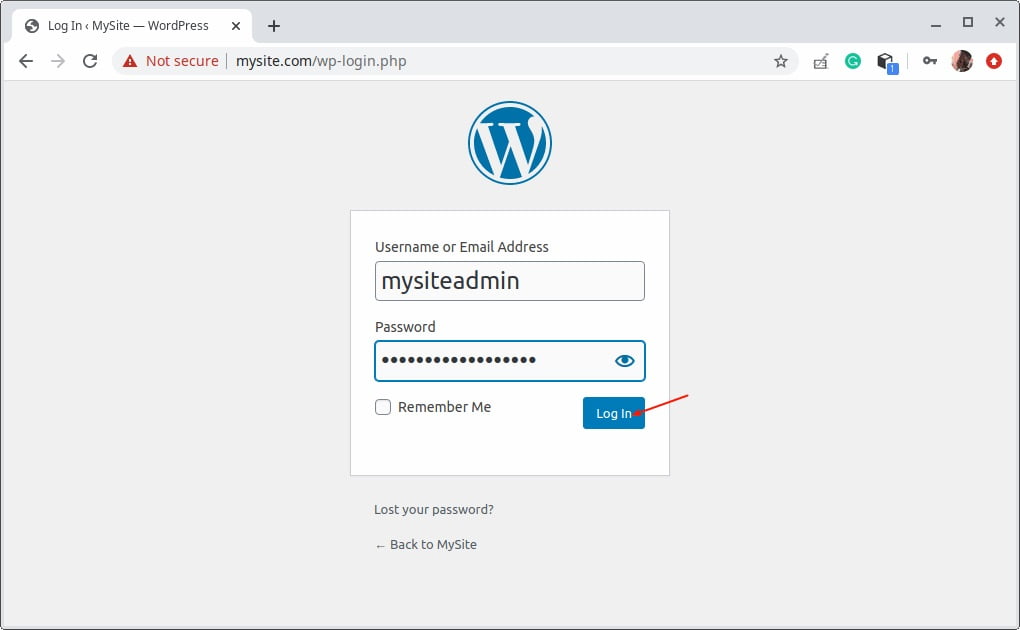
15- To access your site’s admin dashboard, at the website admin’s login page, provide your username and password created above and click login.
That’s it! You have successfully installed the latest version of
WordPress with
NGINX in
Ubuntu 20.04, to start building your new website or blog.
Dear user, we wish this tutorial would be helpful for you, to ask any question or review the conversation of our users about this article, please visit Ask page. Also to improve your knowledge, there are so many useful tutorials ready for Eldernode training.