Zenmap is a network scanning and analysis tool developed by Nmap. The main difference between Zenmap and Nmap tools is its graphical interface, which can be suitable for beginners or to speed up the work process. This means that you can simply scan graphically without using a Linux terminal. Zenmap is also available by default on Kali Linux and other operating systems for hackers and security professionals, and you can use them without installation from the beginning. In this article, we are going to teach you about Tutorial Setup Zenmap on Ubuntu 20.10. You can visit the packages available in Eldernode if you wish to purchase an Ubuntu VPS server.
Table of Contents
How to Setup Zenmap on Ubuntu 20.10 step by step
Zenmap is the official graphical user interface (GUI) for Nmap Security Scanner. This is a free, open-source multi-platform application that uses advanced features for experienced Nmap users to make Nmap easy for beginners. It is interesting to note that frequently used scans can be saved as profiles for easy repetition.
A command creator allows Nmap command-line interactions to be created. On the other hand, scan results can be saved and viewed later. Saved scans can be compared to see the difference. Recent scan results are stored in a searchable database.
In the continuation of this article, join us to get fully acquainted with Zenmap and its installation method on ubuntu 20.10.
What is Zenmap?
Zenmap is a free and open-source graphical user interface for Nmap. This tool is available on many operating systems such as Linux, Windows, Mac OS X, BSD, etc., and makes Nmap easy for beginners. Zenmap does not mean replacing Nmap but making it more useful. Scans that are often used in Zenmap can be saved as profiles for easy repetition. In the next section, we will introduce you to some of the features of Zenmap. Please join us.
Zenmap Features
In this section, we want to mention some of the most important features of Zenmap. These features include:
1. Interactive and graphical results viewing
This feature indicates that Zenmap can display normal Nmap output. You can also set its display to show all ports of one host or all hosts that have a specific service. It should note that this feature provides details about a host or com scan on a convenient screen.
2. Comparison
Using the compare feature, you can use it to show the differences between the two scans graphically. This can help you track new hosts or services that are appearing on their networks or existing hosts that are disappearing.
3. Repeatability
Using the repeatability feature, you can use Zenmap command profiles to perform the same scan more than once.
4. Ease of use
Zenmap is easy to use. Especially useful for people who do not have much experience in Linux shell.
In the next section, join us to teach you to step by step how to Install Zenmap on Ubuntu 20.10.
How to Install Zenmap on Ubuntu Linux
Since Zenmap is no longer available in the official Ubuntu repository, you will need to download and install it manually. To do this, you must first update the system and installed packages using the following command:
sudo apt updateThen you need to install Nmap by running the following command:
sudo apt install nmapIt is important to note that Zenmap uses Python GTK to create a graphical user interface. So before you start installing Zenmap, you need to install Python GTK on your Ubuntu 20.10 system. To do this you can use the following commands:
wget http://archive.ubuntu.com/ubuntu/pool/universe/p/pygtk/python-gtk2_2.24.0-5.1ubuntu2_amd64.debsudo apt install ./python-gtk2_2.24.0-5.1ubuntu2_amd64.debIn the next step, you should download the Zenmap Debian package by visiting the following address:
http://archive.ubuntu.com/ubuntu/pool/universe/n/nmap/You can also do this using the following command:
wget http://archive.ubuntu.com/ubuntu/pool/universe/n/nmap/zenmap_7.60-1ubuntu5_all.debFinally, you can install Zenmap using the following command:
sudo apt install ./zenmap_7.60-1ubuntu5_all.debSetup Zenmap on Ubuntu 20.10
After you were able to successfully install Zenmap in the previous section, we now want to teach you how to run and set it up. Note that to access Zenmap features, Zenmap must be run as a root user. So you have to run the following command in the command terminal:
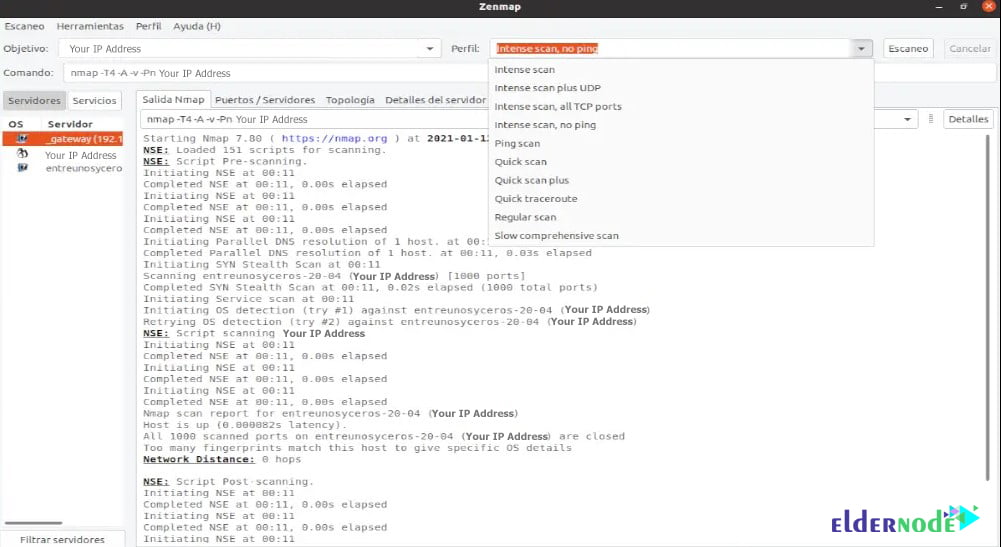
sudo zenmapYou can use Zenmap on Ubuntu 20.10 by running the above command. It should be noted that to scan the network, you only need to type the IP address or hostname.
From the drop-down box, users can choose from a variety of analyzes such as full scan, simple scan, or ping scan to confirm computer availability. As you can see in the image below, in the Nmap output window on the right, you can see the separate steps in Nmap.
Conclusion
Zenmap is a security scanner with a graphical user interface that offers hundreds of different options. This graphical tool allows users to save and compare scans performed. They also have the ability to view network topology maps, viewports running on one or all hosts on a network, and store scans on a searchable database. In this article, we tried to introduce you to Tutorial Setup Zenmap on Ubuntu 20.10.