[Updated on Date: 2021-02-06] It is so ideal to be able to make our safe and secure our internet. When you are connected to an untrusted network, a Virtual Private Network (VPN) allows you to traverse untrusted networks privately and securely as if you were on a private network. The operation is that the traffic emerges from the VPN server and continues its journey to the destination. In this article, you will learn how to set up an OpenVPN server on Debian 10. This setup allows you to secure your wireless logins and transactions, anytime you combine with HTTPS connections. It should also note that you can visit the packages available in Eldernode to purchase a Linux VPS server.
Table of Contents
Tutorial set up an OpenVPN server on Debian 10
To get familiar with a full-featured, open-source Secure Socket Layer (SSL) VPN solution that accommodates a wide range of configurations, the OpenVPN, follow this tutorial to review set up it, and then configure access to it from Windows, macOS, iOS, and/or Android. Follow us in this article to learn How to set up an OpenVPN server on Debian 10.
Prerequisites to set up an OpenVPN Server on Debian
The tutorial may be more useful if you know:
– A non-root user with Sudo privileges.
– To set up, follow our Initial Setup with Debian 10
– A separate machine to serve as your certificate authority (CA).
– generate an SSH keypair for each server, then add the OpenVPN server’s public SSH key to the CA machine’s authorized_keys file.
Follow us in this article to learn How to set up an OpenVPN server on Debian 10.
Set up an OpenVPN server on Debian 10
OpenVPN is the newest and most advanced protocol used for VPN communication. OpenVPN uses the OpenSSL and SSLv3 // TLSv1 libraries for added security and is highly flexible and configurable. The protocol is updated periodically, and the Open Source community is constantly updating and fixing security issues and potential bugs. Follow us in this article to learn how to set up an OpenVPN server on Debian 10 completely and step by step.
Installing OpenVPN and EasyRSA
As the OpenVPN is available in Debian’s default repositories, you can use apt for the installation. To start, update your VPN server’s package index and install OpenVPN.
sudo apt update sudo apt install openvpnAs a TLS/SSL VPN, the Open VPN utilizes certificates in order to encrypt traffic between the server and client, so you can set up your own simple certificate authority (CA). Download the latest version of EasyRSA, which you will use to build your CA public key infrastructure (PKI), from the project’s official GitHub repository.
Why you should build the CA on a standalone server as you read in the prerequisites because when an attacker could infiltrate your server, managing the CA from a standalone machine helps to prevent unauthorized users from accessing your VPN.
Use wget to download the latest version of EasyRSA on both your CA machine and your OpenVPN server to build the CA and PKI infrastructure. You can go to the Releases page on the official EasyRSA GitHub project, download the link (ending in .tgz) and then paste it into the following command:
wget -P ~/ https://github.com/OpenVPN/easy-rsa/releases/download/v3.0.6/EasyRSA-unix-v3.0.6.tgz Then extract the tarball:
cd ~ tar xvf EasyRSA-unix-v3.0.6.tgz How to Configure the EasyRSA Variables and Building the CA
Navigate to the EasyRSA directory on your CA machine
cd ~/EasyRSA-v3.0.6/Make a copy of the file vars.example which is inside this directory.
cp vars.example vars Open this new file using your preferred text editor:
nano vars ~/EasyRSA-v3.0.6/vars. . . #set_var EASYRSA_REQ_COUNTRY "US" #set_var EASYRSA_REQ_PROVINCE "California" #set_var EASYRSA_REQ_CITY "San Francisco" #set_var EASYRSA_REQ_ORG "Copyleft Certificate Co" #set_var EASYRSA_REQ_EMAIL "[email protected]" #set_var EASYRSA_REQ_OU "My Organizational Unit" . . .Uncomment these lines and update the highlighted values to whatever you would prefer, just do not leave them blank:
. . . set_var EASYRSA_REQ_COUNTRY "US" set_var EASYRSA_REQ_PROVINCE "NewYork" set_var EASYRSA_REQ_CITY "New York City" set_var EASYRSA_REQ_ORG "DigitalOcean" set_var EASYRSA_REQ_EMAIL "[email protected]" set_var EASYRSA_REQ_OU "Community" . . .Save and close the file, when you are finished
There is a script called easyrsa in the EasyRSA directory. To initiate the public key infrastructure on the CA server. run this script with the init-pki option
./easyrsa init-pki . . . init-pki complete; you may now create a CA or requests. Your newly created PKI dir is: /home/noodi/EasyRSA-v3.0.6/pkiTo build the CA and create two important files ca.crtandca.key (to make up the public and private sides of an SSL certificate), call the easyrsa script again, following it with the build-ca option.
Also, you can run the build-ca command with the nopass option, if you don’t want to be prompted for a password every time you interact with your CA.
./easyrsa build-ca nopass Then, you will be asked to confirm the common name for your CA:
. . . Common Name (eg: your user, host, or server name) [Easy-RSA CA]: How to Create the Server Certificate, Key, and Encryption Files
Navigate to the EasyRSA directory on your OpenVPN server to start.
cd EasyRSA-v3.0.6/Although you already ran this command on the CA machine, run the easyrsa script with the init-pki option, because it is really necessary to run and CA will have separate PKI directories.
./easyrsa init-pki Here, you can call the easyrsa again, with the gen-req option, as it could be helpful to make it something descriptive. Be sure to use the nopass option, otherwise, will password-protect the requested file which could lead to permissions issues later on:
Note: In case you prefer to choose another name, you need to adjust some of the instructions below. While you are copying the generated files to the /etc/openvpn directory, you will have to substitute the correct names. Then you need to to modify the /etc/openvpn/server.conf file later to point to the correct .crt and .key files.
./easyrsa gen-req server nopassNow, you created a private key for the server and a certificate request file called server.req. Copy the server key to the /etc/openvpn/ directory:
sudo cp ~/EasyRSA-v3.0.6/pki/private/server.key /etc/openvpn/Transfer the server.req file to your CA machine by using a secure method.
scp ~/EasyRSA-v3.0.6/pki/reqs/server.req noodi@your_CA_ip:/tmpNavigate to the EasyRSA directory, on your CA machine
cd EasyRSA-v3.0.6/Again you need to use the easyrsa script to import the server.req file.
./easyrsa import-req /tmp/server.req serverBy running the easyrsa script with the sign-req option and type the common name. Also, you may use the type of client or server, however, remember to use the server request type, when requesting the OpenVPN server’s certificate.
./easyrsa sign-req server serverWhen you are asked to verify that the request comes from a trusted source, type yes then press ENTER to confirm in the output.
You are about to sign the following certificate. Please check over the details shown below for accuracy. Note that this request has not been cryptographically verified. Please be sure it came from a trusted source or that you have verified the request checksum with the sender. Request subject, to be signed as a server certificate for 1080 days: subject= commonName = server Type the word 'yes' to continue, or any other input to abort. Confirm request details: yesAlso, you would be prompted for your password, if you encrypted your CA key and transfer the signed certificate back to your VPN server using a secure method.
scp pki/issued/server.crt noodi@your_server_ip:/tmpTransfer the ca.crt file to your server as well, before logging out of your CA machine
scp pki/ca.crt noodi@your_server_ip:/tmpThen, log back into your OpenVPN server and copy the server.crt and ca.crt files into your/etc/openvpn/ directory:
sudo cp /tmp/{server.crt,ca.crt} /etc/openvpn/Next, navigate to your EasyRSA directory.
cd EasyRSA-v3.0.6/To use during the key exchange, create a strong Diffie-Hellman key as below.
./easyrsa gen-dh And to strengthen the server’s TLS integrity verification capabilities, generate an HMAC signature.
sudo openvpn --genkey --secret ta.keyCopy the two new files to your /etc/openvpn/ directory, after finishing the command.
sudo cp ~/EasyRSA-v3.0.6/ta.key /etc/openvpn/ sudo cp ~/EasyRSA-v3.0.6/pki/dh.pem /etc/openvpn/ How to Generate a Client Certificate and Key Pair
For this guide, we will generate a single client key and certificate pair, but if you have more than one client, you can repeat this process for each one. Do not forget that you should pass a unique name value to the script for every client.
mkdir -p ~/client-configs/keysTo observe a security measure, lockdown the permissions now.
chmod -R 700 ~/client-configs Then, run the easyrsa script with the gen-req and nopass options, along with the common name for the client after you navigated back to the EasyRSA directory
cd ~/EasyRSA-v3.0.6/ ./easyrsa gen-req client1 nopassTo confirm the common name press ENTER and copy the client1.keyfile to the /client-configs/keys/ directory you created earlier:
cp pki/private/client1.key ~/client-configs/keys/Then, by using a secure method, transfer the client1.req file to your CA machine.
scp pki/reqs/client1.req noodi@your_CA_ip:/tmpNavigate to the EasyRSA directory, log into your CA machine, and import the certificate request:
ssh noodi@your_CA_ip cd EasyRSA-v3.0.6/ ./easyrsa import-req /tmp/client1.req client1Make sure to specify the client request type and sign the request as you did for the server in the previous step
./easyrsa sign-req client client1Type the word 'yes' to continue, or any other input to abort. Confirm request details: yesYou would be asked for your password here, as you have encrypted your CA key. Then a client certificate file named client1.crt will be created. Transfer this file back to the server:
scp pki/issued/client1.crt noodi@your_server_ip:/tmpCopy the client certificate to the /client-configs/keys/ directory and SSH back into your OpenVPN server.
cp /tmp/client1.crt ~/client-configs/keys/Now, copy the ca.crtand ta.key files to the /client-configs/keys/ directory.
sudo cp ~/EasyRSA-v3.0.6/ta.key ~/client-configs/keys/ sudo cp /etc/openvpn/ca.crt ~/client-configs/keys/ Follow us in this article to learn How to set up an OpenVPN server on Debian 10.
How to Configure the OpenVPN Service
As both your client and server’s certificates and keys have been generated, let’s begin configuring the OpenVPN service to use these credentials. Copy a sample OpenVPN configuration files into the configuration directory and then extract it in order to use it as a basis for your setup:
sudo cp /usr/share/doc/openvpn/examples/sample-config-files/server.conf.gz /etc/openvpn/sudo gzip -d /etc/openvpn/server.conf.gz Then, open the server configuration file in your preferred text editor:
sudo nano /etc/openvpn/server.conf/etc/openvpn/server.conftls-auth ta.key 0 # This file is secretBy looking for the commented out cipher lines to find the section on cryptographic ciphers. The AES-256-CBC cipher offers a good level of encryption and is well supported. Although this line should already be uncommented, if it isn’t then just remove the “;” preceding it:
/etc/openvpn/server.confcipher AES-256-CBC to select the HMAC message-digest algorithm, add an auth directive, and SHA256 is a good choice.
auth SHA256Now, you need the line containing a dh directive that defines the Diffie-Hellman parameters. The filename for the Diffie-Hellman key may be different than what is listed in the example server configuration file, because of some recent changes made to EasyRSA. Also, you can change the file name listed here by removing the 2048 so it aligns with the key you generated in the previous step:
/etc/openvpn/server.confdh dh.pem At last, find the user and group settings and remove the “;” at the beginning of each to uncomment these lines
/etc/openvpn/server.confuser nobody group nogroupall the changes you made till here to the sample server.conf file up to this point is necessary to help the OpenVPN to function. But The changes outlined below are optional,
The changes you’ve made to the sample server.conf file up to this point is necessary in order for OpenVPN to function. The changes outlined below are optional.
Push DNS changes to redirect all traffic through the VPN
In case, you need to use the VPN to route all of your traffic, try to push the DNS settings to the client computers. Also, you can use the above setting to create a VPN connection between the two machines.
You can use some directives in the server.conf and change them, you want to enable this functionality. After finding the redirect-gateway section, remove the semicolon “;” from the beginning of the redirect-gateway line to uncomment it:
/etc/openvpn/server.confpush "redirect-gateway def1 bypass-dhcp" Now, find the dhcp-option section and remove the “;” from in front of both of the lines to uncomment them:
/etc/openvpn/server.confpush "dhcp-option DNS 208.67.222.222" push "dhcp-option DNS 208.67.220.220" Adjust the port and protocol
While the OpenVPN server uses port 1194 and the UDP protocol to accept client connections by default you can change the port option if you need to use a different port because of restrictive network environments that your clients might be in. But if you are not hosting web content on your OpenVPN server, port 443 is a popular choice since it is usually allowed through firewall rules.
/etc/openvpn/server.confOptional! port 443If the protocol is restricted to that port, change proto from UDP to TCP:
Optional! proto tcpPoint to Non-Default credentials
If you used the default name, “server”, this is already set correctly, but if you selected a different name, modify the cert and key lines that you see to point to the appropriate.crt and .key files.
cert server.crt key server.keyThen, save and close the file.
How to Adjust the server networking configuration
To let the OpenVPN route traffic through the VPN correctly, you need to tweak some aspects of the server’s networking configuration. The IP forwarding is a method for determining where IP traffic should be routed which is essential to the VPN functionality that your server will provide.
You can modify the /etc/sysctl.conf file, to adjust your server’s default IP forwarding setting.
sudo nano /etc/sysctl.conf Also, you can remove the “#” character from the beginning of the line to uncomment this setting while looking for the commented line that sets net.ipv4.ip_forward
/etc/sysctl.confnet.ipv4.ip_forward=1 Now, you can save and close the file.
Use the following command to read the file and adjust the values for the current session.
sudo sysctl -pnet.ipv4.ip_forward = 1Find the public network interface of your machine and then, open the firewall configuration file to add the masquerading rules.
ip route | grep defaultdefault via 203.0.113.1 dev eth0 proto staticWhile you have the interface associated with your default route, you can open the /etc/ufw/before.rules file to add the relevant configuration:
sudo nano /etc/ufw/before.rules/etc/ufw/before.rulesrules.before Rules that should be run before the ufw command line added rules. Custom rules should be added to one of these chains: ufw-before-input ufw-before-output ufw-before-forward START OPENVPN RULES NAT table rules *nat :POSTROUTING ACCEPT [0:0] Allow traffic from OpenVPN client to eth0 (change to the interface you discovered!) -A POSTROUTING -s 10.8.0.0/8 -o eth0 -j MASQUERADE COMMIT END OPENVPN RULES Don't delete these required lines, otherwise there will be errors *filter . . .Note: Do not forget to replace eth0 in the -A POSTROUTING line above with the interface you found
Now, you can save and close the file.
Then, open the /etc/default/ufw file to tell UFW to allow forwarded packets by default.
sudo nano /etc/default/ufw Change the value from DROP to ACCEPT in the DEFAULT_FORWARD_POLICY
To allow traffic to OpenVPN, adjust the firewall itself. In case you have not changed the port and protocol in the/etc/openvpn/server.conf file, open up UDP traffic to port1194. If you modified the port and/or protocol, substitute the values you selected here.
Add the SSH port when completing the prerequisite tutorial, if you did not yet.
sudo ufw allow 1194/udp sudo ufw allow OpenSSHWhen you added the rules, disable and re-enable UFW to restart it and load the changes from all of the files you’ve modified.
sudo ufw disable sudo ufw enableHow to Start and Enable the OpenVPN Service
In this step, you are ready to start the OpenVPN service on your server. So you need to start the OpenVPN server by specifying your configuration file name as an instance variable after the systemd unit file name. As the configuration file for your server is called /etc/openvpn/server.conf, add @server to end of your unit file when calling it:
sudo systemctl start openvpn@serverTo double-check if the service has started successfully or not:
sudo systemctl status openvpn@server ● [email protected] - OpenVPN connection to server Loaded: loaded (/lib/systemd/system/[email protected]; disabled; vendor preset: enabled) Active: active (running) since Wed 2019-07-17 03:39:24 UTC; 29s ago Docs: man:openvpn(8) https://community.openvpn.net/openvpn/wiki/Openvpn24ManPage https://community.openvpn.net/openvpn/wiki/HOWTO Main PID: 3371 (openvpn) Status: "Initialization Sequence Completed" Tasks: 1 (limit: 3587) Memory: 1.2M CGroup: /system.slice/system-openvpn.slice/[email protected] └─3371 /usr/sbin/openvpn --daemon ovpn-server --status /run/openvpn/server.status 10 --cd /etc/openvpn --config /etc/openvpn/server.conf --writepid /run/openvpn/To check if the OpenVPN tun0 interface is available or not, run the following command.
ip addr show tun03: tun0: <POINTOPOINT,MULTICAST,NOARP,UP,LOWER_UP> mtu 1500 qdisc pfifo_fast state UNKNOWN group default qlen 100 link/none inet 10.8.0.1 peer 10.8.0.2/32 scope global tun0 valid_lft forever preferred_lft forever inet6 fe80::dd60:3a78:b0ca:1659/64 scope link stable-privacy valid_lft forever preferred_lft foreverEnable the service when it is started to be able to start automatically at boot
sudo systemctl enable openvpn@server How to Creating the Client Configuration Infrastructure
Since every client must have its own config and each must align with the settings outlined in the server’s configuration file, create configuration files for OpenVPN clients can be somewhat involved. You can process for building a client configuration infrastructure that you can use to generate config files on-the-fly and stop writing a single configuration file that can only be used on one client. To do that you need to create a “base” configuration file then build a script that will allow you to generate unique client config files, certificates, and keys as needed. Choose the location you want to store client configuration files within the client-configs the directory you created earlier, and create a new directory.
mkdir -p ~/client-configs/filesTo use as your base configuration, copy an example client configuration file into the client-configs directory.
cp /usr/share/doc/openvpn/examples/sample-config-files/client.conf ~/client-configs/base.conf Then, open this new file in your text editor:
nano ~/client-configs/base.confChange 1194 to the port you selected If you want to change the port that the OpenVPN server is listening on.
~/client-configs/base.conf. . . The hostname/IP and port of the server. You can have multiple remote entries to load balance between the servers. remote your_server_ip 1194 . . .~/client-configs/base.confproto udp~/client-configs/base.confDowngrade privileges after initialization (non-Windows only) user nobody group nogroupTry to find directives that set the ca, cert, and key.
~/client-configs/base.confSSL/TLS parms. See the server config file for more description. It's best to use a separate .crt/.key file pair for each client. A single ca file can be used for all clients. ca ca.crt cert client.crt key client.key~/client-configs/base.confif a tls-auth key is used on the server then every client must also have the key. tls-auth ta.key 1~/client-configs/base.confcipher AES-256-CBC auth SHA256~/client-configs/base.confkey-direction 1 ~/client-configs/base.confscript-security 2 up /etc/openvpn/update-resolv-conf down /etc/openvpn/update-resolv-confNow, create a simple script that will compile your base configuration with the relevant certificate, key, and encryption files and then place the generated configuration in the ~/client-configs/files directory.
Open a new file called make_config.sh within the ~/client-configs directory:
nano ~/client-configs/make_config.sh!/bin/bash First argument: Client identifier KEY_DIR=/home/noodi/client-configs/keys OUTPUT_DIR=/home/noodi/client-configs/files BASE_CONFIG=/home/noodi/client-configs/base.conf cat ${BASE_CONFIG} \ <(echo -e '<ca>') \ ${KEY_DIR}/ca.crt \ <(echo -e '</ca>\n<cert>') \ ${KEY_DIR}/${1}.crt \ <(echo -e '</cert>\n<key>') \ ${KEY_DIR}/${1}.key \ <(echo -e '</key>\n<tls-auth>') \ ${KEY_DIR}/ta.key \ <(echo -e '</tls-auth>') \ > ${OUTPUT_DIR}/${1}.ovpnNote: Make sure to change “noodi” to that of your server’s non-root user account.
You can save and close the file now.
And use the below command to mark this file as executable.
chmod 700 ~/client-configs/make_config.shYou should generate new keys and certificates for it before you can run this script and generate its configuration file when you add a new client.
How to Generate client configure on OpenVPN
You saw how you created a client certificate and key named client1.crt and client1.key, respectively, in Step 4. Move into your ~/client-configs directory and running the script you made at the end of the previous step, to generate a config file for these credentials.
cd ~/client-configs sudo ./make_config.sh client1To create a file named client1.ovpn in your ~/client-configs/files directory:
ls ~/client-configs/filesclient1.ovpnYou can transfer this file to the device you plan to use as the client. (your local computer or a mobile device)
A secure method you can use to transport your client’s VPN authentication files over an encrypted connection is SFTP (SSH file transfer protocol) or SCP (Secure Copy) on the backend.
local $ sftp noodi@your_server_ip:client-configs/files/client1.ovpn ~/How to Install the Client Configuration
At this point, you see how to install a client VPN profile on Windows, macOS, Linux, iOS, and Android, but none of them are dependent on one another. As you see, in this guide the OpenVPN connection has the name you called the .ovpn file. So the connection is named client1.ovpn, aligning with the first client file you generated.
How to Install Client VPN profile on Windows
Download the OpenVPN client application for Windows from OpenVPN’s Downloads page. Choose the appropriate installer version for your version of Windows.
Note: To install the OpenVPN, you need to have administrative privileges.
Copy the .ovpn file, when you installed the OpenVPN.
C:\Program Files\OpenVPN\configAfter launching OpenVPN, it will automatically see the profile and make it available.
Anytime you used OpenVPN you should run it as an administrator, even by administrative accounts. You can do this from an administrative account and it is not necessary to right-click and select Run as administrator every time you use the VPN. Although the standard users will need to enter the administrator’s password to use OpenVPN, also they must have elevated privileges and admin rights for their OpenVPN application to be able to connect to the server. And then right-click on the OpenVPN app on the taskbar and click to connect.
After the OpenVPN windows appear, you should type your username and password for authentication.
How to Install Client VPN profile on MacOS
Tunnelblick is a free, open-source OpenVPN client for macOS. Download the latest disk image from the Tunnelblick Downloads page. and then double-click the downloaded .dmg file and follow the prompts to install.
When Tunnelblick asks you about having any configuration files, Answer I have configuration files and let Tunnelblick finish. To let it install the client profile, open a Finder window and double-click client1.ovpn. Please be aware that administrative privileges are required.
Connecting
Double-click the Tunnelblick icon in the Applications folder to launch Tunnelblick. To control the connections, use the Tunnelblick icon in the menu bar at the top right of the screen and click on this icon and then the Connect client1 menu item to initiate the VPN connection.
How to Install Client VPN profile on Linux Server
You can use a variety of tools. Your desktop environment or window manager might also include connection utilities. But the most universal way of connecting is to just use the OpenVPN software.
You can install on Debian, just as you did on the server.
client$ sudo apt update client$ sudo apt install openvpnAnd you need to enable the EPEL repositories and then install on CentOS.
client$ sudo yum install epel-release client$ sudo yum install openvpnHow to configure Client VPN profile on Linux
To check if your distribution includes an /etc/openvpn/update-resolv-conf script:
client$ ls /etc/openvpn update-resolv-confTo edit the OpenVPN client configuration file you transferred:
nano client1.ovpn Uncomment the three lines you added to adjust the DNS settings if you found an update-resolv-conf file.
script-security 2 up /etc/openvpn/update-resolv-conf down /etc/openvpn/update-resolv-confWhile you use CentOS, to match the distribution’s available groups, you need to change the group directive from nogroup to nobody
group nobody You can save and close the file.
To connect to the VPN, point the OpenVPN command to the client configuration file:
sudo openvpn --config client1.ovpnHow to Install Client VPN profile on iOS
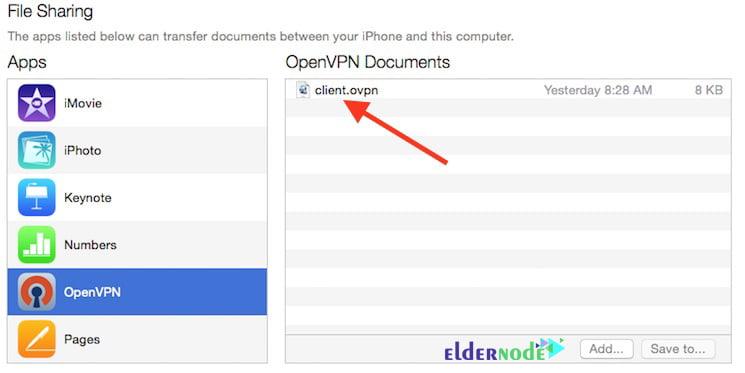
After installing Open VPN connect, the official iOS OpenVPN client application from the iTunes App Store, to transfer your iOS client configuration onto the device, connect it directly to a computer.
Tap the green plus sign to import, after receiving a notification that says a new profile is ready to import.
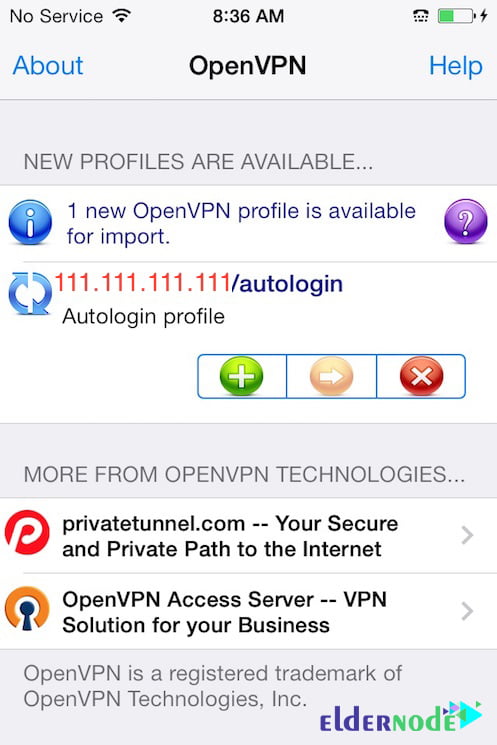
Note: If you try to use the PN switch under Settings to connect to the VPN, you will receive a notice to only connect using the OpenVPN app.
How to Install Client VPN profile on Android
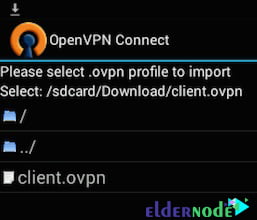
After installing Android OpenVPN connect the official Android OpenVPN client application from the Google Play Store, start the OpenVPN app, and tap the menu to import the profile.

Then navigate to the location of the saved profile.
How to test the VPN connection
Open a browser and go to DNSLeakTest, without having a VPN connection enabled. You can click on Extended Test to see which DNS servers you are using to check your DNS settings through the same website. Then, connect the OpenVPN client to your Droplet’s VPN and refresh the browser to see a completely different IP address. To confirm you are now using the DNS resolvers pushed by your VPN, check with DNSLeakTest’s Extended Test again.
How to Revoke client certificates
Sometimes, you may need to revoke a client certificate to prevent further access to the OpenVPN server. So, navigate to the EasyRSA directory on your CA machine:
cd EasyRSA-v3.0.6/ Then, run the easyrsa script with the revoke option
./easyrsa revoke client2Output
Please confirm you wish to revoke the certificate with the following subject: subject= commonName = client2 Type the word 'yes' to continue, or any other input to abort. Continue with revocation: yesThe CA willfully revoke the client’s certificate, however as the OpenVPN server currently has no way to check whether any clients’ certificates have been revoked, and the client will still have access to the VPN, you need to create a certificate revocation list (CRL) on your CA machine to correct it.
./easyrsa gen-crl Now, you have a file called crl.pem.
scp ~/EasyRSA-v3.0.6/pki/crl.pem noodi@your_server_ip:/tmpOn your OpenVPN server, copy this file into your/etc/openvpn/ directory:
sudo cp /tmp/crl.pem /etc/openvpn Now, open the OpenVPN server configuration file:
sudo nano /etc/openvpn/server.conf Then, add the crl-verify option to the end of the file to instruct the OpenVPN server to check the certificate revocation list that we’ve created each time a connection attempt is made.
/etc/openvpn/server.confcrl-verify crl.pem Now, you can save and close the file.
To implement the certificate revocation, restart OpenVPN.
sudo systemctl restart openvpn@server At this point, the client should no longer be able to successfully connect to the server using the old credential. But you can revoke any probably additional clients in this way:
1- Revoke the certificate with the ./easyrsa revoke client_name command
2- Generate a new CRL
3- Transfer the new crl.pem file to your OpenVPN server and copy it to the /etc/openvpn directory to overwrite the old list.
4- Restart the OpenVPN service.
Conclusion
OpenVPN is open-source software for implementing virtual private networking techniques to establish secure point-to-point or site-to-site communications. One of the most important advantages of OpenVPN is that it is compatible with a variety of operating systems such as Mac, Linux, BSDs, and more. In this article, we tried to learn How to set up an OpenVPN server on Debian 10. You are now securely traversing the internet protecting your identity, location, and traffic from snoopers and censors. It should note that if you wish, you can refer to the article How to Setup OpenVPN On Windows Server 2019.


![TOP 9 Download Managers for Linux Server [2022]](https://blog.eldernode.com/wp-content/uploads/2022/09/TOP-9-Download-Managers-for-Linux-Server-2022-300x164.webp)
