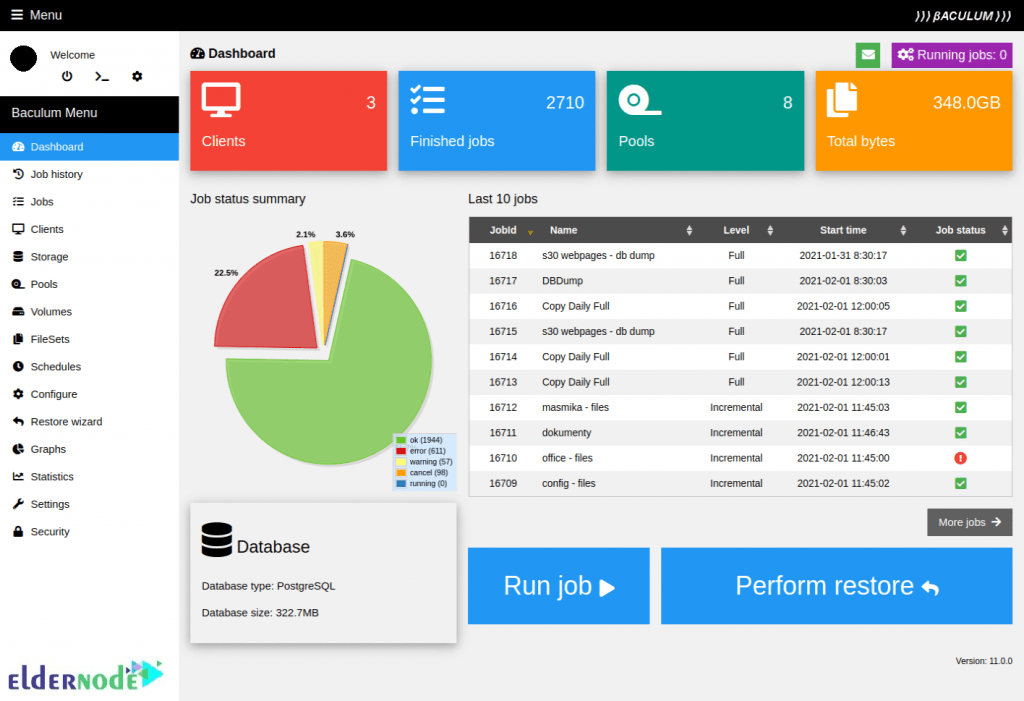
As an administrator, you need a program to manage backup, recovery, and verification of computer data across a network of computers of different kinds. Bacula is powerful, easy to use, and efficient. It can also run entirely upon a single computer and can backup to various types of media, including tape and disk. Using Bacula allows you to find and recover lost or damaged files. Since Bacula has a modular design, it is scalable from small single computer systems to systems consisting of hundreds of computers located over a large network. This article presents Introducing And Install Bacula On Ubuntu 20.04. If you are preparing to purchase a fully managed VPS, count on our technical team in Eldernode to buy your own Ubuntu VPS.
Table of Contents
Introducing Bacula on Ubuntu Linux
previously, you have read about how to make a backup and its tools on the Eldernode blog. But first, let us explain that Bacula is not a complete disaster recovery system itself. It is a backup, restore, and verification program that is able to be a key part of one if you plan carefully and follow the instructions. Bacula provides many features. So, if you are using tar, dump, or bru to backup your computer data and you need a more flexible network solution or catalog services, Bacula is an ideal choice. You should be an expert in a sophisticated backup package because Bacula is much more difficult to set up and use than tar or dump.
Bacula has been compiled and run on OpenSuSE Linux, FreeBSD, and Solaris systems. Bacula supports Linux, Windows, and macOS backup clients. It consists of several components including, Bacula directory, Bacula, console, Bacula storage, Bacula file, Bacula monitor, and Bacula catalog. There are three versions of the Console: Text-based command-line version, Gnome-based GTK+ Graphical User Interface (GUI) interface, and wxWidgets GUI interface. The components manage specific jobs. These services and applications can be run on multiple servers and clients, or they can install on one machine if backing up a single disk or volume.

Install Bacula Backup Server On Ubuntu 20.04 | Ubuntu 18.04
It seems that you know Bacula as the best networkable Linux backup solution. So, let’s go through the steps of this guide and review the process of Bacula installation on Ubuntu 20.04.
Prerequisites to Install Bacula On Ubuntu 20.04
To let this tutorial work better, please consider the below Prerequisites:
_ A non-root user with Sudo privileges.
_ To set up, follow our Initial server setup on Ubuntu 20.04.
_ At least 2 GB RAM.
Since Bacula does not install a database for you if you are using MySQL or PostgreSQL as your database try to have the services available.
How to Install and Configure Bacula on Ubuntu Linux
Join us with this guide to learn how to install Bacula on Ubuntu 20.04. As usual, let’s start with updating your system. So, use the following command and update your system to the latest stable version:
apt-get update -yThe Bacula package is available in Ubuntu 20.04 by default. To install it just run a simple command and go on:
apt-get install bacula -yYou will now be prompted for Mail Server, System mail name, Configure database for bacula-directory-pgsql, and Configure a password for the Bacula PostgreSQL database.
Select your desired mail server, provide your mail name, and click on the OK button. Then, you will be asked to configure a database for bacula. Select the host of the PostgreSQL server and select localhost. Finally, you will be asked to provide a PostgreSQL password
Note: Once you completed them, you will get your prompt back and can continue on with the configuration.
You need to pass a required step before configuring Bacula. You should create a directory to store the backup files. So, type:
mkdir /backupNow, to change the ownership of the bacula directory to bacula user and group, run the command below:
chown -R bacula:bacula /backupAt this point, edit the bacula storage default configuration file and define the device and location of the storage:
nano /etc/bacula/bacula-sd.confNext, remove or comment out other “Device {” and “Autochanger {” section and add the following lines:
Device { Name = Local-device Media Type = File Archive Device = /backup LabelMedia = yes; # lets Bacula label unlabeled media Random Access = Yes; AutomaticMount = yes; # when device opened, read it RemovableMedia = no; AlwaysOpen = no; Maximum Concurrent Jobs = 5 }Now, you can save and close the file. Use the command below to restart the Bacula storage service:
systemctl restart bacula-sd.serviceAlso, you can verify the status of the Bacula storage:
systemctl status bacula-sdThe below output should be displayed:

How to Configure Bacula Director on Ubuntu 20.04
In this section, you can edit the Bacula director configuration file and provide your storage location. Run the following command to do this:
nano /etc/bacula/bacula-dir.confAdd the following lines, including, Device name, Storage name, password, Job, etc:
Storage { Name = ubuntu2004-sd # Must be equal to the "Name" parameter of the "Storage" section in the /etc/bacula/bacula-sd.conf file Address = 127.0.0.1 Password = "aFEH-0a3QycsbYQVcoy_VoUMhAHJQ00CD" # Password must match the password in the /etc/bacula/bacula-sd.conf Device = Local-device Media Type = File } FileSet { Name = "Local-file" Include { Options { signature = MD5 } File = /etc } } Schedule { Name = "LocalDaily" Run = Full daily at 06:00 } Job { Name = "LocalBackup" JobDefs = "DefaultJob" Enabled = yes Level = Full FileSet = "Local-file" Schedule = "LocalDaily" Storage = ubuntu2004-sd Write Bootstrap = "/var/lib/bacula/LocalhostBackup.bsr" }Again, you can save and close the file at this point. Restart the Bacula director service to apply the changes:
systemctl restart bacula-dirUse the following command to verify the status of the Bacula director service
systemctl status bacula-dirThe below output should be displayed:

How to Verify Backup Job on Ubuntu 20.04 using Bacula
Run the command below and use the Bacula Console to run your first backup job:
bconsoleWhen you connect, you will see the following output:

Now, you can use the following command and start the backup job:
*runNext, you will be asked to select the backup job as shown below:

To view the following output type 2 to select the LocalBackup which you have defined in the configuration file and hit Enter:

The Backup job is starting now. Run the following command to check the status of the backup job:
*statusThen, you will be asked to select the status of the following components:

To see the following output, type 1 and hit Enter to check the status of the Director:

Again, check the status of Bacula storage by running the command below:
*statusThe below output should display:

At this point, you can exit from the Bacula console. So, run:
*exitThen, use the command below to verify the backup directory:
ls /backup/And finally, you can see that Vol-0001 backup is made:
Vol-0001Conclusion
In this article, the Bacula was introduced to you and you learned How To Install Bacula on Ubuntu 20.04. From now on you are ready to secure your client system by installing the Bacula client on the remote computer. Tell your friends on Eldernode community if you are using this program or even if you have found an alternative.


