HAProxy is software by which you will be able to create a powerful load balancer. HAProxy stands for High Availability Proxy. This software is one of the most powerful, best, and most professional software in the field of load balancing. With this system, you will be able to distribute your visitors between different servers. This will increase your uptime. Also, not all the pressure will be on one server and it will be spread between several servers. This article is about Introducing and Configuring HAProxy Stats. Note that if you want to buy a VPS server, you can see the packages available in Eldernode.
Table of Contents
Introducing HAProxy Stats [Complete]
HAproxy is one of the most popular load balancing software. It should be noted that HAproxy is used in many high load environments such as GitHub, Imgur, Instagram, and Twitter. In the next section, we will try to provide you with a definition of HAProxy Stats. After getting acquainted with the definition of HAProxy Stats, in the next step, we will mention some of the features of HAProxy Stats. Then we are going to explain how to install HAProxy on Ubuntu/CentOS step by step and in the final part we will teach you How to Configure HAProxy Stats. Please accompany us in the continuation of this article.
What is HAProxy Stats?
HAProxy is open-source software that is commonly using as a load balancer and proxy for web services. This tool can even be used to balance TCP traffic. Load balancing is the improvement of the load distribution between multiple sources (such as network, processor, disk, etc.). What is the purpose of this work? Improve resource utilization, increase throughput, reduce response time, and prevent overload on a resource.
The HAProxy server is not physically, but logically, in front of the web servers, and user requests are first sent to this server. This server then adjusts the load of the web servers according to the algorithms defined for it.
HAProxy Stats Features
HAProxy will give you great features. For example, with this software, you will be able to redirect users to the second/third server if one of your servers crashes and is down. This will reduce your downtime and prevent pressure on the server. With HAProxy you will also be able to distribute visitors according to the power of each server between them.
To show why it performs so well, HAProxy lists a number of architectural features, including Event-Driven, Zero-copy forwarding, O (1) event checker, and more.
How to Install HAProxy on Ubuntu/CentOS
In this section, we are going to teach you to step by step how to install HAProxy on Ubuntu/CentOS. Based on this, in the first step, we will teach you how to install HAProxy on Ubuntu and then on CentOS. Please join us.
Install HAProxy on Ubuntu
At the beginning of this section, we are going to teach you how to install HAProxy on Ubuntu. In the first step, you can enter the following command to know what version number is offered through official channels:
sudo apt show haproxyThen to install HAProxy from an external repository, you must add the new repository with the following command. After typing the following command, press Enter to confirm the addition of the new PPA:
sudo add-apt-repository ppa:vbernat/haproxy-1.7The next step is to update your list of resources using the following command:
sudo apt updateFinally, you can install HAProxy on the Ubuntu system by running the following command:
sudo apt install -y haproxyInstall HAProxy on CentOS 8
Here’s how to install HAProxy on CentOS 8. First, you need to run the following command to find out the latest version of HAProxy:
sudo yum info haproxyThen you need to check if you have the prerequisites to download and edit the program. To do this, use the following command:
sudo yum install gcc pcre-devel tar make -yIn the next step, you must download the source code using the following command:
wget http://www.haproxy.org/download/2.0/src/haproxy-2.0.7.tar.gz -O ~/haproxy.tar.gzNote: See the HAProxy download page for the latest version of HAProxy.
Now you need to extract the file by executing the following command:
tar xzvf ~/haproxy.tar.gz -C ~/After successfully extracting the file, you must now enter the extracted source list by the following command:
cd ~/haproxy-2.0.7Note that you must compile the program for your system. So to do this you must use the following command:
make TARGET=linux-glibcFinally, you can install HAProxy using the following command:
sudo make installHow to Configure HAProxy Stats
After you have successfully completed the HAProxy installation steps in the previous step, now it is time to configure it. You can view HAProxy statistics in your web browser. HAProxy Stats provides a lot of information about data transfer, total connectivity, server status, and so on. You can easily configure it by making a few changes to the HAProxy settings using the following steps.
In the first step, you need to enable HAProxy Stats. Note that you can enable statistics in HAProxy. To do this, you need to edit your HAProxy configuration file. So you have to add the following commands after the default section:
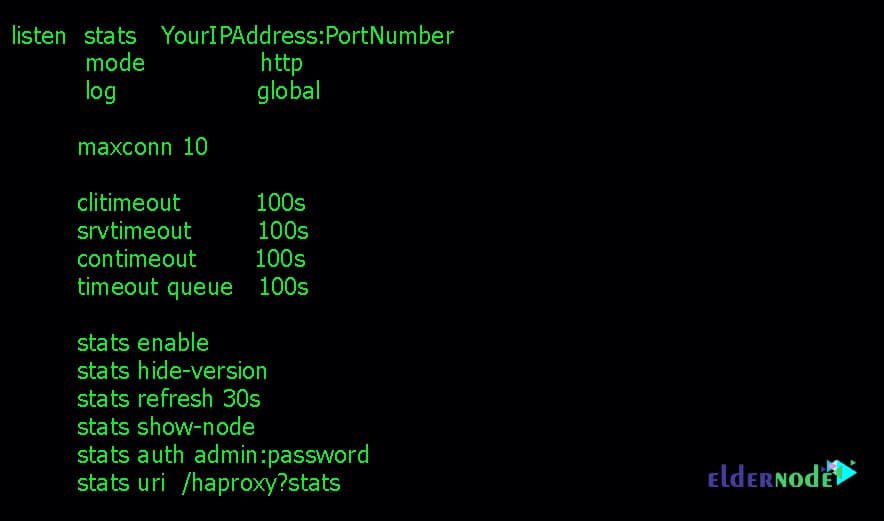
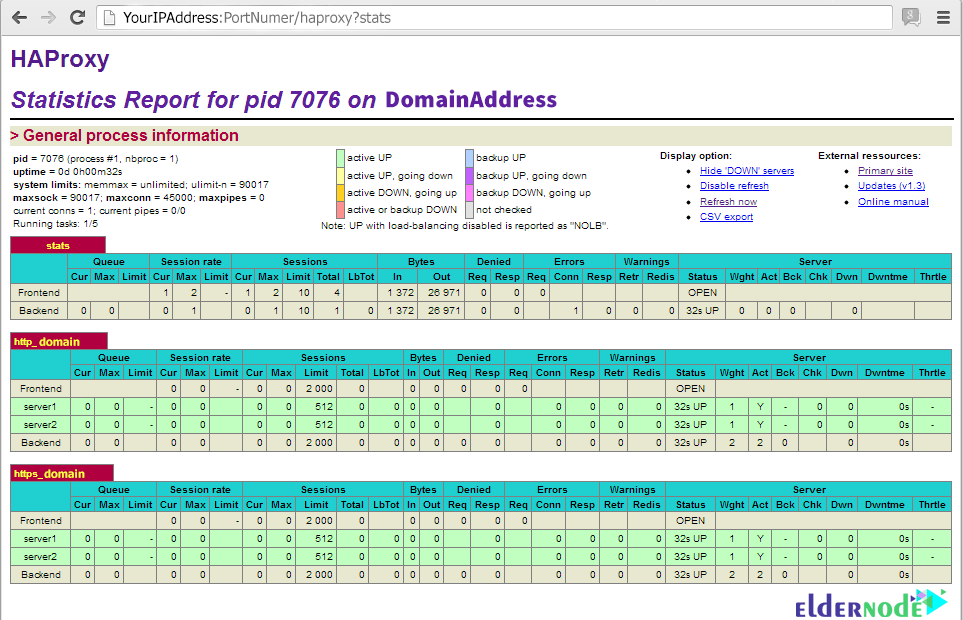
You can easily access HAProxy statistics in the next step using the following URL. To do this, use the IP address of your server followed by the statistics URI in the above configuration. As you can see in the following commands, you can use the configured login information with statistics in the configuration file:
URL: http://YourIPAddress:PortNumber/haproxy?statsLogin user: adminLogin password: passwordThen you can see the statistics as shown below:
Note that if you want to change the login details of HAProxy stats, you can edit your configuration file. Update the value of “stats auth” as in the following command. Then you need to save the configuration file and exit it. You will need to restart the system to apply the changes you have made.
stats auth username:passwordFinally, you can edit the configuration file to change the URL of HAProxy statistics and update it using the following commands:
stats uri /ha-statsor
stats uri /statsYou will need to save the file again and restart the system to apply the changes.
Now, after completing the above steps correctly, you can access the URL using the following addresses:
http://YourDomainAddress:PortNumber/ha-statsor
http://YourDomainAddress:PortNumber/statsConclusion
HAProxy is one of the free and very powerful services in the field of Load Balancing. This service is using to increase the performance and availability of web servers. This service can also be launched on Linux, Solaris, and FreeBSD platforms. This free and very small service has a very high performance and is also used in Enterprise environments. In this article, we tried to teach about Introducing and Configure HAProxy Stats.