As an administrator, you may need a tool to be able to monitor network bandwidth and count the transmit and receive on the network device and then check the data that is kept in its database. VnStat is a command-line network monitoring utility. In this way, you can check the performance of your server while you are monitoring it. In this article, you will learn How To Install vnStat On Debian 10. To start this tutorial, you need to have a Cloud Server running Debian 10. So, order your preferred package on Eldernode to buy your own Linux VPS.
Table of Contents
Tutorial Install vnStat On Debian 10 step by step
vnStat is a network traffic monitor for Linux. It is an open-source and lightweight utility that keeps a log of network traffic for the selected interfaces and uses the network interface statistics provided by the kernel as an information source. You can use vnStat to collect persistent statistics through system reboots, and provide a usage summary of 5 minutes, hourly, daily, monthly, weekly, yearly intervals, as well as displaying the top days of usage in its history. You can also use vnStat without root privileges and check the traffic statistics stored in a database. It is also presented per network interfaces and all of them have their own databases.
Install vnStat On Debian 10 and Check vnStat Features
Let’s see what are the features of vnStat. Here is a list of them:
– Monitoring multiple network interface at the same time
– Once the system reboots, Statistics remain available
– Multiple output options
– Use JSON for output
– Sort the data by hour, day, month, week or get the top 10 days
– The interface bandwidth will automatically detect
– Generate png graphic of the output
– Customizable options for content positioning and image background color to vnStat.cgi.
– Configure “Months” to follow up with different billing cycles you may have
– Very light – consumes a really small portion of your system resources
– Low CPU usage no matter how much traffic you generate
– Quick and simple to install and get running
– Data retention duration is fully user-configurable on the fly
– Same low CPU usage regardless of traffic
– Can use without root permissions
– The online color configuration editor
Install vnStat On Debian 10
You may now interest in using vnStat and use its features. So, let’s go through the steps of this guide and review the process of vnStat installation on Debian 10.
Step 1:
As you learned in the previous article for installing vnStat on Ubuntu, vnStat is available from Debian/Ubuntu official repositories. To install its packages, you just need to run the following command:
sudo apt-get install vnstatStep 2:
The vnStatd daemon will be automatically started after it’s installed. It will auto-start when Debian is booted up. To check this out with systemctl and start the service, type:
sudo systemctl start vnstat.serviceStep 3:
Now, use the command below to make sure vnStat starts on boot automatically:
sudo systemctl enable vnstat.serviceHow to use vnStat on Debian Linux
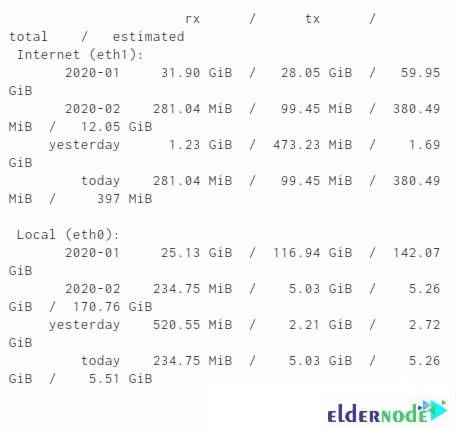
From now on, capturing data and statistics for traffic on the interface of your server will be started by vnStat. Also, you are waiting to receive the data report. But vnStat needs to build up some data before it can display it. Do not worry! just run the following command to view the standard report for vnStat:
vnstatThe report could be as shown below:
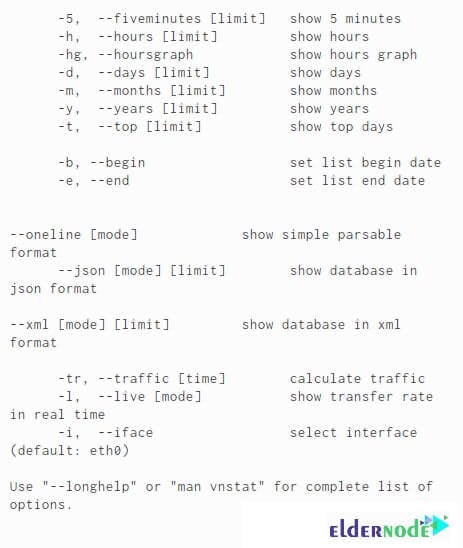
Next, you can use flags if you wish to get the more specific output of the data. If you append the flags to the vnStat command you can have the specific outputs as is explained below:
How to create Database for Network Interface
As we mentioned at the beginning of this article, after installing vnStat on Debian 10 a database will be automatically initialized for each network interface. /var/lib/vnstat is the database directory for vnStat:
ls /var/lib/vnstat/ eth0 eth1Use the following command to create a new database. Remember to replace eth0 with the interface that should monitor:
vnstat --create -i eth0How to remove the Database for an interface
You can also remove the database you have created. Again, do not forget to replace eth0 with the interface that you don’t want to monitor. So, run the following command to remove the database:
vnstat --delete -i eth0The daemon vnStatd is responsible for data retrieval and storage whereas the vnStat command provides an interface for querying the traffic information stored in network interface-specific databases.
Conclusion
In this article, you learned How To Install vnStat On Debian 10. If you have passed the steps carefully, you have now a working installation of vnStat. Start using vnStat and monitor your server’s traffic over multiple interfaces. If you are interested in learning more, find our related article on Monitor Network Traffic with vnStat on Centos 7.