Install SMTP server on Windows Server 2022 is one of the ways that can be used to send, receive, and transfer emails. Because the Simple Mail Transfer Protocol server takes email clients in programs like Outlook, Gmail, and Thunderbird and directs all this information to the main server as an intermediary. In this topic, we also want to examine how to install an SMTP server in Windows Server 2022, so we recommend that you stay with Eldernode!
Table of Contents
Prerequisites for installing SMTP server on Windows Server
1- You must have a Windows VPS Server operating system.
2- You will need a user account with administrator privileges.
The best way to install an SMTP server in Windows Server 2022!
To start the installation, you must first use the Server Management Console and perform the 7 steps listed below:
Step 1: Add Roles and Features in the Server Manager Dashboard
In the first step of install SMTP server on Windows Server, you must first log in to the Server Management Console and select the dashboard on the left side, as shown in the image.
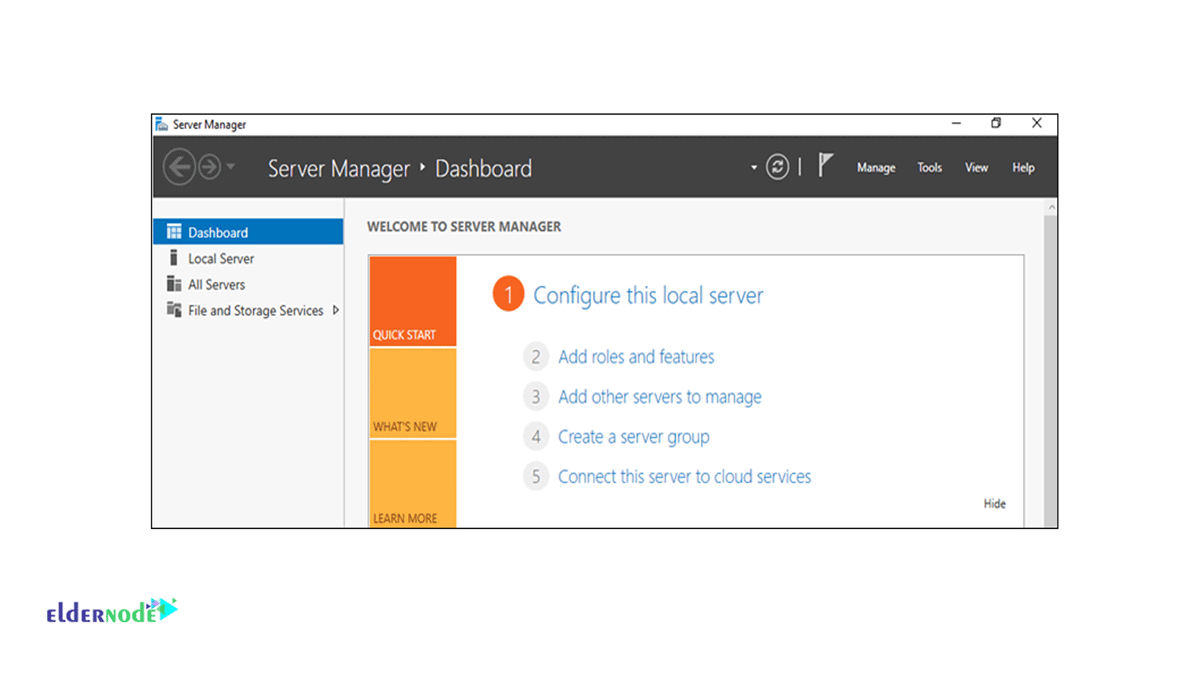
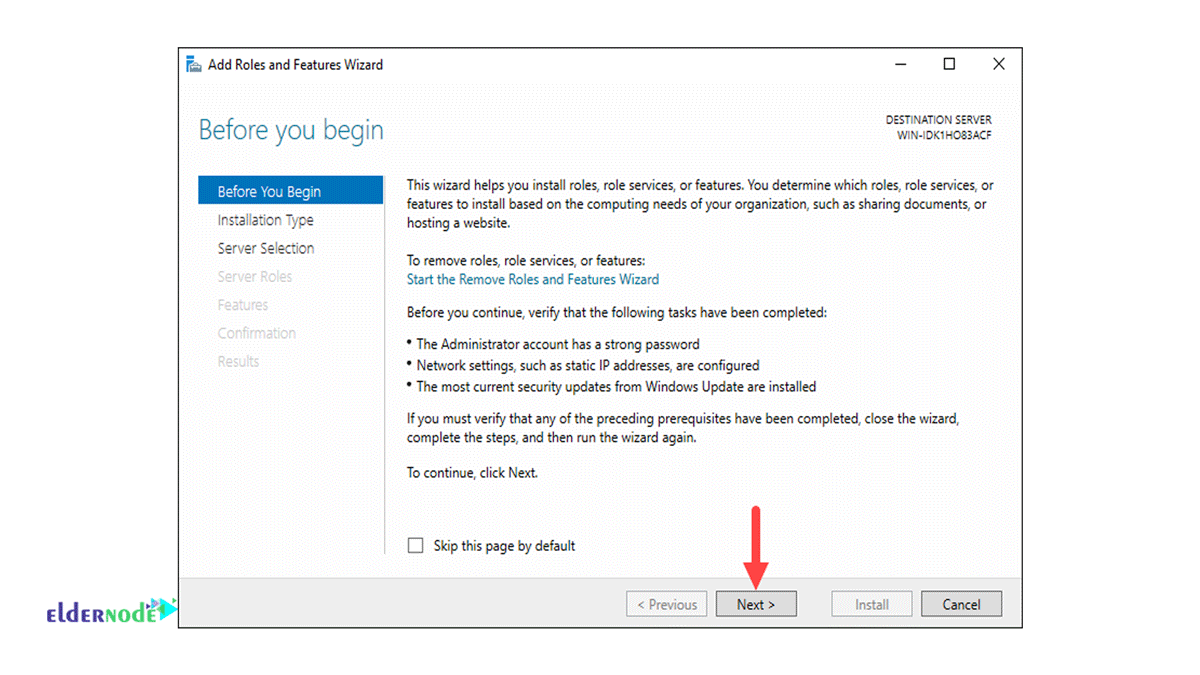
In the second step, now enter the dashboard and select the Add Roles and Features option to launch the wizard and install SMTP server on Windows Server. Now you need to enter the prerequisites that this page asks you, which include the following:
- Create a strong password on the Administrator account.
- Consider the network settings on the configuration server.
- Install the latest version of specific security updates.
Now that you have implemented all the prerequisites according to the above, you can confirm and move on to the next step of install SMTP server on Windows Server.
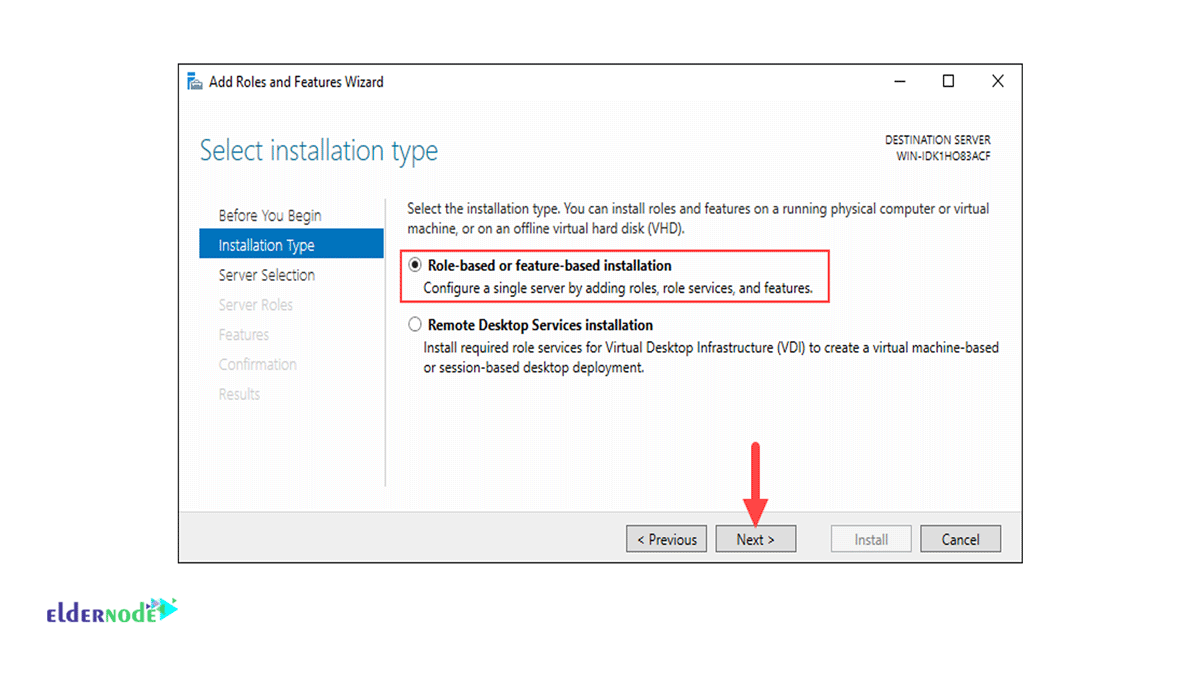
Step 2: You need to specify the type of SMTP server installation on Windows Server.
In this step, you need to specify the role-based or feature-based installation you want and move on to the next step of installing the server on Windows.
Step 3: Select the destination server where you want to receive emails.
To receive emails, you need to select the Select a server from the server pool option and select the server from the Server Pool that you want to be your email inbox. Note that the Server Pool option can only list servers that have been added using the Add Server option in Server Manager in order.
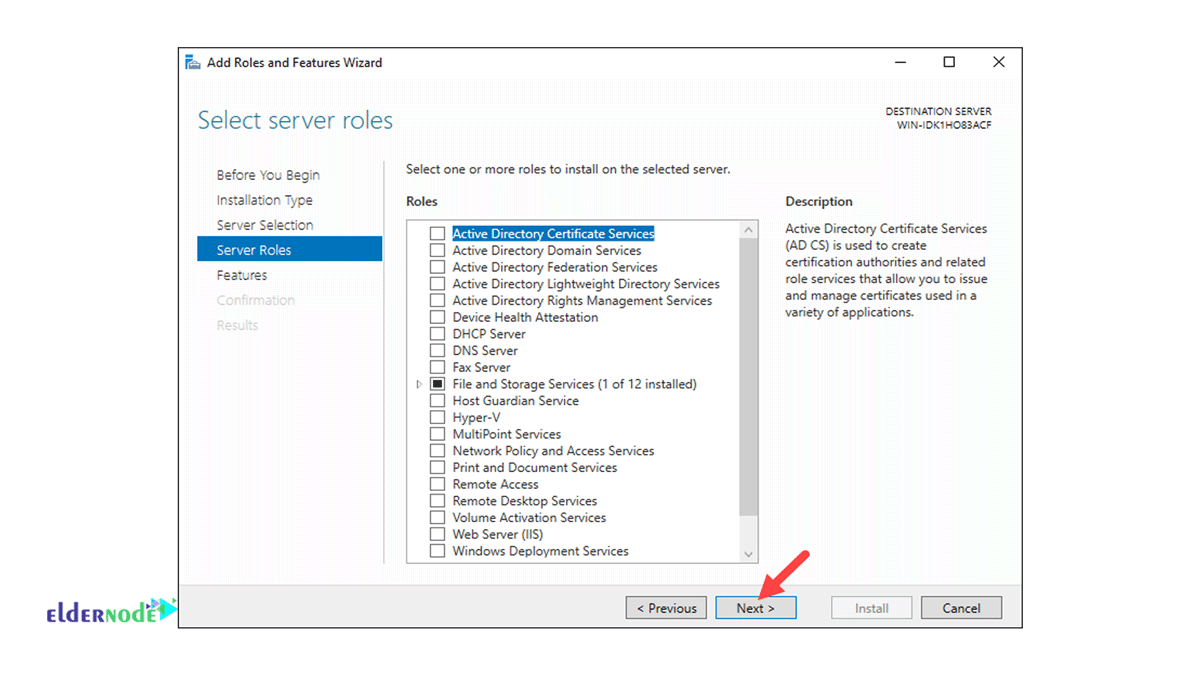
Step 4: Select the server role to continue install the SMTP server on Windows Server.
A page for selecting roles on servers will be displayed, allowing you to select server features and roles, or you can keep the selection as default and skip this step with final confirmation.
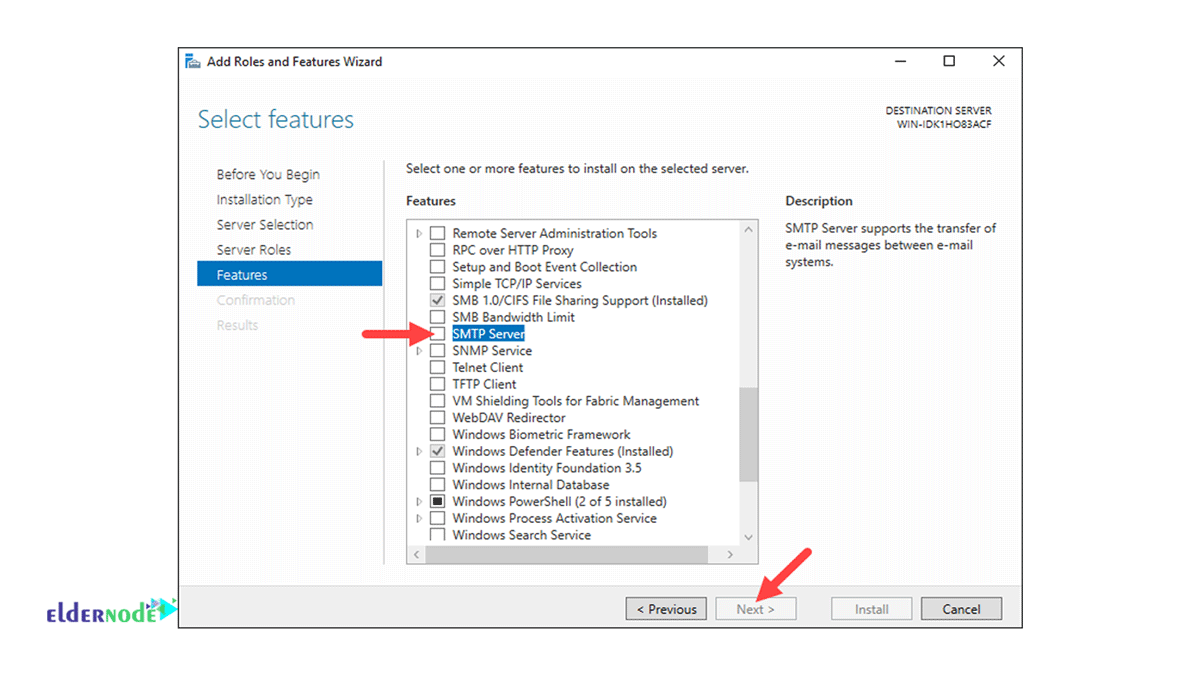
Step 5: Select the features you want to install along with the SMTP server installation on Windows.
Now scroll through to find and select SMTP Server.
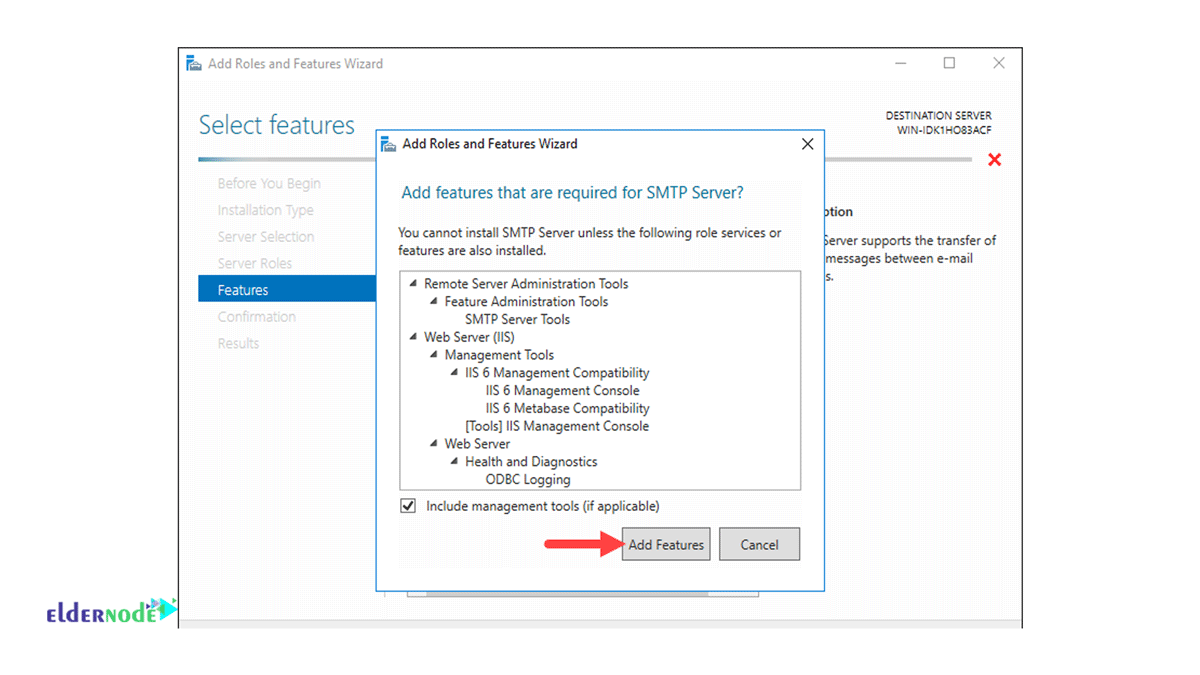
Step 6: Install the missing features you want
In general, The remote server management roles along with the web server roles may not have been installed properly before, so at this stage of the Install Smtp Server on Windows Server 2022, the wizard will ask you to install all of them if needed. So you need to check the Include management tools option and then click Add Features to install them, as shown in the image.
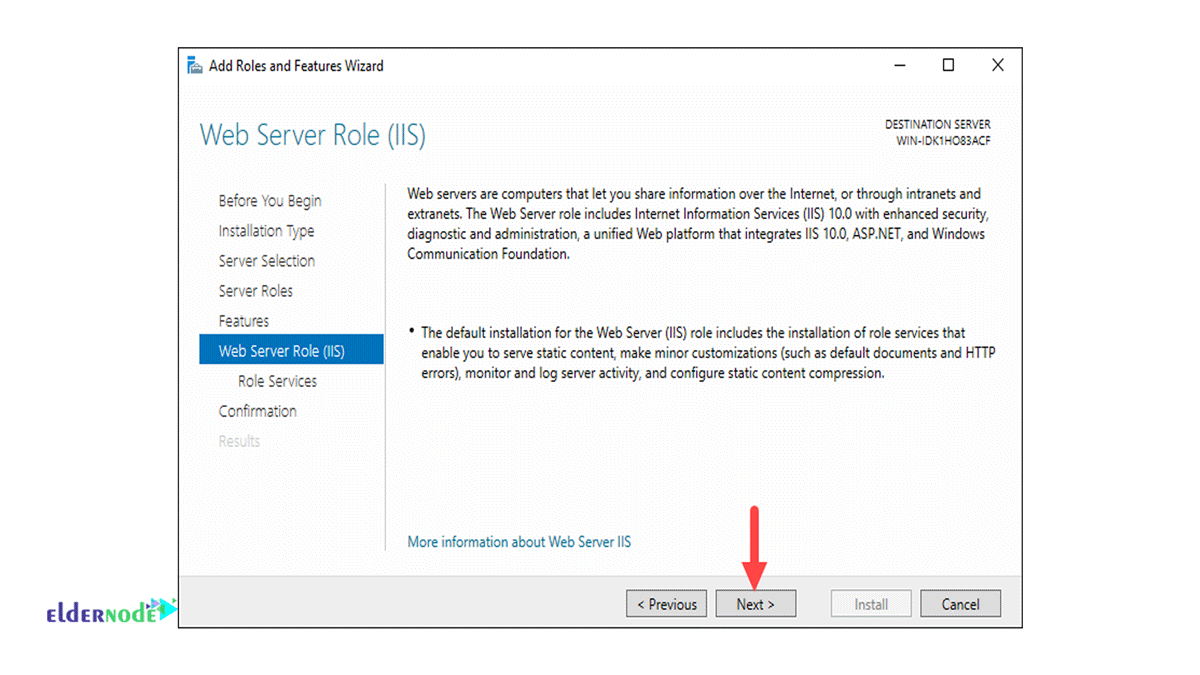
The web server role (IIS) will be displayed to you by the wizard, and you can assign this role by simply pressing the Next option.
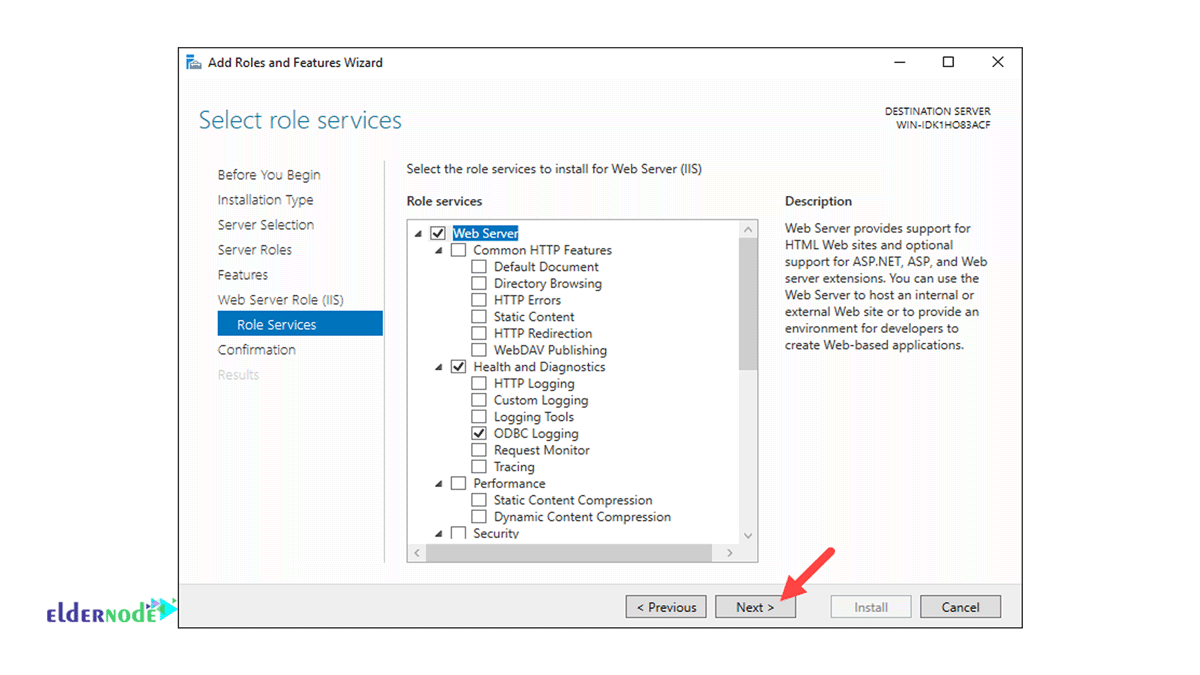
We want to install Role Services, but all the default options are selected by default, and you can add some services that are along these roles to them and refer to the final step of install SMTP server on Windows Server 2022.
Step 7: Confirm installation SMTP Server in Windows
The wizard will display the properties you have implemented in a tabbed window at this final stage of Install Smtp Server on Windows Server 2022. First, you need to make sure that the Restart the Destination Server automatically option is checked if you need it, and finally click the option to confirm the install SMTP server on Windows Server.
Configuring SMTP Server Installation in Windows Server 2022
Now the steps of install Smtp server on Windows Server 2022 are completed and we want to configure the installed SMTP server properly. In this case, there are a few steps that are given in the form of a picture and you can use them.
Step 1: Log in to IIS 6.0
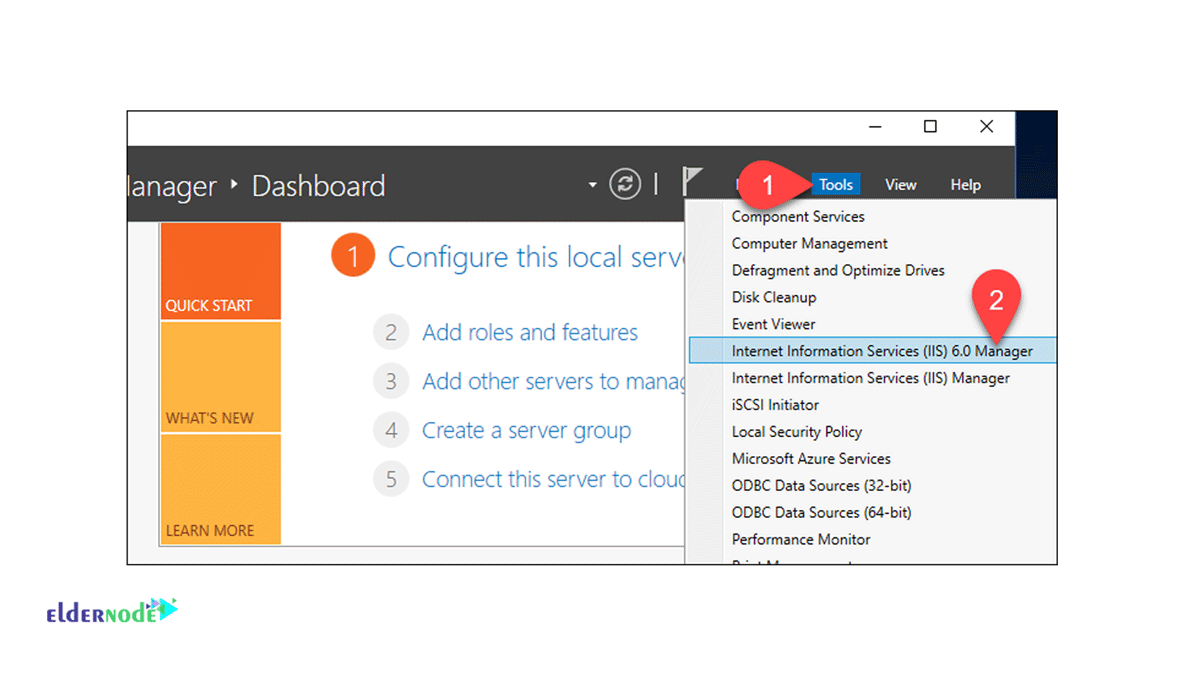
At this stage of install SMTP server on Windows Server 2022, from the Server Manager dashboard, click the IIS Manager 6.0 option. And by selecting Tools, make sure to look for Internet Information Services (IIS) 6.0 Manager and find it.
Step 2: Configure the SMTP Virtual Server
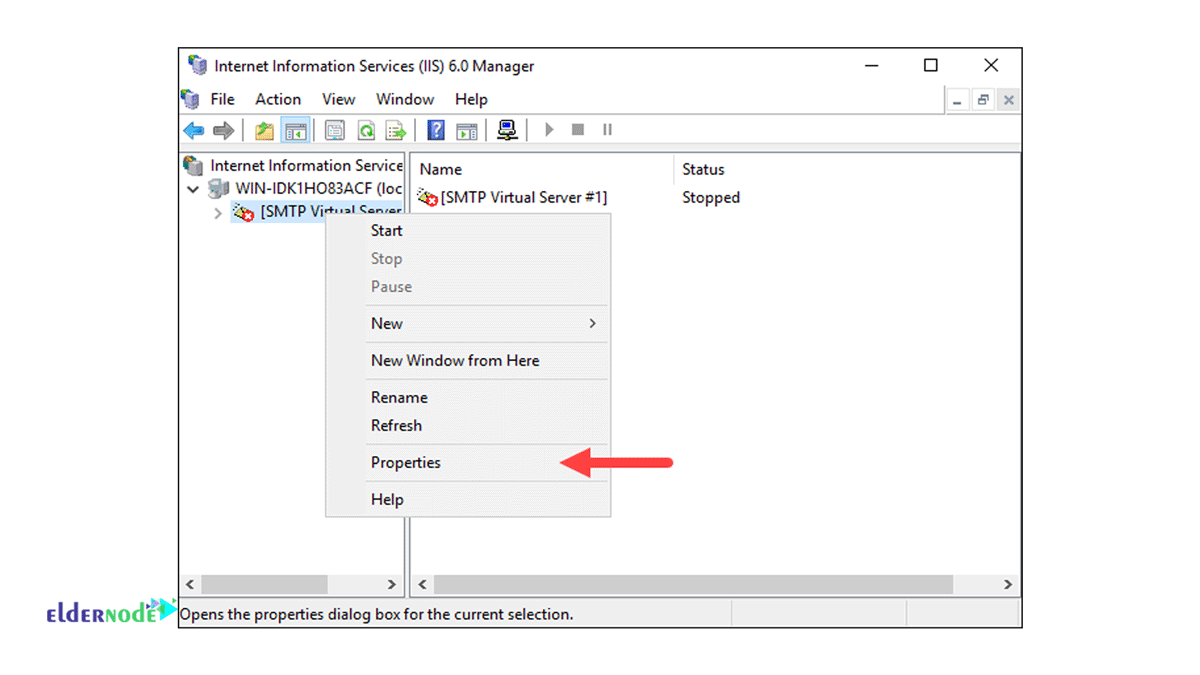
In IIS Manager 6.0, expand your computer name as follows and right-click on the option that shows you [SMTP Virtual Server #1], in this case the Properties option will be displayed which you need to press.
Step 3: Check Relay and configure it.
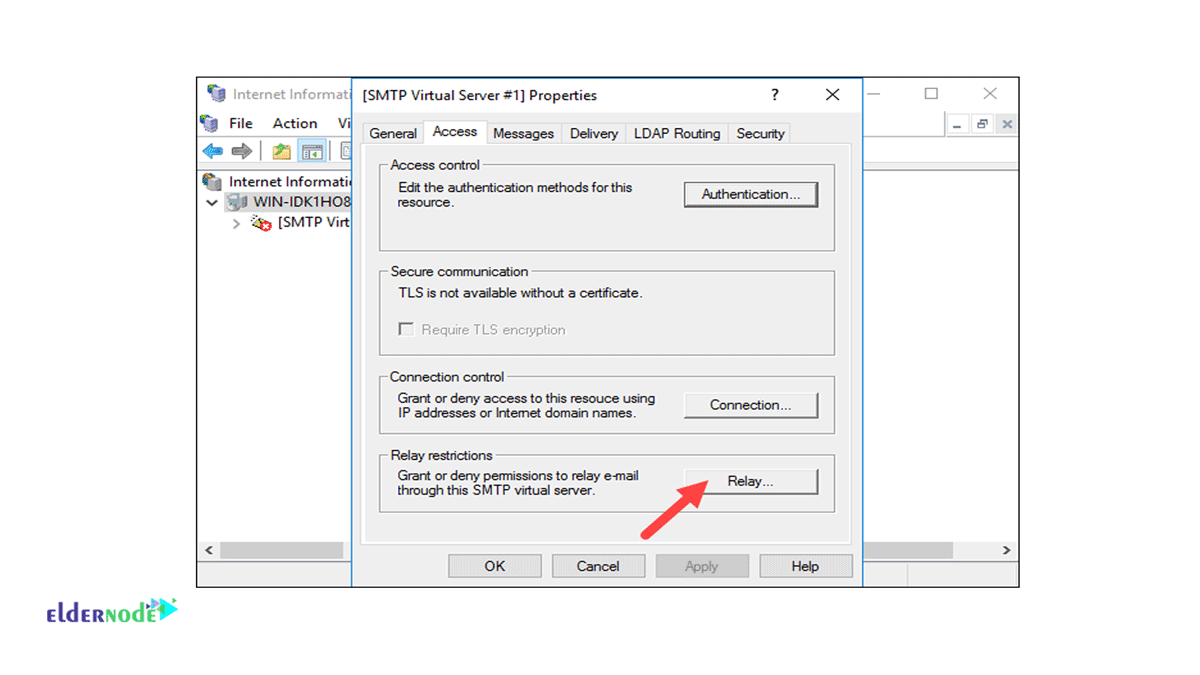
Now we have reached the stage of install where you can send emails through the SMTP virtual server by specifying the origin. So you need to click on the Access tab in the [SMTP Virtual Server #1] properties and select Relay.
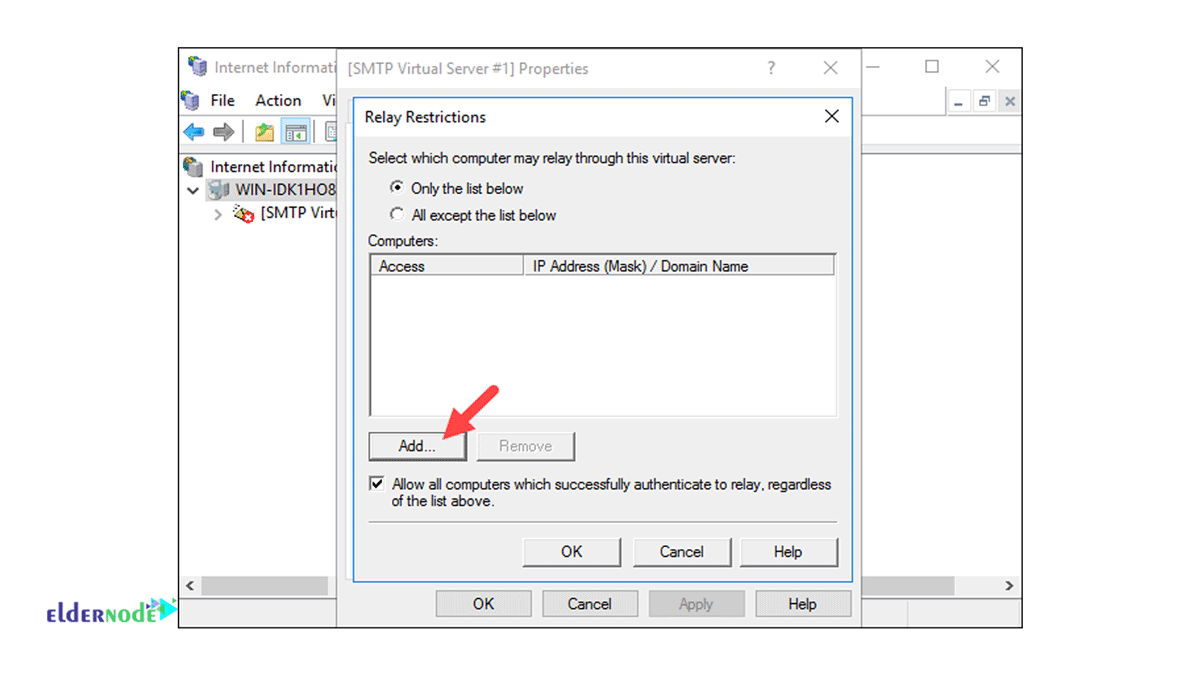
You can check the Add options to specify which computers can check emails through the server.
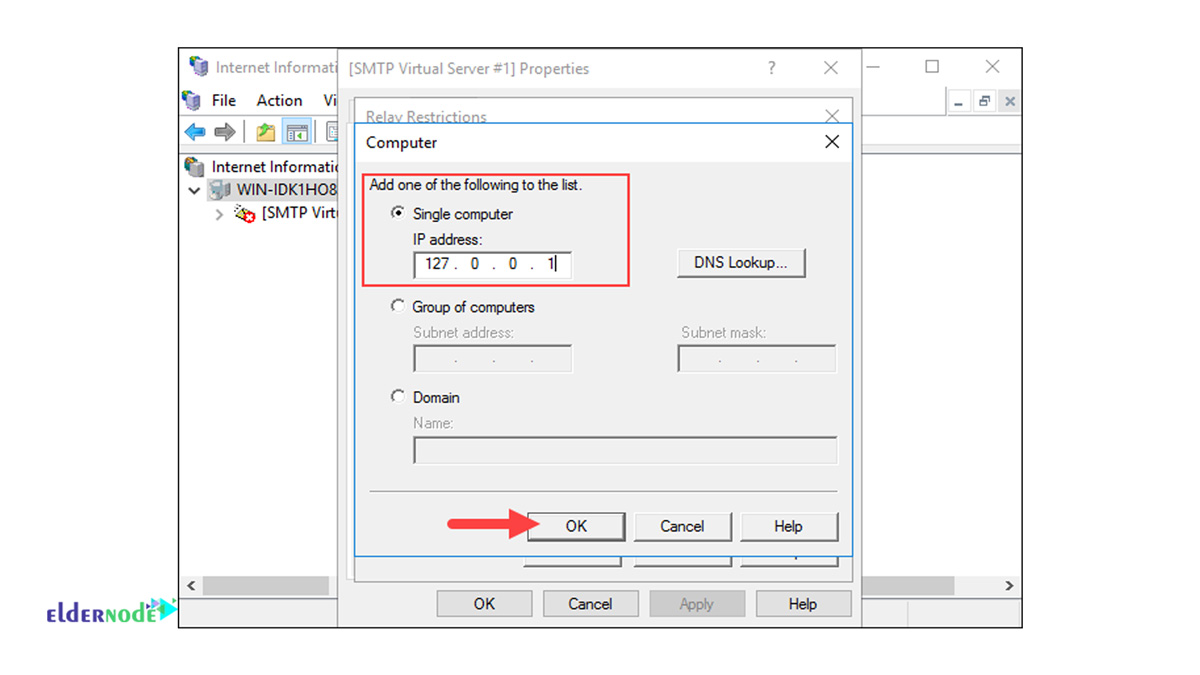
Selecting Single Computer and writing 127.0.0.1 will grant permission to localhost to send emails through the SMTP server. You can also specify a group of computers using the Group of computers option. So now we can say that we are reaching the parts of configuring and install SMTP server on Windows Server 2022 where we can get a little help with emails!
Step 4: You need to configure the settings.
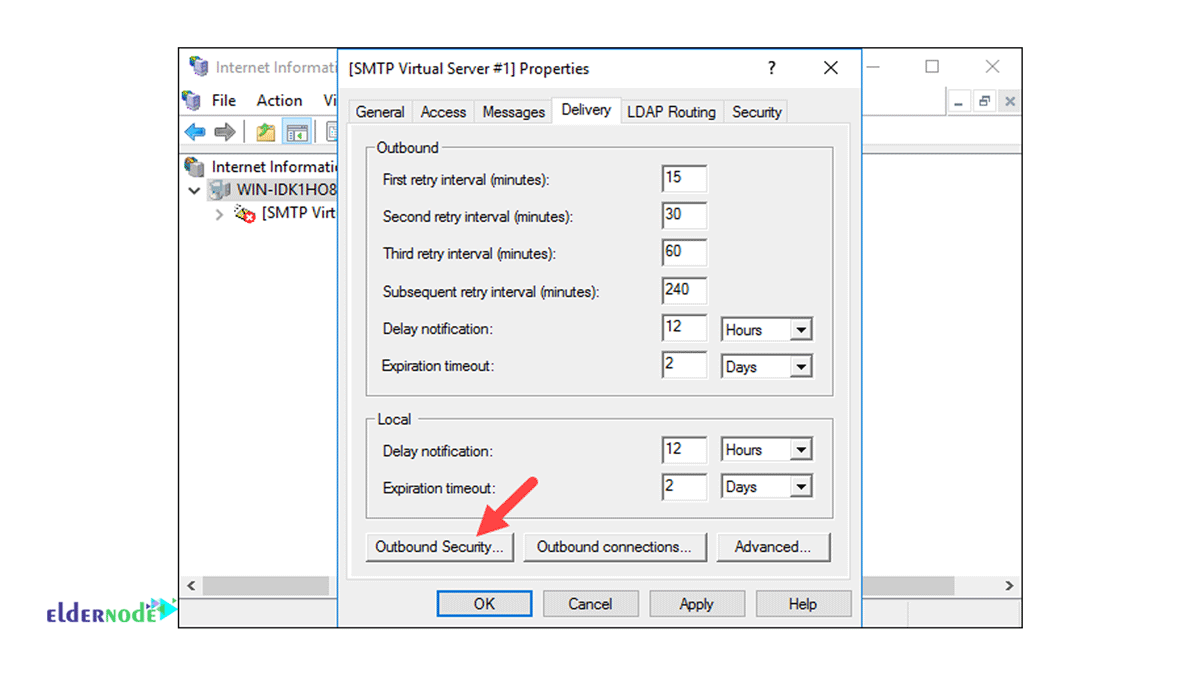
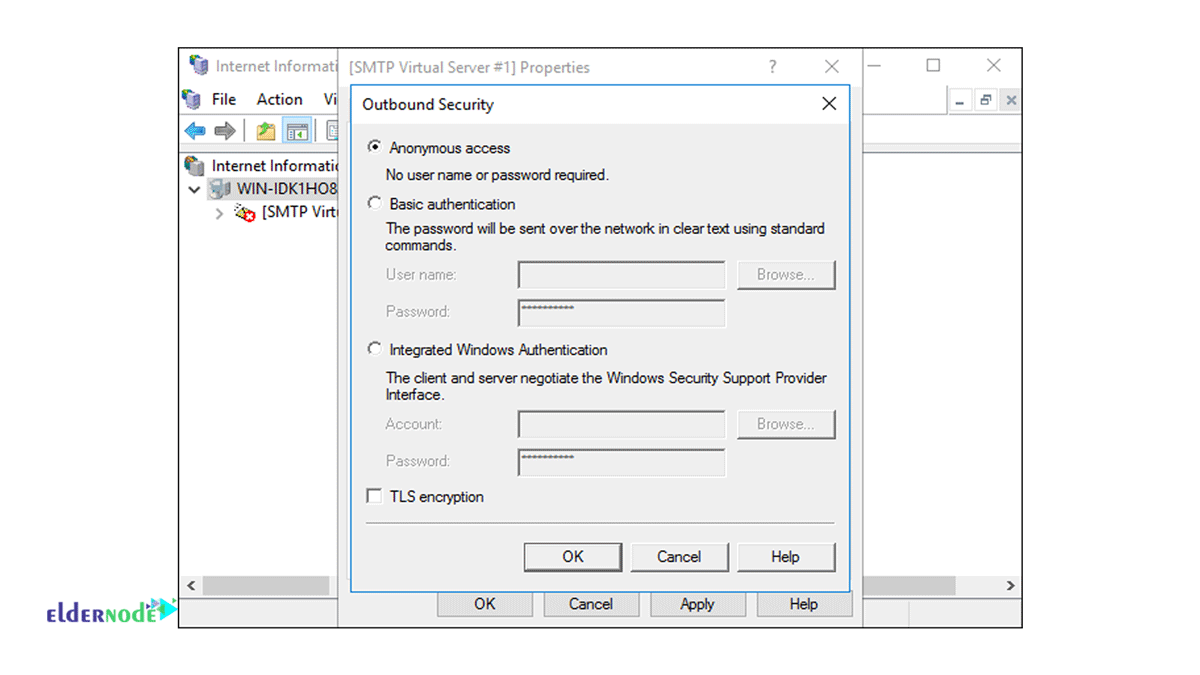
You will see a settings tab for resending intervals for outbound emails after a failed delivery. You can configure it by clicking on the Outbound Security option.
Click one of the four options to secure the SMTP server you want to run.
Conclusion
In fact, by following the steps mentioned above to install SMTP server on Windows Server, you were able to create an interaction between SMTP and Mail Transfer Agent (MTA) so that your email information can be accessed from various programs. Also, after installing the SMTP server on Windows Server, you can perform the configuration steps and enjoy a secure installation.
