
Learn how to Install Plesk on Centos 8 or centos 7 Linux server step by step. Plesk is one of the most popular control panels for web hosting. This control panel allows users to easily manage websites, databases, emails, and domains by the web control panel through the browser. The software was first released in Russia in 2001 by Plesk and sold to SWSoft in 2003, renamed Parallels in 2008 and becoming a separate business in December 2015. Plesk is a commercial web hosting automation software designed for web hosting providers based on Linux and Windows. It also allows server administrators to control the new site, reseller, email accounts, and DNS records through a graphical user interface. This control panel is designed to install and manage the required web hosting systems and applications on a dedicated server. Administrators can also create control panel hosts for customers or set resource allocation parameters for different domains or customers.
In this article, we try to teach you How to Install Plesk on Centos 8. You can visit the packages available in Eldernode to purchase a CentOS VPS server.
Table of Contents
How to Install Plesk on Centos 8
Tutorial install Plesk on Centos 8
Initially, the Plesk control panel was developed for the Windows operating system and today it is considered as one of the best and most popular control panels for the Windows operating system. Users have many options to install a control panel on Linux, such as Cpanel and DirectAdmin, but due to the smoothness and some features, users are turning to install Plesk on Linux. That’s why we decided to teach you How to Install Plesk on Centos 8 in this tutorial. Follow us in the continuation of this article.
Note: Plesk control panel is a non-free panel and you must obtain the relevant license to use it. But for installation and use for 14 days, the company gives you a temporary license to buy the original license after testing.
Steps to install Plesk on CentOS
Installing Plesk on CentOS Linux has 3 main steps, which are as follows:
1- Receiving a 14-days temporary license from Plesk site
2- Installing prerequisites and preparing the space for installing Plesk
3- Install Plesk on CentOS
How to get a temporary license from Plesk site
First, go to the Plesk website and enter the requested information carefully.
(Get free license for Plesk control panel)

After registration, the activation serial will be sent to your email for a limited time. You will need it at the end of installing and activating the Plesk control panel.
How to install prerequisites and prepare the space for installing Plesk
Note: You must have a Clean Linux to install the Plesk control panel, otherwise you may encounter a problem during installation.
To prepare and clean your CentOS Linux, enter the following commands in order:
package-cleanup --dupespackage-cleanup --cleandupesThen clean the Yum using the following commands and update the existing packages:
yum clean allyum update -yAfter the update, enter the following commands to clear Apache, MYSQL, Cyrus and php.
Note: Note that if any of the items listed on your CentOS Linux are installed, you will encounter an installation error.
yum remove http*yum remove php*yum remove cyrus*yum remove mysql*If you are using CentOS 8, install the wget package using the following command:
yum install wget -yAfter executing the above commands, reboot your CentOS Linux once using the reboot command:
rebootAfter CentOS boots, enter the following command to disable SELinux:
setenforce 0Learn how to Install Plesk on Centos 8
A. First enter the following command to download the Plesk file:
wget http://autoinstall.plesk.com/plesk-installerC. You can now grant script execution access by entering the following command:
chmod 755 plesk-installerD. After downloading, enter the following command to install the Plesk control panel:
./plesk-installerE. Now you have to wait for Plesk to be fully downloaded and installed. After completing the installation steps of Plesk, information like the image below is displayed. Copy the link and open it using a browser:
Note: If you are unable to open the page after entering the link above, stop your firewall service.
F. You can use the following command to stop the firewall service in CentOS 8:
systemctl stop firewalldG. In the View Selector step, select the type of Plesk and shell you want to use and click OK.
H. In the next step, in the Administrator’s preferences section, you need to enter a password for your Plesk Administrator user.
I. In the Administrator information section, enter the complete information of the Administrator user and then click OK.
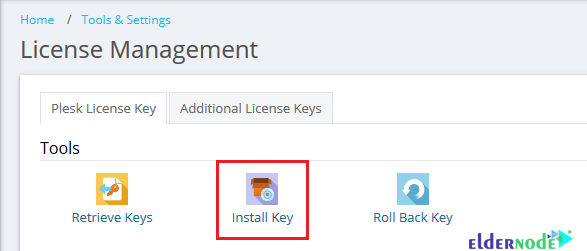
J. After entering the information in the next step, you must enter a license similar to the image below. To do this, click on the Install Key option:
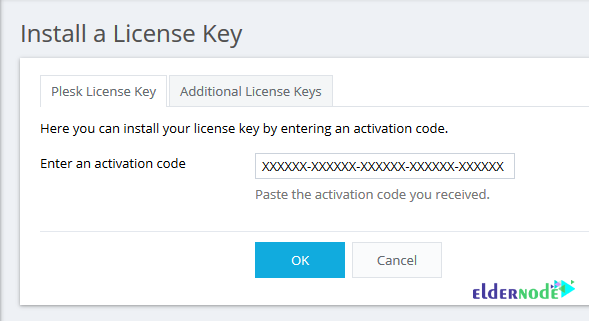
K. Enter the license you received from your email in the field indicated in the image and click OK:
L. Now it’s time to enter a Username to use Plesk with a password in the Create Your Webspace section.
M. After a few moments, you enter the Plesk control panel.
Conclusion
Plesk is one of the most popular web-based control panels in the world today, and many hosting companies use this control panel. Simple configuration in Plesk makes it easy for web hosting providers to manage large numbers of hosts on one server. Plesk control panel, like other web hosting control panels such as Cpanel and Direct Admin, has many advantages. In this article, we tried to teach you How to Install Plesk on Centos 8.