You may be in a situation where the local Wi-Fi network cannot meet your needs on your iPhone and iPad, or you cannot connect all your devices to Wi-Fi at the same time. In this case, hot-spotting the laptop and connecting other devices to its Wi-Fi is the best solution. You can also hotspot your MacOS. This article will teach you How to Install HotSpot on MacOS. Eldernode website offers economical VPS servers, which you can buy if you want.
Table of Contents
How to Install HotSpot on MacOS
The HotSpot is a feature that allows you to share your Internet with people around you. It turns your device into a modem that you can connect to the Internet easily. This feature is a way to direct and access Wi-Fi and is used to transfer data and share the Internet. Your Mac can act as a wireless hotspot and allows you to share the Internet with other computers on your local network. In fact, you can connect your other devices to it and share its internet connection.
Enabling Internet Sharing
In this step, you will learn the installation process of HotSpot on your Mac operating system. To do this, follow the steps below.
The MacOS has a feature of Internet Sharing, of which the Wi-Fi hotspot option is a part.
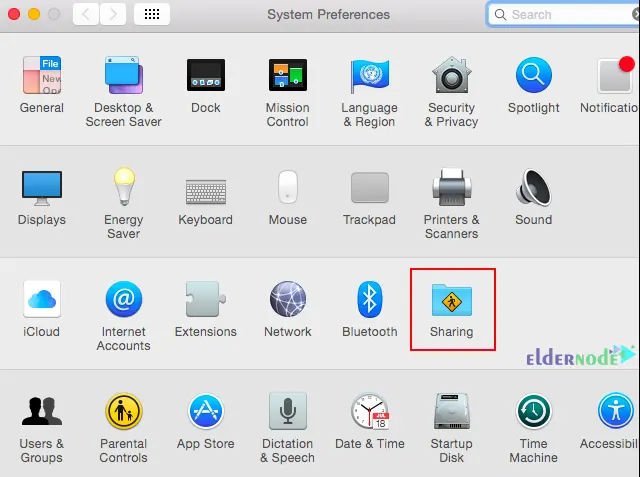
First, go to the Apple menu and choose the System Preferences window. Then press the Sharing icon as shown below:
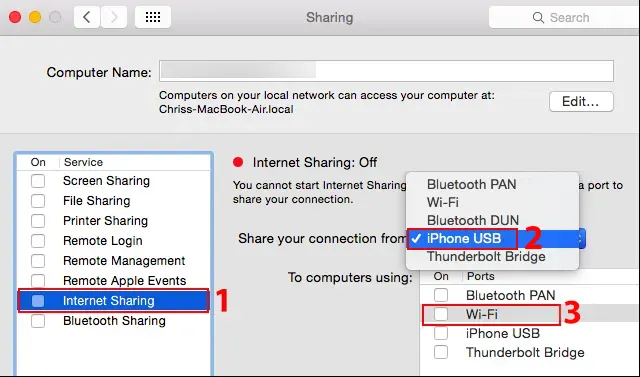
Now choose the Internet Sharing option and the desired Internet connection to share with the devices. We choose iPhone USB. In the ‘To computers using’ section, choose the Wi-fi option to create a Wi-Fi hotspot. If you connect your mac to the Internet through an Ethernet adapter, choose Ethernet and share a wired connection over Wi-Fi. And if your mac is connected to the Internet via Bluetooth or tethered to an iPhone with a USB cable, you should choose the options related to them:
Note that it is not possible to connect to a Wi-Fi network and host a Wi-Fi network at the same time.
Configuring HotSpot on MacOS
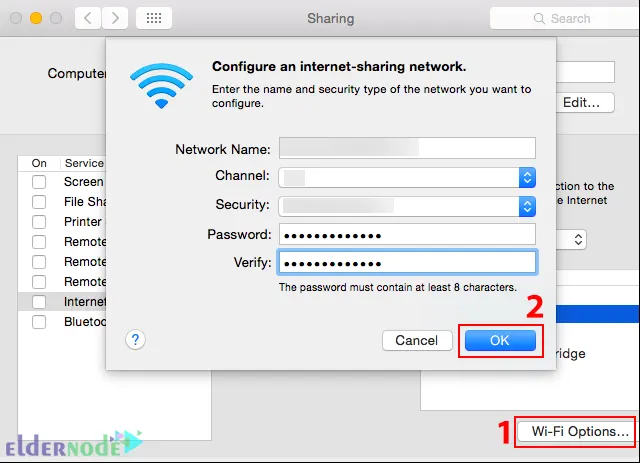
Let’s configure Wi-Fi HotSpot on MacOS. To do this click on the Wi-Fi Options at the bottom of the window.
Now you will see the following window in which you should choose the Network Name and Wi-Fi Channel. Then choose WPA2-Personal from the Security section and provide a password:
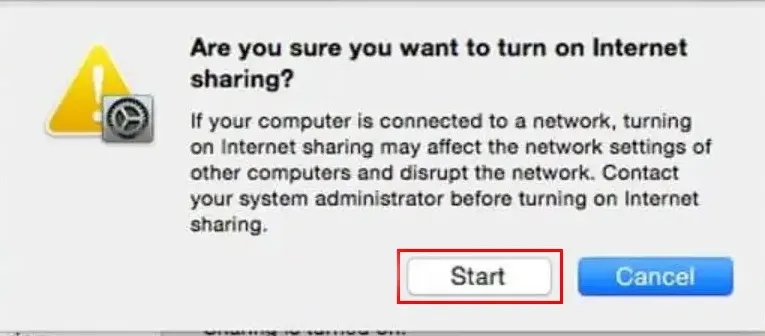
Once done, check the Internet Sharing box and click on Start:
Sharing a Wi-Fi Connection on MacOS
The Mac’s physical Wi-Fi interface can both connect to a Wi-Fi network and host its own network. But you can only do one of them at a time and you cannot both connect to the same Wi-Fi network and share the connection of that Wi-Fi network via Wi-Fi.
It is also possible to share the Wi-Fi connection by creating a Bluetooth PAN (Personal Area Network). So you need to connect to Wi-Fi and tell your Mac that you want to share the Wi-Fi connection via Bluetooth PAN. Then pair other Bluetooth devices with your Mac’s Bluetooth and share the Wi-Fi connection wirelessly via Bluetooth.
That’s It!
Conclusion
The HotSpot is a feature that allows you to share your Internet with people around you. You saw that the MacOS also has the HotSpot option. In this article, we taught you how to install HotSpot on MacOS. I hope this tutorial was useful for you and helps you to install HotSpot on your MacOS. If you face any problems or have any suggestions, you can contact us in the Comments section.

