Recently, you have reviewed about SSH. In this article, you will learn How to install Fail2Ban to protect SSH on CentOS 8. But first, what is Fail2ban. It is a free, open-source and widely used intrusion prevention tool that scans log files for IP addresses that show malicious signs such as too many password failures, and much more, and it bans them. And by default, it ships with filters for various services including sshd.
you are recommended to read initial set up centos 8 to let us guide you easier to know how to install and configure fail2ban to protect SSH and improve SSH server security against brute force attacks on CentOS 8.
Table of Contents
Installing Fail2ban on CentOS 8
In this paragraph, After logging into your system, access a command-line interface to enable the EPEL repository on your system. because the fail2ban package is not in the official repositories but it is available in the EPEL repository.
dnf install epel-releaseOR
dnf install https://dl.fedoraproject.org/pub/epel/epel-release-latest-8.noarch.rpmNext, use the command below to install the Fail2ban package.
dnf install fail2ban How to Configuring Fail2ban to protect SSH
vi /etc/fail2ban/jail.local[DEFAULT] ignoreip = 192.168.56.2/24 bantime = 21600 findtime = 300 maxretry = 3 banaction = iptables-multiport backend = systemd [sshd] enabled = true 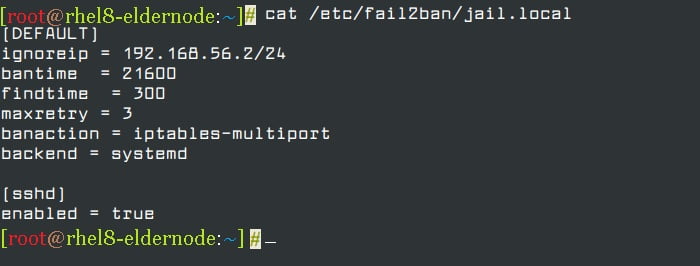
Now, Let’s see the explanation of options in the above configuration:
- ignoreip: specifies the list of IP addresses or hostnames not to ban.
- bantime: specified the number of seconds that a host is banned for (i.e effective ban duration).
- maxretry: specifies the number of failures before a host gets banned.
- findtime: fail2ban will ban a host if it has generated “maxretry” during the last “findtime” seconds.
- banaction: banning action.
- backend: specifies the backend used to get log file modification.
So, the above configuration, means if an IP has failed 3 times in the last 5 minutes, ban it for 6 hours, and ignore the IP address 192.168.56.2.
Firstly, start and enable the fail2ban service for now and check if it is up and running using the following systemctl command.
systemctl start fail2ban systemctl enable fail2ban systemctl status fail2banMonitoring Failed and Banned IP Address Using fail2ban-client
In this step, you can monitor failed and banned IP addresses using the fail2ban-client, After configuring fail2ban to secure sshd. Secondly, to view the current status of the fail2ban server, use the following command.
fail2ban-client status To monitor the sshd jail:
fail2ban-client status sshd fail2ban-client unban 192.168.56.1 However, for more information on fail2ban, read the following man pages.
man jail.confman fail2ban-clientConclusion
You have thus installed and successfully configured Fail2Ban for your CentOS 8 server which is to protect your SSH server from brute force attacks. However, do not forget to update Fail2Ban and check its logs regularly.


![How To Install Hadoop On Ubuntu 20.04 LTS [Focal Fossa]](https://blog.eldernode.com/wp-content/uploads/2020/11/How-To-Install-Hadoop-On-Ubuntu-20.04-LTS-Focal-Fossa-300x164.png)
