Ntopng is a free, open-source, highly useful monitoring tool that monitors network traffic in real-time. This is a high-performance, low-resource, next-generation version of the original ntop version based on libpcap. Ntopng is multi-platform and runs on every Unix, MacOSX, and Windows platform. Monitoring and reporting of various protocols including, TCP, UDP, ICMP, DLC, IPX, ARP, Netbios, Decnet, and many more is the responsibility of ntopng. In this article, we are going to teach you How to Install and Use Ntopng on Debian 11. You can visit the packages available in Eldernode if you wish to purchase a Linux VPS server.
Table of Contents
How to Install and Use Ntopng on Debian Linux
Since analyzing data for information can be a difficult task in a computer network, using the necessary tools can make it easier. ntopng lets you quickly and easily analyze network traffic but check other things as well.
Introduction to Ntopng
In a straightforward way, Ntopng is a web-based application that allows you to monitor network traffic. This program has an open-source community resource that is released under the GPLv3 license and is free to use and is considered as a reference in this section.
Ntopng Features Include:
- Geolocation of IP addresses
- Analyzes traffic and sorts it by source/destination
- Displays network traffic and IPv4 / IPv6 hosts
- Report and sort IP protocol usage by protocol type
- Stores traffic statistics in RRD format
How to Install Ntopng on Debian 11 | Debian 10
This is the most efficient and secure way to install Ntopng. Also, you can download it from the APT by adding it to the repository if it is updated.
Then, load a DEB package that adds and configures the Ntopng repository.
cd /tmpwget http://apt.ntop.org/buster/all/apt-ntop.debThen start installing GPG to add the tank properly:
sudo apt install gpgIn this step, install the downloaded package to add the tank:
sudo dpkg -i apt-ntop.debNow, with the repository already added, we need to refresh the APT packet source:
sudo apt updateFinally, install ntopng and some of its modules with the following command:
sudo apt install pfring-dkms nprobe ntopng n2disk centoTo use the web interface, you need to make some previous configurations. For example, specify the runtime port. To do this, just edit the application configuration file:
sudo nano /etc/ntopng/ntopng.conf
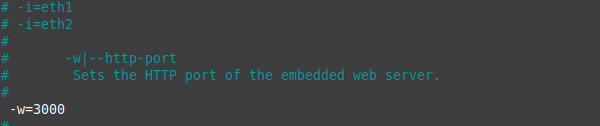
According to the image above, the -w value specifies the port used in the web interface. You can customize it, but remember to open it in the firewall.Also, by creating a new file, you specify the range of your network IP addresses. Also the default or active network interface.
sudo nano /etc/ntopng/ntopng.start/Then, by restarting the service, the necessary changes are applied:
sudo systemctl restart ntopngNow, open your web browser and go to HTTP://your-server:[port], you will see the login page.
Username: adminpassword: adminCongratulation! You installed Ntopng in Debian 11.
Conclusion
In this article, we tried to teach how to install and use Ntopng on Debian 11. Ntopng is a leader in high-level network monitoring. With the help of the social version, we may have it on our servers to help us monitor network behavior. Using its repositories in Debian, we were able to install it without major complications.