Learn how to install and Configuring Cacti on Centos 8. The importance and necessity of using network monitoring software is not hidden from any network expert. Because in real time, you can be informed about the status of servers, switches and routers, or in other words, all network equipment, and if a problem occurs, it can be solved in the shortest time. Cacti is a web-based open source tool that monitors computer networks. In this article, we try to introduce you to how to install and Configuring Cacti on Centos 8. You can visit the packages available in Eldernode to purchase a CentOS VPS server.
Table of Contents
Tutorial install and Configuring Cacti on Centos 8
What are the characteristics of Cacti?
Cacti software connects to your devices using the SNMP protocol and checks them during the interval set by you. This software is based on PHP/MySQL, which is mainly installed on Linux operating systems and uses RRDTool software to present its graphs. This software also allows you to provide a monitoring panel to your customers. In this software, you can specify which ports your subscriber will have access to after logging in. Here are some features of cacti:
– Quick survey of criteria
– Support for multiple data acquisition methods
– Advanced graph pattern support
– Ability to manage the user with ACL
– Provide an intuitive and easy web interface for managing network monitoring and configuration
Install and Configure Cacti on Centos 8
After logging in as the first step, you must first disable SELinux. This is done after opening the SELinux file with the following command:
vim /etc/sysconfig/selinuxAfter you find SELINUX = enforcing in the file, replace it with SELINUX = disabled. After saving the file, you can reboot the system using the following command:
rebootThe second step is to install the EPEL repository. We recommend that you go to the Fedora site to copy the latest version of this file and replace it in the following command.
rpm -Uvh https://dl.fedoraproject.org/pub/epel/epel-release-latest-8.noarch.rpmAlso, by referring to the Remi site, you can copy the link of the latest version and put it in the following command:
wget http://rpms.famillecollet.com/enterprise/remi-release-8.rpmNow you can use the following commands to install the repository and list them:
rpm -Uvh remi-release-7.rpmyum repolistFrom now on, 6 steps must be taken to install and configure cacti. These steps include:
1. Installation of Apache
2. Install SNMP and RRDTool
3. Install MariaDB Server
4. PHP and needed packages
5. Create a Cacti Database
6. Database optimization
Follow us in this article to fully explain these 6 steps.
How to install Apache
You can install Apache using the following command:
yum install httpd httpd-develYou can also start the service by typing and executing the following command:
systemctl start httpdHow to install SNMP and RRDTool
To install SNMP and RRDTool, just type and run the following command. You will then be asked if you would like to continue the installation. You must enter “Y” here:
yum install net-snmp net-snmp-utils net-snmp-libs rrdtoolNow you can also start running SNMP with the following command:
systemctl start snmpdHow to install MariaDB Server
Installing MariaDB Server is one of the steps that must be done before installing and configuring cacti. To do this, type and execute the following command:
yum install mariadb-serverEnter the following command to start the MariaDB server:
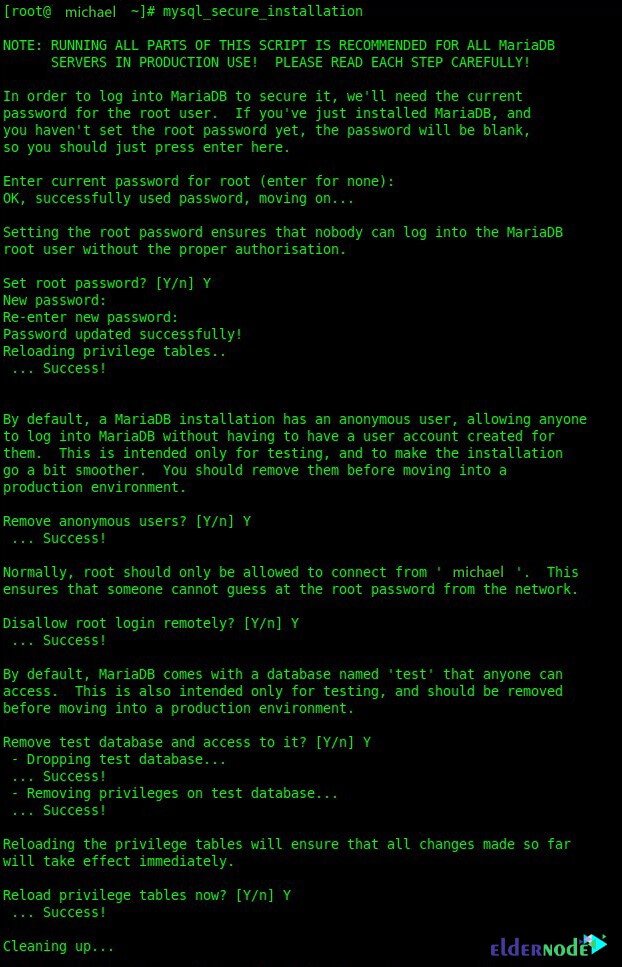
systemctl start mariadbTo secure and complete the MariaDB server installation, type the following command:
mysql_secure_installation
PHP installation tutorial
You can use the following command to install PHP and the required packages:
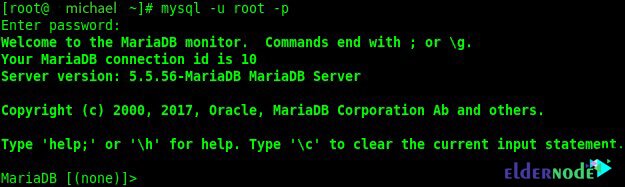
yum --enablerepo=remi install php-mysql php-pear php-common php-gd php-devel php php-mbstring php-cli php-intl php-snmpFirst, log in to the database server with the following command:
mysql -u root -p
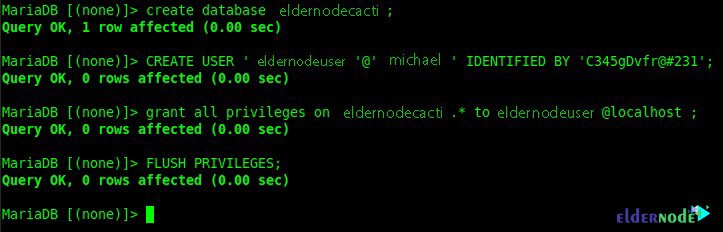
Now you need to type and execute the following command to create a database:
MariaDB [(none)]> create database eldernodecacti;You must also create a user by executing the following command:
MariaDB [(none)]> CREATE USER 'eldernodeuser'@'michael' IDENTIFIED BY 'C345gDvfr@#231';Using the following command you can Grant permission:
MariaDB [(none)]> grant all privileges on eldernodecacti.* to eldernodeuser@michael;You can also flush privileges with the following command:
MariaDB [(none)]> FLUSH PRIVILEGES;
To be able to create a database user you must first have access to mysql.time_zone_name. So you have to enter mysql_test_data_timezone.sql into the MySQL database. To do this, use the following command:
mysql -u root -p mysql < /usr/share/mysql/mysql_test_data_timezone.sqlNow you need to login to MariaDB using the following command:
mysql -u root -pYou must allow the cacti database user access with the following command:
MariaDB [(none)]> GRANT SELECT ON mysql.time_zone_name TO eldernodeuser@michael;You can also flush privileges with the following command:
MariaDB [(none)]> flush privileges;

Learn how to Optimize Database
The last step you need to do before installing cacti is to optimize the database. Type the following command to optimize the parameters:
vim /etc/my.cnf.d/server.cnfNow you need to add the following command lines in the mysqld section:
collation-server = utf8_general_ci init-connect='SET NAMES utf8' character-set-server = utf8 max_heap_table_size = 128M max_allowed_packet = 16777216 tmp_table_size = 64M join_buffer_size = 64M innodb_file_per_table = on innodb_buffer_pool_size = 512M innodb_doublewrite = off innodb_additional_mem_pool_size = 80M innodb_lock_wait_timeout = 50 innodb_flush_log_at_trx_commit = 2
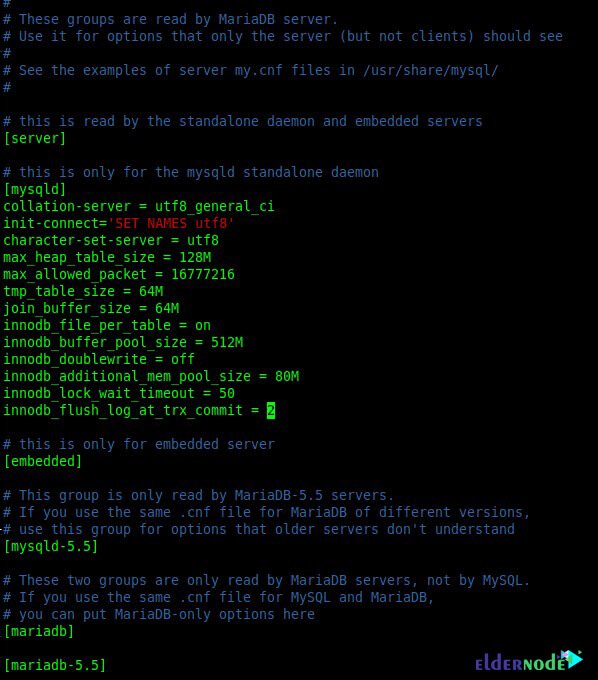
After performing the above steps, you can restart the MariaDB service with the help of the following command:
systemctl restart mariadb.serviceHow to install and Configuring Cacti on Centos 8
After preparing and installing all the prerequisites, now is the time to install cacti using the following command:
yum -y install cactiThen, by typing the following command, you can import the cacti database file into the created database:
cd /usr/share/doc/cacti-1.1.38Now you need to import the SQL file into it:
mysql -u root -p eldernodecacti < cacti.sqlIt should be noted that the Cacti configuration file contains a database, password details, and so on. You can easily edit it by entering the following command:
vim /usr/share/cacti/include/config.phpNow you need to edit the database details like the following commands:
$database_type = ‘mysql’;
$database_default = ‘eldernodecacti’;
$database_hostname = ‘michael’;
$database_username = ‘eldernodeuser’;
$database_password = ‘C345gDvfr@#231’;
$database_port = ‘3306’;
$database_ssl = false;
The next step is to set the cron in cacti, which you must first open with the following command:
vim /etc/cron.d/cactiThen you have to uncomment the following line and save the file:
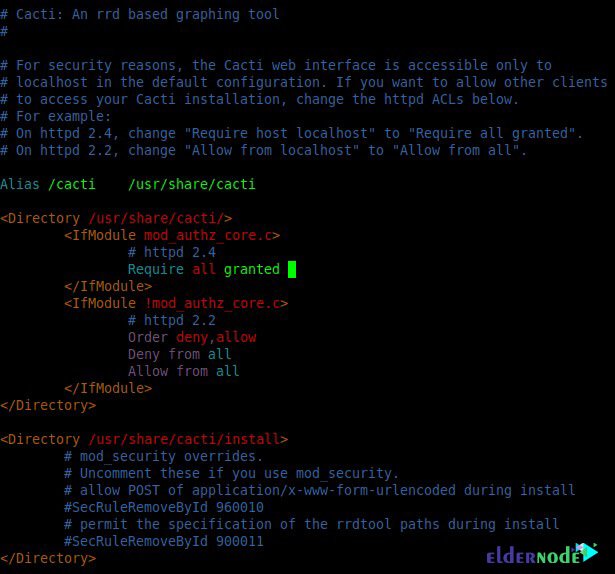
*/5 * * * * apache /usr/bin/php /usr/share/cacti/poller.php > /dev/null 2>&1Another important step is to configure Apache in cacti, which you must first open the config file with the following command:
vim /etc/httpd/conf.d/cacti.confAfter opening the config file, now you need to Change “Require host localhost” to “Require all granted” and “Allow from localhost” to “Allow from all“.
Type and run the following command to change the time zone:
vim /etc/php.iniYou can now enter your time Zone:
date.timezone = your time ZoneAfter completing the above steps, you must restart Apache, MariaDB, and SNMP. To restart Apache, type and run the following command:
systemctl restart httpd.serviceYou must also run the following command to restart MariaDB:
systemctl restart mariadb.serviceFinally, to restart SNMP, you must run the following command:
systemctl restart snmpd.serviceIn terms of security, it is necessary to configure the firewall. Therefore, you can use the following commands to configure the firewall:
firewall-cmd --permanent --zone=public --add-service=httpfirewall-cmd --reloadHow to start Cacti installation
Now we have reached the final step, which is to start installing cacti. To access the Cacti web interface, enter the following URL in your browser:
http://Your-Server-IP/cacti
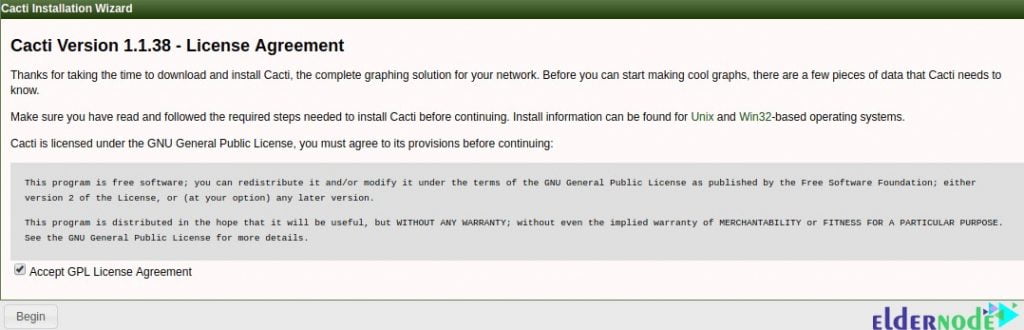
In the opened page, check Accept GPL License Agreement and click Next.
Click Next on the next page.
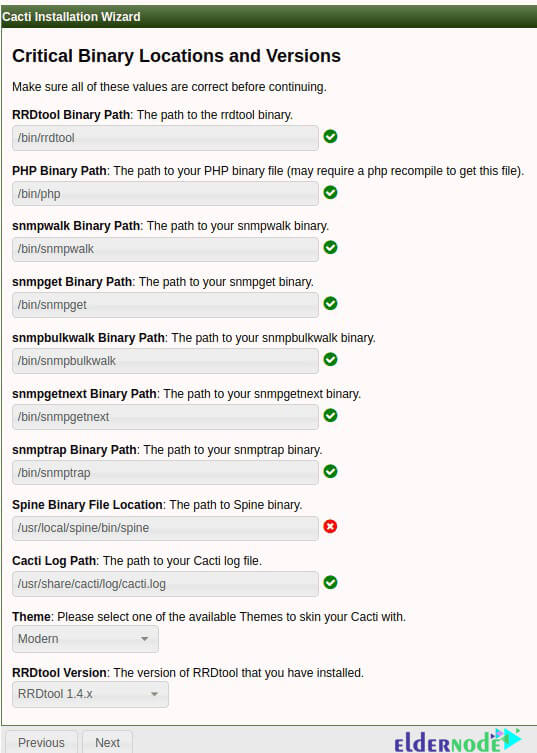
The next window specifies the installation type as well as the database specifications. Click Next again.
On the next page, confirm the desired options. Note that all must be correct before proceeding.
In the rest of the pages, click on Next until the end and finally click on Finish.
Conclusion
The importance and necessity of using network monitoring software is not hidden from any network expert. In real time, you can be informed of the status of servers, switches, and routers, or in other words, all network equipment, and if a problem occurs, you can solve it in the shortest time. That’s why we tried to teach you How to install and Configuring Cacti on Centos 8 in this article.