Simple Network Management Protocol (SNMP), is used to monitor, report events, and manage devices on the network. This protocol includes a set of network management standards, including an application layer protocol, and a set of object data. In general, SNMP works by having an agent send and monitor client information to SNMP Manager. By default, port UDP 161 is used to send and receive SNMP messages, and port 162 is used to exchange SNMP traps. Of course, these ports can be changed. In this article, you will learn How To Install And Configure SNMP Service In Windows 10. Do not miss 2021 offers on Eldernode to purchase your own Windows VPS.
Table of Contents
Tutorial Install and Configure SNMP Service In Windows 10
SNMP can receive several different information from different devices such as switches, servers, routers, or computers that have SNMP Agent installed like when the system was on, Performance Counters, and device parameters, and so on. In Windows 10, the SNMP service is available as a separate component that is not installed by default.
By default, the SNMP protocol is disabled on Windows XP, Vista, 7, 8, 10, and on Windows Servers 2003, 2008, 2012, 2016, and you must enable and configure it. Follow us in this tutorial.
How to install SNMP Service in Windows 10
Using the Get-Service PowerShell command, you can check if the SNMP service is enabled on Windows:
Get-Service -Name snmpYou can install the SNMP service from the Control Panel.
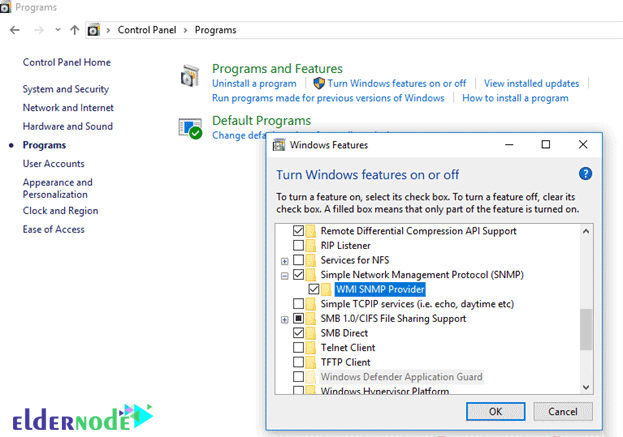
Go to Control Panel > Programs and Features > Turn Windows features on or off.
In the Windows feature list, select Simple Network Management Protocol (select SNMP and WMI SNMP Provider ) and then click OK.
Point: This service provides access to SNMP information via Windows Management Instrumentation interfaces.
In addition, you can enable SNMP service using PowerShell:
Enable-WindowsOptionalFeature -online -FeatureName SNMPHow to configure SNMP in Windows 10
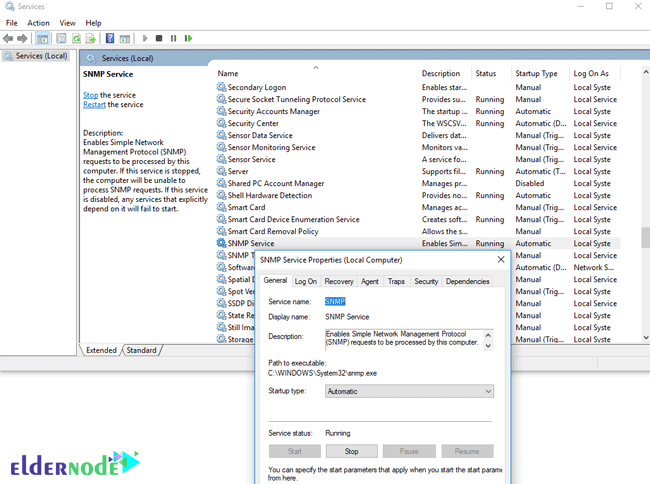
After installation, the SNMP service starts automatically. Open the Services management (services.msc) console.
Two new services should be displayed in the list of services:
– SNMP Service: This is the main SNMP agent service that tracks activities and sends information.
– SNMP Trap: Receives trap messages from local or remote SNMP agents and forwards messages to the SNMP management software running on that computer.
Open Properties for SNMP Service. If it is in Stop mode, click the Start button and change its startup type to Automatic.
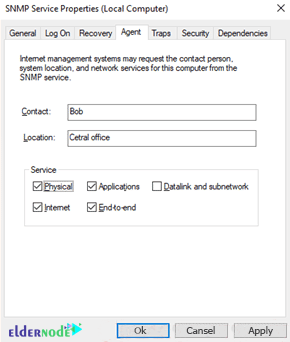
Click the Agent tab. Fill in the Contact and Location fields (you can specify the username and location of the computer) and select a list of services from which you want to collect data and send it to the monitor. There are five types of services to collect:
1. Physical
2. Applications
3. Internet
4. End-to-end
5. Datalink and subnetwork
Click the Security tab. Here you can configure several different types of settings for SNMP servers.
The Accepted community names list includes the names of the SNMP devices.
The community name has a function similar to the username and password.
Click Add and select Community Name and one of the four access levels (None, Notify, READ ONLY, READ WRITE, and READ CREATE)
Note: READ WRITE is the maximum access level in SNMP.
How to monitor the system using the SNMP service in Windows 10
To monitor the system, you can use READ ONLY, which does not apply any changes to the system.
In this example, we named the community public and access READ ONLY.
Then, in the Accept SNMP packets from these hosts section, enter the list of monitoring servers (name or IP address) from which you want to receive the SNMP package.
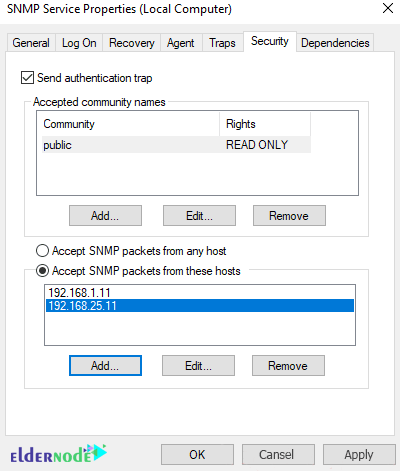
You can choose the Accept SNMP packets from any host option, but this is not very secure.
Save the changes and reset the SNMP service. If you want to enable SNMP on multiple hosts or remote servers, you can use PowerShell or Group Policy.
Conclusion
In this article, you learned How To Install And Configure SNMP Service In Windows 10. Installing SNMP Service in Windows 10 was taught firstly using PowerShell commands as well as the control panel. Then, you saw how to configure SNMP in Windows 10. Finally, the way of monitoring the system using the SNMP service in Windows 10 was explained with an example. By installing SNMP monitoring systems can receive the necessary information from the operating system. Complete your knowledge of Windows by spending useful time on Windows tutorials.


What are the firewall settings for configuring the SNMP service?
SNMP uses the UDP 161 port number to exchange messages and the UDP 162 port number to send the SNMP Trap.
Is there an SNMP service in Windows Client?
The SNMP service is installed on the Windows client and, like the Windows server, does not need to be set up or installed.
How many ways are there to communicate between NMS and SNMPAgent?
There are three ways to communicate between NMS and SNMPAgent:
1.Read only: means NMS can only receive and view information.
2. Read Write: In this case it has both set and get.
3. Trap: This method is newly added and the agent can send data to the manager without getting anything.
Please name the benefits of the SNMP protocol.
* This protocol requires a relatively simple code to run that manufacturers can easily incorporate SNMP agents into their products.
* The SNMP protocol is extensible and manufacturers can easily add functions for network management operations.
* In this protocol, the network management architecture is independent of the hardware device architecture, which allows support for multiple vendors.
* Extensive use of it in networks.
What are the functions of the SNMP protocol?
The tasks of the SNMP protocol include network monitoring and data collection from nodes, network configuration, and alert sending.