The Nikto tool is an open-source web server scanner written in Perl that detects more than 6,700 vulnerabilities on the webserver. This scanner scans for obsolete server software and other security issues. The Nikto tool performs specific public and server-type checks. It also records and displays each received cookie. Nikto examines server configurations such as HTTP server settings, the presence of multiple files, and attempts to identify installed web servers and software. This tool is written to perform all scans in the fastest possible time. In this article, we are going to teach you How to Install and Configure Nikto on Ubuntu 20.04. You can see the packages available in Eldernode to purchase the Ubuntu VPS server.
Table of Contents
Tutorial Install and Configure Nikto on Ubuntu 20.04
Nikto is an Open-Source Website (GPL) scanner that performs comprehensive tests on multiple web servers. Nikto also examines server configurations such as the presence of multiple files, HTTP server settings, and attempts to identify web servers and installed software. Scanned items and plugins are updating regularly and can update automatically. In the rest of this article we will talk about What is Nikto and what does it do. Then we will teach you to step by step how to Install Nikto on Ubuntu 20.04. Please join us.
What is Nikto and what does it do?
There are many tools and programs to find vulnerabilities in websites, but one of the simplest of these tools is the Nikto tool. Although the Nikto tool is very old, it is still one of the most popular scanners. This simple and small tool tests the target website and gives you a report of potential vulnerabilities found. Vulnerabilities that could use to hack the target site. In addition, Nikto is a common vulnerability search tool in the security industry.
Although the Nikto tool is very useful and effective, like many other scanner tools, it has one major drawback. The scan with the Nikto tool is not hidden and does not do anything secretly. Any website that has an IDS intrusion detection system or other security features and capabilities will detect your scans by the Nikto tool. The reason for this is that Nikto was not supposed to do anything secretly because from the beginning it was designed and created only for security testing (not covert intrusion)!
Install Nikto on Ubuntu 20.04
After get acquaint with the Nikto tool in the previous steps, now we will install it in this step. To install Nikto on Ubuntu 20.04, just follow the steps below. The first step is to update the system repositories using the following commands:
sudo apt-get updatesudo apt-get upgradeYou can now easily install Nikto by running the following command:
sudo apt-get install nikto -yTo check if Nikto is installed correctly and also its version, you can run the following command:
niktoHow to Configure Nikto on Ubuntu 20.04
In this section, we will discuss the various Nikto settings. If you have multiple virtual hosts on the same host server listening on different ports, you can specify multiple ports:
nikto -h Your_IP_Address -p 8080,8888Note that you can specify a range of ports in port1-portN format:
nikto -h Your_IP_Address -p 8080-8888You can also enter the URL you want instead of the IP address:
nikto -h example.comnikto -h https://example.comNote that you can also specify a port when using the URL:
nikto -h example.com -p 8080nikto -h https://example.com -p 8443Now we want to go to the proxy settings. If you are using a proxy server, you can use the -useproxy option to ask Nikto to use a proxy. Note that you can set proxy details in the Nikto configuration file, /etc/nikto/config.txt. You can also set it on the command line as shown below:
PROXYHOST=Your_IP_Address PROXYPORT=3128 PROXYUSER=username PROXYPASS=passwordOnce you have configured the Nikto proxy, you can now run it as follows:
nikto -h Your_IP_Address -useproxyIn the next step, you must do the following to determine the details of the proxy connection on the command line:
nikto -h Your_IP_Address -useproxy http://id:password@Your_IP_Address:3128/nikto -h Your_IP_Address -useproxy http://@Your_IP_Address:3128/The interesting thing to note is that Nikto can export scan results in various formats such as CSV, HTML, XML, NBE, text. To do this you must use the -o/-output and -Format commands as in the following:
nikto -h YOUR_IP_Address -o test.html -F htmlHow o use Nikto on Ubuntu 20.04
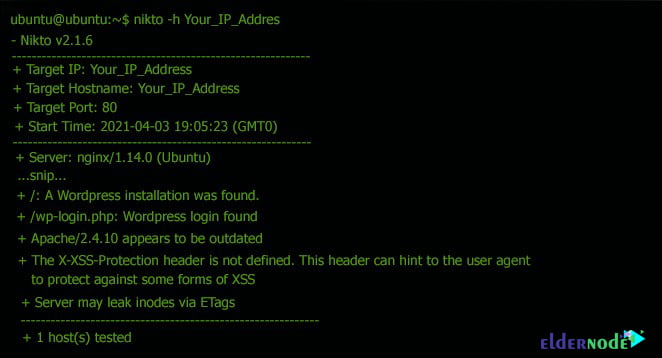
Now that you have successfully installed and configured Nikto, here is how to use it. It should be noted that you have a host address to scan your device. In the following command, you must enter the IP you want instead of the IP address:
nikto -h Your_IP_AddressOr
nikto -host Your_IP_Address
Conclusion
Nikto is an open-source tool for scanning web servers that performs numerous tests to find vulnerabilities. In this article, we have tried to fully acquaint you with Nikto scanning tools. Then we taught you how to Install and Configure Nikto on Ubuntu 20.04.