
In this tutorial you will learn how to install and use Nano text editor. Nano Learning will allow you to edit text files when you are logged into the command line of your VPS via SSH. The two main stream editors used by the novice Linux users are Vim and Emacs but the Nano takes a very simple approach. That is the reason why it is one of the top-rated text editors in the Unix environment.
Before Installing and Operating Nano Text Editor, the Following Prerequisites Need to be Satisfied.
A computer with either Ubuntu or CentOS operating systems (use of SSH to log into a computer with one of these operating systems is permissible as well).
Table of Contents
How to Install Nano Text Editor on Linux
The process of installing Nano Text Editor follows varied parameters depending on the operating system. For the most part, guests can access the Nano Text Editor as Nano is already installed on some operating OS. However, if this program is not available, or you have never used it, go to the ‘Get it’ section which is where the Nano Text Editor will need to be downloaded as described, and please come back to this paragraph at such time that you have the Nano Text Editor ready to be used.
Install Nano Text Editor in Debian / Ubuntu
If you want to install the Nano text editor in Debian or Ubuntu operating systems, use the command:
sudo apt-get install nanoWait for the installation process to finish and the installation of Nano Text Editor is completed.
Note, Sudo section is intended to run this command which is required to perform the action as root user. You may be prompted to type your password if you have not logged in as root user from the very beginning So, no worries.
Install Nano Text editor on CentOS/RHEL Operating Systems:
To install Nano editor on Centos/Rhel operating systems, use the following command:
yum install nanoThis command starts the Nano Text Editor installation. Once the settings are complete, you can use it!
The subsequent command will open a Nano text editor page for you. Any text which has been modified will be saved to test.txt. The nano can be closed by using CTRL + X keys combination. After the prompt, the system will ask, do you want to save the file changes? Enter Y to confirm this operation then press enter.
nano test.txtThe following is the procedure to use the Nano Editor. In this, we shall study:
– How to open and close files and edit
– Nano Editor Tips and Tricks
– Search and replace text
– Check basic commands
How to open and close Nano text editor
The main command to open the editor is as follows:
nano filenameNote: Instead of the file name one could type in the name of a new or desirable file. As already pointed out, do not forget that if you want to work with an already existing file, you must be in a directory that contains the file. You are not limited to the core file name but can also indicate the full file path.
For instance, to open a file in the directory you are currently located, you can type the following command:
nano test.txtTo open a file in another directory:
nano /path/to/directory/test.txtTo create a file “sample.doc” using nano, this document can be in a directory known as words, however, its name maybe words. Note that if such a file does not exist in the mentioned directory, a new file with that name will be created.
When you make use of the command mentioned to edit a document, you shall be directed to the editor window which resembles the word processor. In this window you’re able to edit text with Nano Text Editor. Arrow keys on the keyboard help in moving the cursor across the text.
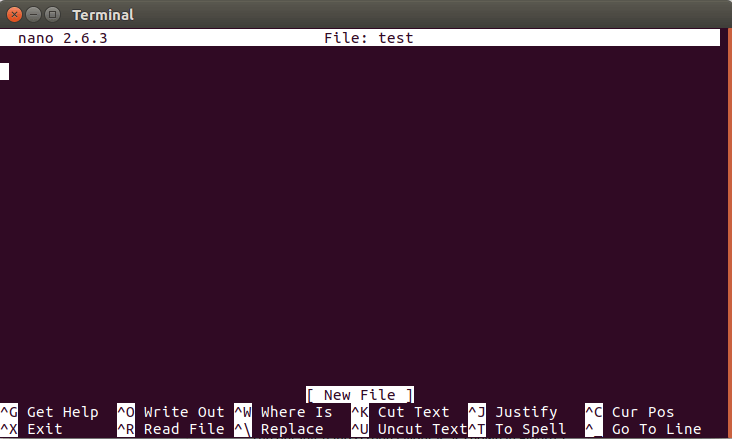
At the bottom of this window, there are some shortcuts which access facilities of the nano text editor. The ^ Symbol is used against any particular key and suggests both the command and its execution by pressing CTRL and the key concerned (CMD for MAC).
Press CTRL + O to save the changes to the file and continue editing.
Use CTRL + X to exit the editor. If any changes are made to the file that is currently open, it will ask you if you want to save it. If you want to save the changes, enter y and then press enter.
Take Note: Use the -w option for all subsequent opening of a configured file in Nano . By default it’s set in such a way that, if some text does not fit it gets converted so as to fit the screen. This could ruin some of the configured files and give many problems.
For example, to open a configured file, use the following command:
sudo nano -w /etc/apache2/apache2.confNano Editor Tips and Tricks
To select the text, go to the beginning of the selected text and press the ALT + A keys. This will set a check mark to select.
Then scroll through the text to select the text with the arrow keys. This selects the text.
Use the ALT + 6 keys to copy the selected text. This will copy the text to the clipboard.
Use CTRL + K to cut the text.
Press CTRL + U to paste the text.
If no text is selected before copying or pasting, it will copy or paste the entire line.
Search and replace text
Press CTRL + W to search for text. This will ask you about the text you want to search. Enter the text you want and press enter. Use ALT + W to search for similar text.
To locate and replace the text, select the combination of CTRL + W and CTRL + R afterwards. This will prompt copy both a search and a replace assessment. This will cause the text box to wade you through the first occurrence of the text and ask you if you wish to change in the future only the current occurrence or all such occurrences.
Here is some basic nano commands used when editing text:
CTRL + A: Go to start line
CTRL + E: Go to the end of the line
CTRL + Y: Scroll text down
CTRL + V: Move text up
CTRL + G: This command opens a help window that displays a list of all commands that can be used in Nano.
CTRL + O: The basic command to save. When used, you will be prompted to edit or confirm the file name and save your file by pressing Enter.
CTRL + W: It is one of the most useful nano commands out there. It is used for finding a particular phrased within your text which is very similar to the usual CTRL + F commands in other programs and operating systems. ALT + W is used to repeat the last command with similar text.
CTRL + K: Cuts the entire selected line and takes it to the cut buffer.
CTRL + U: Paste text from the cut buffer on the selected line.
CTRL + J: Justify the current paragraph
CTRL + C: Displays the current location of the cursor in the text (line / paragraph / column)
CTRL + X: By using this command, the nano software can be closed. If there is any change in the text, a save message will appear immediately.
CTRL + R: Open a file with the “Read File” command. Inserts the file from disk into the current cursor location.
CTRL + \: Replaces a regular string or phrase.
CTRL + T: Use a spell checker, if applicable.
_ + CTRL: Go to the specified row and column number.
ALT + A: Select text. First move the cursor to the text you want to select, then press ALT + A. The text will then be selected by moving the cursor with the arrow keys to the right. You can combine this command with CTRL + K and cut the selected text and move it to the cut buffer.
These commands were the basic commands and the most useful and used nano commands. If you need more commands, do not forget CTRL + G, this command will take you to the nano commands window.
Conclusion
In this tutorial, you have understood the procedure to install and edit using the Nano text editor. Ideally, you must follow a particular command depending on the kind of Linux operating system you have. There are starting rules and hotkeys which will allow you to edit your files in a quicker and easier manner as was noted above. Barring the next time, you do not have to install Nano and just make use of the edit file command.


How many types of scrolling does nano support?
It supports two types of scrolling. One chunk-by-chunk that scrolls multiple lines and one line-by-line that scrolls line by line.
How to back up in Nano Editor?
Add the following line in the settings file:
set backupOr use this switch at runtime:
-B or --backupCan Case Sensitive Searches be done in Nano Text Editor?
nano by default, uppercase and lowercase letters do not matter. If you want to make the nano search case, add the following line to the configuration file:
set casesensitiveHow to access the history of Nano Text Editor?
If you need to access the search / replace history in nano, just add the following line to the configuration file:
set historylogYou can also use the switch below to save the history:
-H or –historylogHow to hide the list of shortcuts in Nano Text Editor?
Use this option to not display the list of shortcuts at the bottom of the screen:
set nohelpRuntime option:
-x or --nohelp