How To Flush DNS Cache Locally In Windows, MacOS, & Linux. DNS, in a simple definition, is a service for converting domain addresses to IP addresses, which helps your system to exchange information from Internet servers. For example, when you enter an Eldernode.com address in your browser, your system will look for its IP address on DNS servers and, once found, will open the site for you.
Although these requests are answered quickly and the user does not notice at first glance, but with a little care you will notice a short pause when the site opens. In this article, we will teach you how to Clear DNS Cache on Windows, Mac and Linux operating systems.
How To Flush DNS Cache in Windows, MacOS & Linux.
ElderNode VPS hosting packages
Table of Contents
What is DNS cache?
The DNS cache on your system is designed so that once your system requests an IP address of a domain from DNS, it stores that IP address for a certain period of time. By saving the IP address for the next time, your system does not need to send requests to DNS servers. In general, it makes the site open a little faster when you open a site a second time.
This DNS cache will sometimes cause problems for users, and because IP addresses are stored, a site may have changed its IP address. This will prevent you from accessing that site. To do this, you need to clear the DNS cache, which we will teach in the following.
How to Clear DNS Cache in Windows
The procedure is the same for almost all Windows systems. For the example below, we will be using Windows 10.
To flush DNS on your Windows machine follow the steps below:
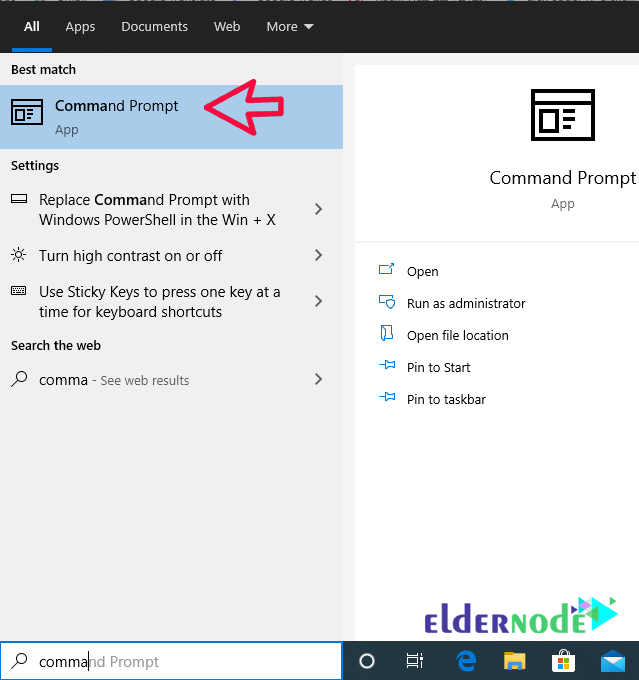
1. Load the Command Prompt as an administrator.
Open the Start Menu and start typing command prompt until you see it in the results.
2. Type ipconfig /flushdns when the prompt loads and hit Enter on the keyboard.

3. The process should take only a few seconds.
When done, you should see a DNS Resolver cache confirmation message similar to the one below:
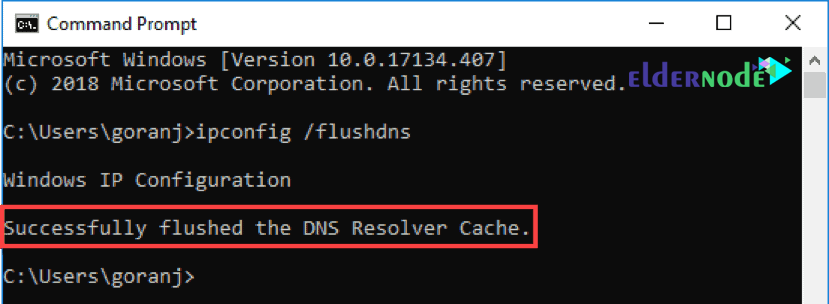
The DNS Cache database on your computer is now clear.
You should get the correct and updated IP mapping from DNS servers next time your machine sends a DNS query.
Tutorial Clear DNS Cache on a Mac
There are a few different commands to use for flushing DNS cache on OS X and macOS depending on the version you are running.
How to Flush DNS on macOS Mojave
To clear DNS cache on macOS Mojave, use the Terminal application:
1. Run terminal.app using your preferred method.
You can launch the app from the following path:
Applications >> Utilities or press Command + Space to launch Spotlight and search for Terminal.

2. Type in sudo killall -HUP mDNSResponder and hit Return on your keyboard.
3. Enter the administrator password for the account in question and hit Return.

If you want to hear an audio notification after the DNS flush is complete, type say some text after the first command. For example:
sudo killall -HUP mDNSResponder; say dns cleared successfully
How to Flush DNS Cache in Linux
Linux distributions are a bit different from Windows and Mac machines.
Each Linux distribution might use a different DNS service. Some distributions, like Ubuntu, don’t have a default DNS service at all.
It depends on which service you have on your distribution and whether it is enabled by default. Some of them are NCSD (Name Service Caching Daemon), dnsmasq, and BIND (Berkely Internet Name Domain).
For every distribution, you need to launch a terminal window.
Press Ctrl+Alt+T on your keyboard and use the corresponding command to clear the DNS cache for the service your Linux system is running.
Flush Local NCSD DNS Cache
Use the following command to clear NCSD DNS cache on your Linux machine:
sudo /etc/init.d/nscd restartEnter your password if necessary. The process stops and then starts the NCSD service within seconds.
Flush Local dnsmasq DNS Cache
You can use the following command to clear the dnsmasq DNS cache on your Linux machine:
sudo /etc/init.d/dnsmasq restartEnter your password again, if the terminal asks you to. You will see the response when the service stops and starts again.
Flush Local BIND DNS Cache
If you use BIND for DNS service, there are a few commands you can use to flush its DNS cache.
Note: You may need to enter your password to finish the process.
sudo /etc/init.d/named restartsudo rndc restartsudo rndc exec
Dear user, we hope you would enjoy this tutorial, you can ask questions about this training in the comments section, or to solve other problems in the field of Eldernode training, refer to the Ask page section and raise your problem in it as soon as possible. Make time for other users and experts to answer your questions.
Goodluck.
