If you are moving any data, you should be sure that the data and information are safe. One of the most effective ways to protect data as it travels between your server and users is to enable HTTPS, also known as an SSL certificate. Every website and blog needs HTTPS. Now is the time to create an HTTPS server with Node.js. This article will teach you 5 Steps to Create an HTTPS Server with Node.js. Check out the packages offered on the Eldernode website, if you want to buy a VPS server.
Table of Contents
How to Create HTTPS Server with Node.js
The HTTP is a protocol for smooth communication between networks but it is not encrypted. HTTPS stands for Hyper Text Transfer Protocol Secure and is an encrypted version of HTTP; which is known as the main protocol used to transfer data through the World Wide Web. It encrypts the data during the transmission between a browser and the server and is a protected connection that you can use to connect to important and sensitive sites.
1- Generating a Self-Signed Certificate
There are two types of certificates which are certificates signed by a Certificate Authority and Self-Signed Certificates. The trusted source for an SSL certificate is the Certificate Authority. If you use it, users will trust the identity of your website. A self-signed certificate will do just fine if you use a CA-signed certificate in a production environment.
First of all, open your terminal and generate a signed certificate using the commands below:
openssl genrsa -out key.pem openssl req -new -key key.pem -out csr.pem openssl x509 -req -days 9999 -in csr.pem -signkey key.pem -out cert.pem rm csr.pemNow you will get some options to fill that except for the two options of the Common Name and Email Address, you can keep the rest as default by entering ”.”.
It will create two files which are:
–> cert.pem: The self-signed certificate file
–> key.pem: The private key of the certificate
You should put these files in the same directory as your Node.js server file.
2- Creating a Form to Send a Message to the Server
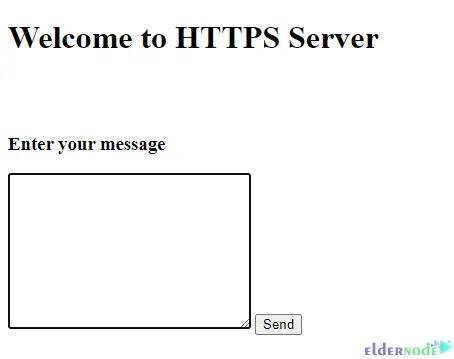
In this step, code the index.html file. You can send a message to the server through a POST request by creating a form:
<!DOCTYPE html> <html lang="en"> <head> <meta charset="UTF-8"> <meta http-equiv="X-UA-Compatible" content="IE=edge"> <meta name="viewport" content ="width=device-width, initial-scale=1.0"> <title>HTTPS Server</title> </head> <body> <h1>Welcome to HTTPS Server</h1> <br><br> <h3>Enter your message</h3> <!-- sending post request to "mssg" with the message from the textarea --> <form action="mssg" method="post"> <textarea name="message" id="" cols="30" rows="10"></textarea> <button type="submit">Send</button> </form> </body> </html>3- Creating an app.js File
Now use the command below to initialize the project:
npm initInstall Express to handle server requests by running the following command:
npm install expressAnd then install body-parser to get input from the form in the POST request by entering the command below:
npm install body-parser4- Setting Up hello world Example
You should set up a hello world example as shown below. Remember that the biggest difference between HTTPS and HTTP is in the options parameter:
const https = require('https'); const fs = require('fs'); const options = { key: fs.readFileSync('key.pem'), cert: fs.readFileSync('cert.pem') }; https.createServer(options, function (req, res) { res.writeHead(200); res.end("hello world\n"); }).listen(8000);5- Starting the HTTPS server with Node.js
You can start your HTTPS server using the following command:
node app.jsOpen your browser and go to the running server address:
curl -k https://localhost:8000You should see a webpage running with HTTPS:
That’s it!
Conclusion
In this article, we explained 5 steps to create an HTTPS Server with Node.js. I hope this tutorial helps you to create an HTTPS server with Node.js. If you have any questions or problems, you can contact us in the Comments section.