ESXi is the latest version of the VMware Hypervisor software suite, which is independent of the operating system and installs directly on the hardware. In this software, Bare Metal technology is using and provides the possibility of managing the hardware and system resources. Using this software, you can build a virtual machine and also the process of allocating resources to the virtual machine. In fact, it can be said that ESXi controls and manages hardware resources among virtual machines. In this article, we try to teach you how to upgrade esx 6.0 to 6.5 with CLI. If you think you have a dedicated server and you can not neglect it, because the cost of reinstalling and restarting your software with a new VPS server is difficult, you do not need to replace or restart. Because it is possible in ESXI to easily convert your physical machine to a virtual machine (Convert) and continue your work process and add other machines along with it. You can also visit the locations and packages available in Eldernode to purchase a dedicated server.
Tutorial upgrade esx 6.0 to 6.5 with CLI
ESXi is mostly using in organizations and managers can upload the necessary information through a configured file. It should be noted that VMware management software can be used to manage ESX servers and other VPS Servers that are built on it. In the continuation of this article, join us to learn how to upgrade esx 6.0 to 6.5 with CLI step by step.
Upgrade esx 6.0 to 6.5 with CLI
In this section, we want to introduce you to how to upgrade Esxi. Before you start, make sure your ESXi 6.X host is connected to the Internet. Then you should review the release notes. Be sure to back up your ESXi 6.X installation or configuration before starting the upgrade.
To do upgrade, you need to enable SSH in the first step. Then you need to connect to your ESXi host via Putty.
After you have successfully logged in to ESXi host, you must enable the firewall (permission) rule for web traffic using the following command:
esxcli network firewall ruleset set -e true -r httpClientNow in this step you have to run the following command to see the VMware online repository and various profiles that you can update from:
esxcli software sources profile list -d https://hostupdate.vmware.com/software/VUM/PRODUCTION/main/vmw-depot-index.xml | grep -i ESXi-6As you can see in the image below, there are two profiles that interest us. You must select “no-tools“.
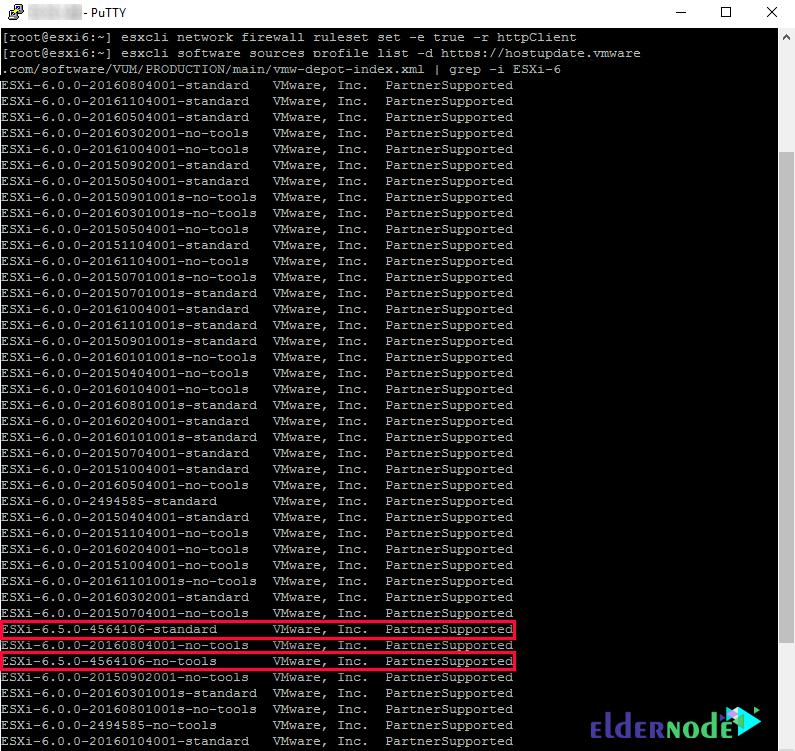
The next step is to run the upgrade using the following command:
esxcli software profile update -p ESXi-6.5.0-20170702001-standard -d https://hostupdate.vmware.com/software/VUM/PRODUCTION/main/vmw-depot-index.xmlThe following command is the main command of ESXi 6.5:
esxcli software profile update -p ESXi-6.5.0-4564106-no-tools -d https://hostupdate.vmware.com/software/VUM/PRODUCTION/main/vmw-depot-index.xmlAfter the upgrade is successful, in the next step, you must enable the firewall again by executing the following command:
esxcli network firewall ruleset set -e false -r httpClientFinally, to complete the installation, you must restart the host to get out of maintenance.
Conclusion
Among the companies providing systems based on virtualization, vmware is one of the pioneers in this field. ESX is a VMware Hypervisor that uses the powerful VMKernel kernel. In this article, we tried to teach you how to upgrade esx 6.0 to 6.5 with CLI.
