If you are a network or website administrator, you should pay attention to the implementation of security rules and principles. But you may not be able to control and monitor all vulnerabilities. Vulnerability scanners are tools that play an important role in automatic security management. One of the most famous security scanners is OpenVAS, which has the ability to scan all kinds of vulnerabilities. This article will introduce 4 Steps to Secure Your Server with OpenVAS. If you intend to VPS server, you can check out the packages offered on the Eldernode website.
Table of Contents
What is OpenVAS?
OpenVAS stands for Open Vulnerability Assessment System and is an open-source and free scanner tool. It can detect security issues in all manner of servers and network devices. This scanner is provided under the GNU/GPL license and obtains the tests for detecting vulnerabilities from a feed that has a long history and daily updates. Greenbone Network developed OpenVAS in 2006. Webservers use OpenVAS to prevent unauthorized access to websites or servers. It also allows users to access various Web applications.
OpenVAS Capabilities
Here are some of the advanced OpenVAS capabilities:
– Unauthenticated Testing
– Various high-level and low-level Internet Protocols
– Performance Tuning for large-scale Scans
– Powerful Internal Programming Language
Securing Your Server with OpenVAS
In this step, we will introduce you to 4 steps to secure your server with OpenVAS. These 4 steps are OpenVAS installation, OpenVAS configuration, OpenVAS monitoring, and OpenVAS management.
1- Installing OpenVAS on your Server
First, update your system packages with the following command:
sudo apt updateSome OpenVAS components are available in default repositories, but it is better to use PPAs to maintain updated versions of packages. So first of all, you should install the python-software-properties package, which allows you to easily work with the PPA. To do this, run the following command:
sudo apt install python-software-propertiesNow add the newest stable version to the system using the command below:
sudo add-apt-repository ppa:openvas/openvas6Update your system again:
sudo apt updateIt’s time to install OpenVAS. Just enter the following command to install the required components:
sudo apt install openvas-manager openvas-scanner openvas-administrator openvas-cli greenbone-security-assistant sqlite3 xsltproc texlive-latex-base texlive-latex-extra texlive-latex-recommended htmldoc alien rpm nsis fakeroot2- Configuring OpenVAS on your Server
SSL certificates for OpenVAS can be generated using the Wrapper tool, which is available by default. You should call this with administrative privileges as follows to place it in a restricted section of the file system:
sudo openvas-mkcertYou can press Enter to accept the default values when prompted. Then create another client certificate for a user named ”marilyn”:
sudo openvas-mkcert-client -n marilyn -iIn this step, you need to build the database information so that our local tools are aware of different types of threats and vulnerabilities. To do this, update the network vulnerability tests database by running the following command:
sudo openvas-nvt-syncThen you will see the latest definitions being downloaded to your local device.
Stop the manager and scanner applications using the command below to be able to call the commands without a conflict momentarily:
sudo service openvas-manager stopsudo service openvas-scanner stopYou can start the scanner program without the parameters in the init file that are normally called with the command below:
sudo openvassdNow rebuild the database generated by the scanner using the following command:
sudo openvasmd --rebuildDownload and update your security content automation protocol data which is known as SCAP data by entering the following command:
sudo openvas-scapdata-syncNow you should run a similar sync operation for the cert data as shown below:
sudo openvas-certdata-syncIf this is the first time you run the above command, you may get the following error:
Error: no such table: metaThis error may be due to missing some files that are packed in some other versions. You can get them from an RPM package for the manager component. To download it into your home directory, just enter the following command:
cd wget http://www6.atomicorp.com/channels/atomic/fedora/18/i386/RPMS/openvas-manager-4.0.2-11.fc18.art.i686.rpmThen extract and expand the directory structure in RPM with the help of the following command:
rpm2cpio openvas* | cpio -divNext, create a directory for the new files so OpenVAS can find them. Then move the files to that directory as shown below:
sudo mkdir /usr/share/openvas/certsudo cp ./usr/share/openvas/cert/* /usr/share/openvas/certRun the certificate sync command again with the following command:
sudo openvas-certdata-syncDelete the extracted RPM data and directories from the home directory using the command below:
rm -rf ~/openvas* ~/usr ~/etc3- Monitoring the Vulnerabilities using OpenVAS
First, you should create a target with the OpenVAS/Greenbone Security Assistant web interface. To do this, navigate the Configuration section, choose Targets and click on the icon shown to create a new target:

You will see the dialog screen in which you should enter the Target name and the target IP host. Once you have entered the information, set other settings to default and click on Create:
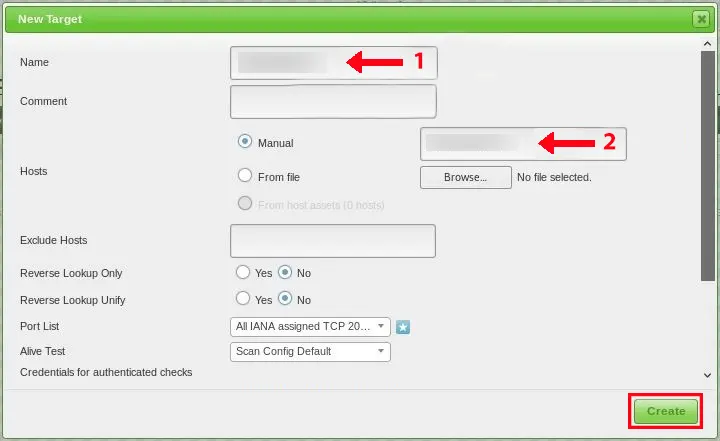
You should see the newly created target in the list of available targets.
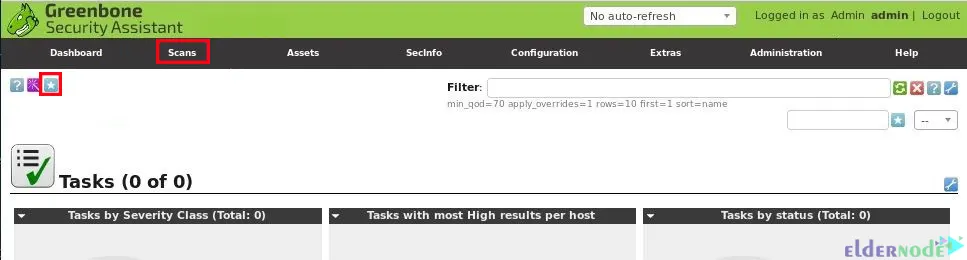
In this step, you should configure a scanning task in OpenVAS. The scanning task defines the targets that will be scanned, the scanning options, the scanning configuration, and concurrently scanned targets and NVTs per host. To do this, navigate to Scans, choose Tasks, click on the shown blue icon and choose New Task:
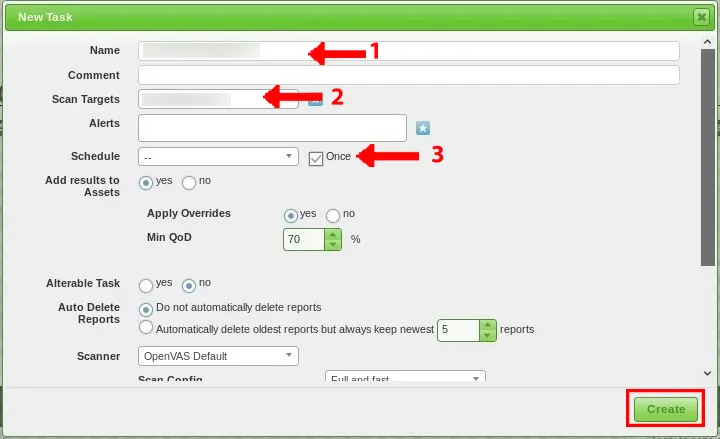
Now you will see the dialog screen in which you should enter the Task name and choose the task name created earlier. Then tick the schedule once checkbox, set other settings default and click on Create:
You will see the newly created task in the task list.
You can run the OpenVAS vulnerability scan by clicking on the shown start button:

The scan task will run against the selected target. If you reload the page, you can check the progress.
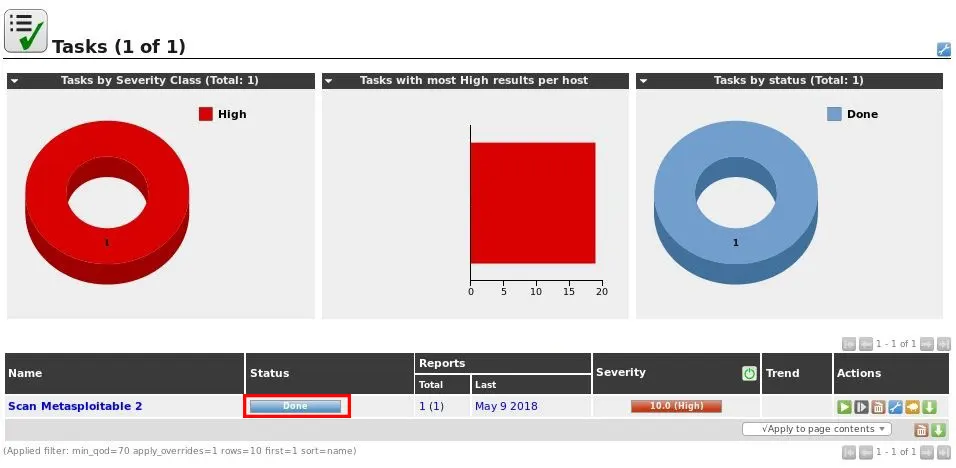
Once it is finished, you can see the status changes to Done:
4- Managing the OpenVAS
You need to set the OpenVAS user and ports because you will need a user to enter the service. Create a user named ”marilyn” with the administrator role as shown below:
sudo openvasad -c add_user -n admin -r AdminYou will be asked to provide a password for the new account.
Now open the file below with root privileges from your desired text editor:
sudo nano /etc/default/greenbone-security-assistantThe parameter on the top specifies the address that the web interface will listen to. To allow it to listen for connections from the Internet, you should change the value from 127.0.0.1 to the public IP address of your VPS:
<pre> GSA_ADDRESS=<span class=“highlight”>your_server_IP_address</span> </pre>Save and close the file.
Some services are running in some capacities, kill all running OpenVAS scanner processes with the help of the following command:
sudo killall openvassdYou can check if processes are still running or not using the following command:
ps aux | grep openvassd | grep -v grepIf a service is returned, you should wait for the process to finish.
Once the process is completed, restart all of the services by running the command below:
sudo service openvas-scanner startsudo service openvas-manager startsudo service openvas-administrator restartsudo service greenbone-security-assistant restartThat’s it! We are offering different packages of Linux VPS servers. If you looking for an economical Linux VPS server, our website is one of the best options.
Conclusion
OpenVAS is a collection of tools that work together to perform tests against client computers using a database of known exploits and vulnerabilities. In this article, we introduced you to 4 steps to secure your server with OpenVAS. I hope this article helps you to secure your server with OpenVAS and was useful for you. If you have any questions or suggestions, you can contact us in the Comments section.