PHP programming language is constantly being updated and different versions of it are used on websites. So it is necessary for every programmer to change the PHP version and choose the appropriate version. This article will teach you How to Switch PHP Version on Ubuntu 20.04. If you intend to buy an Ubuntu VPS server, you can check out the packages offered on the Eldernode website.
Table of Contents
Tutorial Change PHP Version on Ubuntu 20.04
PHP stands for Hypertext Pre-processor and is an open-source, server-side scripting language that you can run and use on any type of system. Updating your PHP version is one of the most important things to do. Older PHP versions are very weak in terms of security and performance and you should update to newer versions as soon as possible. Using updated versions of PHP is the best option, and the more you can keep your PHP version up to date, the more security, efficiency, and features you will have.
Switching PHP Version on Ubuntu 20.04
In this section, you will learn how to switch the PHP version for the Apache Web Server, CLI, and Nginx on Ubuntu 20.04. To do this, follow the steps below.
Apache Web Server
First, disable the current version of PHP using the command below to switch PHP version for the Apache web server. Our current version is PHP 7.0:
sudo a2dismod php7.0The output should be as follows:
Module php7.0 disabled.Now enable PHP 8.0 by running the following command:
sudo a2enmod php8.0Finally, you should restart Apache Web Server by running the following command:
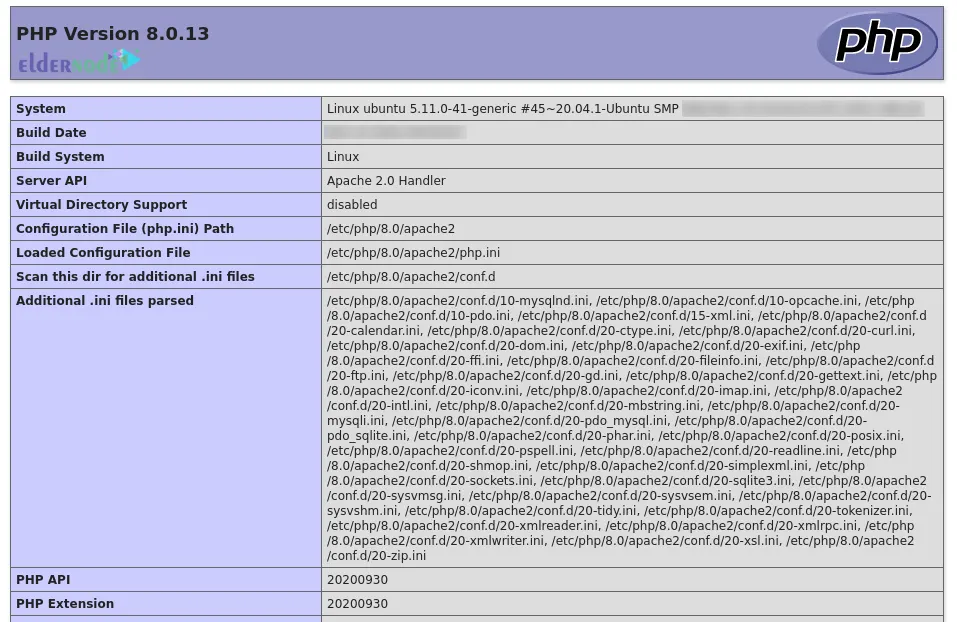
sudo service apache2 restartAnd refresh the info.php using the Web Browser:

You can also configure the selected virtual host to use the PHP version specified by you. To do this you need to use PHP FPM installed.
Check the status of PHP 7.0 FPM using the following command:
systemctl status php7.0-fpmAnd run the following command to check the status of PHP 8.0:
systemctl status php8.0-fpmBoth PHP 7.0 FPM and PHP 8.0 FPM are running as you can see in the outputs. Next, you need to enable Apache2 to use multiple versions of PHP. To do this, install FCGID by entering the following command:
sudo apt install libapache2-mod-fcgidAnd enable it with the command below:
sudo a2enmod actions fcgid alias proxy_fcgiThen restart Apache to make the changes take effect:
sudo service apache2 restartYou need to update the Virtual Host as shown below:
<VirtualHost *:80> ---- ---- <FilesMatch \.php$> # For Apache version 2.4.10 and above SetHandler "proxy:unix:/run/php/php7.0-fpm.sock|fcgi://localhost" </FilesMatch> ---- ---- </VirtualHost>Lastly, reload Apache using the command below:
sudo service apache2 reloadAnd check the output of info.php again using the Browser. You will see the configurations specific to PHP 7.0.
CLI
Firstly, check the current PHP version with the following command:
php --versionTo configure multiple PHP versions installed on Ubuntu 20.04, enter the following commands.
PHP 7.0:
sudo update-alternatives --set php /usr/bin/php7.0 sudo update-alternatives --set phar /usr/bin/phar7.0 sudo update-alternatives --set phar.phar /usr/bin/phar.phar7.0PHP 8.0:
sudo update-alternatives --set php /usr/bin/php8.0 sudo update-alternatives --set phar /usr/bin/phar8.0 sudo update-alternatives --set phar.phar /usr/bin/phar.phar8.0Run the following commands to switch between PHP 7.0 and PHP 8.0:
sudo update-alternatives --config php sudo update-alternatives --config phar sudo update-alternatives --config phar.pharAnd verify the PHP version as shown below:
php --versionNginx
Nginx uses PHP FPM to run PHP scripts and you can easily change the PHP version for Nginx.
To do this, open the configuration file with a text editor:
sudo nano /etc/nginx/sites-available/example.comAnd pass the PHP scripts to FastCGI:
location ~ \.php$ { root /var/www/example.com/html; fastcgi_intercept_errors on; fastcgi_pass unix:/run/php/php7.0-fpm.sock; fastcgi_index index.php; fastcgi_param SCRIPT_FILENAME $document_root/$fastcgi_script_name; include fastcgi_params; } ... ... }Save the file and exit.
That’s it!
Conclusion
Every programmer should switch PHP versions and choose the appropriate version. In this article, we taught you how to switch the PHP version on Ubuntu 20.04. I hope this tutorial was useful for you and helped you to switch PHP versions on Ubuntu 20.04. If you have any questions or problems, you can contact us in the Comments section.


