Pandora Flexible Monitoring System is a free open-source and highly-scalable IT infrastructure monitoring tool. Pandora FMS is released under the terms of the GNU General Public License. Using Pandora FMS allows you to manage network equipment such as systems and applications. Since Pandora FMS is designed to be modular, multi-platform, and easy to customize, it supports monitoring of networks, servers, applications, databases, cloud and virtualization, logs, user experience, and business processes. This article presents Tutorial Setup Pandora FMS on Debian 10. You can visit the available packages of Eldernode and order your own Linux VPS with the best price and support.
Table of Contents
How To Setup Pandora FMS on Debian 10 step by step
As an administrator, you need to use software for monitoring the computer network. Using Pandora FMS allows you to have visual monitoring of the status and performance of several parameters from different operating systems, servers, applications, and hardware systems. Linux is Pandora FMS’s preferred operating system, but it also works perfectly under Windows. CentOS 7 is the recommended distribution. There are installation packages in Debian/Ubuntu and SUSE Linux.
Components of Pandora FMS
Pandora Monitoring System has four components. Let’s read more about them.
1- Pandora FMS Servers
A Perl-based program in charge of performing checks, collecting, aggregating, and processing the data. They save data into the database. All servers are integrating into a single multi-threaded application.
2- Pandora FMS Console
A PHP-based user interface to operate and manage the monitoring system. It is powered by a database and a web server. It is also in charge of displaying the information present in the database.
3- Database
A data about the monitoring system is storing in the database.
4- Software Agents
An application installed on monitored systems, and run as daemons or services to collect the data to send it to the Pandora FMS servers.
Prerequisites to Install and setup Pandora FMS On Debian 10
To let this tutorial work better, please consider the below Prerequisites:
_ A non-root user with Sudo privileges.
_ To set up, follow our Initial server setup on Debian 10.
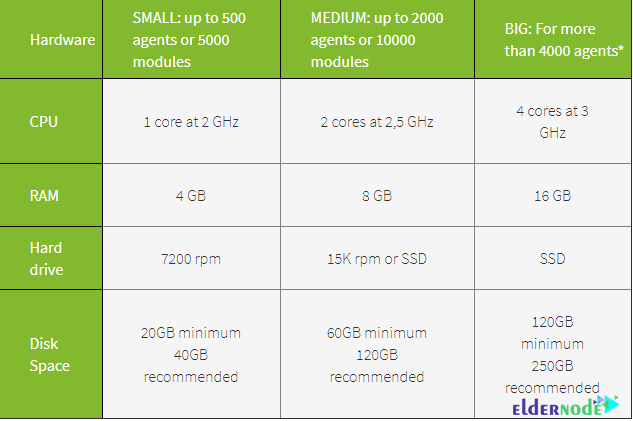
_ To see the system hardware requirements, have a look at the below table:
How to Install Pandora FMS on Debian 10 | Debian 9
If you have not installed Pandora FMS, review this section and follow the required steps of installation. But if Pandora is already installed on your Debian 10 server, go to the part of How To Monitor Debian 10 With Pandora FMS in this article and see how to setup Pandora FMS.
However, let’s start with updating your system packages to the updated version. Use the following command to do this:
apt-get update -yWhen you updated the packages, run the command below to install all the dependencies required for Pandora FMS:
apt-get install snmp snmpd libnet-telnet-perl libgeo-ip-perl libtime-format-perl libxml-simple-perl libxml-twig-perl libdbi-perl libnetaddr-ip-perl libhtml-parser-perl xprobe2 nmap libmail-sendmail-perl traceroute libio-socket-inet6-perl libhtml-tree-perl libsnmp-perl snmp-mibs-downloader libio-socket-multicast-perl libsnmp-perl libjson-perl -yHow to Install LAMP Server
In this part, you must install the Apache server, MariaDB, PHP, and other required dependencies to your system. So, type:
apt-get install apache2 mariadb-server php php-common php-gmp php-curl php-mbstring php-xmlrpc php-mysql php-gd php-bcmath php-xml php-cli php-zip php-pear php-zip php-sqlite3 php-snmp php-db graphviz php-curl php-ldap dbconfig-common unzip git -yOnce the installation of all packages is finished, edit the php.ini file and define the recommended settings:
nano /etc/php/7.4/apache2/php.iniAnd then, change the following lines:
memory_limit = 256Mupload_max_filesize = 100Mmax_execution_time = 360max_input_vars = 2000date.timezone = Europe/ParisHow to Configure MariaDB Database
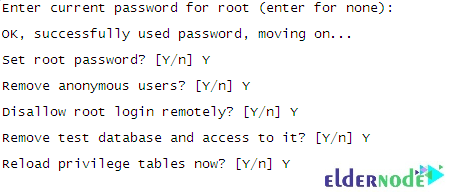
Since the root password of MariaDB is not set by default, run the script below to set it in your system:
mysql_secure_installationAnd then answer all the following question to set the root password:
Next, run the following command to log into the MariaDB shell:
mysql -u root -pProvide your root password when prompt then enable the mysql_native_password plugin with the following command:
MariaDB [(none)]> USE MySQL;MariaDB [(none)]> UPDATE user SET plugin='mysql_native_password' WHEREUser='root';To create a database and user for Pandora, type:
MariaDB [(none)]> CREATE DATABASE pandora;MariaDB [(none)]> GRANT ALL PRIVILEGES ON pandora.* to pandora@'localhost'IDENTIFIED BY 'pandora';And then, to flush the privileges and exit from the MariaDB shell, run:
MariaDB [(none)]> FLUSH PRIVILEGES;MariaDB [(none)]> EXIT;Now, you need to edit the /etc/mysql/my.cnf file and define the sql_mode.
nano /etc/mysql/my.cnfAdd the following lines:
[mysqld]sql_mode=NO_ENGINE_SUBSTITUTIONAnd finally, you can save and close the file. Use the following command to restart the MariaDB service to apply the changes:
systemctl restart mariadbHow to download Pandora FMS
To download the latest version of Pandora FMS, run the command below to get it from Github:
cd /var/www/html/git clone https://github.com/pandorafms/pandorafms.gitThen, you can give proper permission and ownership to the downloaded directory:
chown -R www-data:www-data /var/www/html/pandorafmschown -R www-data:www-data /var/www/html/pandorafms/pandora_console/chmod -R 775 /var/www/html/pandorafms/pandora_console/Now, edit the Pandora configuration file:
nano /var/www/html/pandorafms/pandora_console/include/config.inc.phpAnd finally, uncomment and change the following lines as per your database settings:
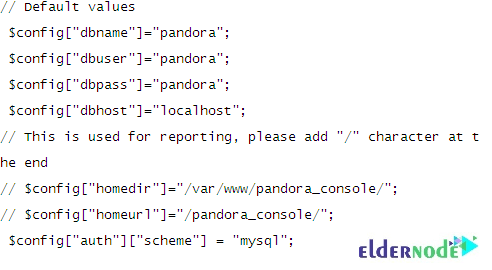
And when you are finished, save and close the file.
How to Configure Apache for Pandora FMS
In this part, you can use the following command to create a new Apache virtual host configuration file:
nano /etc/apache2/sites-available/pandora.confThen, add the following lines:
<VirtualHost *:80>ServerAdmin [email protected]ServerName pandora.eldernode.comDocumentRoot /var/www/html/pandorafms/pandora_console<Directory /var/www/html/pandorafms/pandora_console>AllowOverride All</Directory>ErrorLog /var/log/apache2/error.logCustomLog /var/log/apache2/access.log combined</VirtualHost>Save and close the file. Use the command below to enable the Pandora virtual host:
a2ensite pandoraThen, reload the Apache service to apply the configuration changes:
systemctl restart apache2How To Monitor Debian 10 With Pandora FMS
Pandora FMS provides notable features that give you the flexibility to monitor servers, applications, and network devices along with their resources with a range of protocols and built-in services. Once the installation is completely finished, you can access the Pandora FMS and start using it.
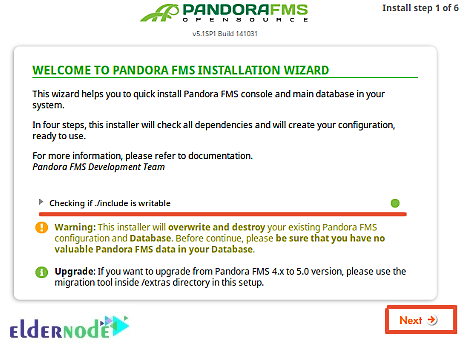
Open your web browser and type the URL http://pandora.eldernode.com/install.php. If the installation steps have been passed successfully, you can view the installation wizard page:
Click in the Next button to see the following page:
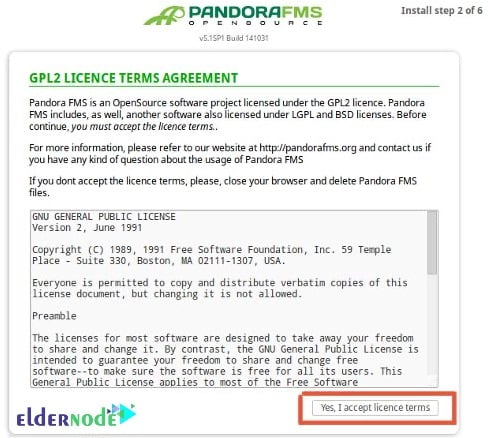
Click on the “Yes, I accept the Licence Terms“. You should see the following page:
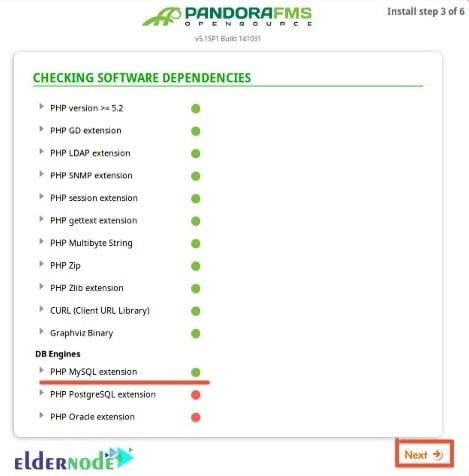
Make sure all the PHP extensions are installed then click on the Next button. You should see the following page:
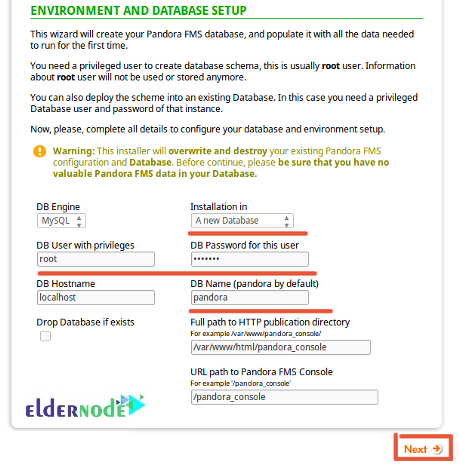
Provide your root username, MariaDB root password, Database name, Path of the Pandora, and click on the Next button. You should see the following page:
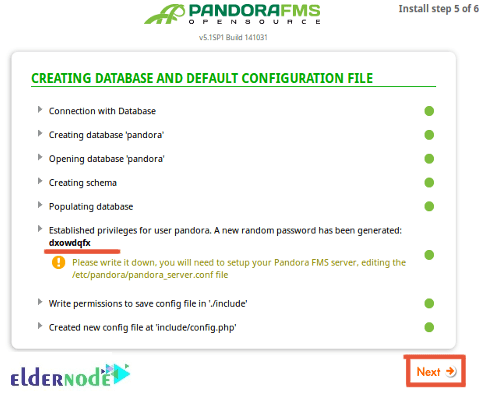
This will change the password for the Pandora database user. So you will need to define your original Pandora database password in the config.php file. Open your terminal and edit the config.php file:
nano /var/www/html/pandorafms/pandora_console/include/config.phpThen, change the “$config[“dbpass”]” field with your original password:
// Begin of automatic config file$config["dbtype"] = "mysql"; //DB type (mysql, postgresql...in future others)$config["mysqli"] = true;$config["dbname"]="pandora";$config["dbuser"]="pandora";$config["dbpass"]="pandora";$config["dbhost"]="localhost";Save and close the file. Then, go back to the Pandora installation wizard and click on the Next button. You should see the following page:
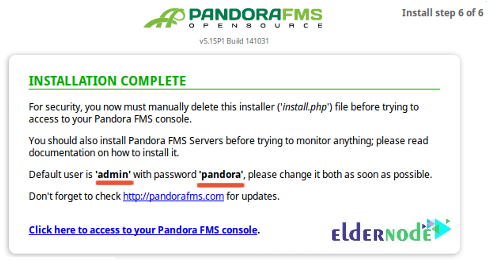
And finally, open your terminal again and remove the install.php file:
rm -rf /var/www/html/pandorafms/pandora_console/install.phpNow, go back to the Pandora FMS installation wizard and click on the “Click here to access to your Pandora FMS console“. You should see the Pandora FMS login screen:

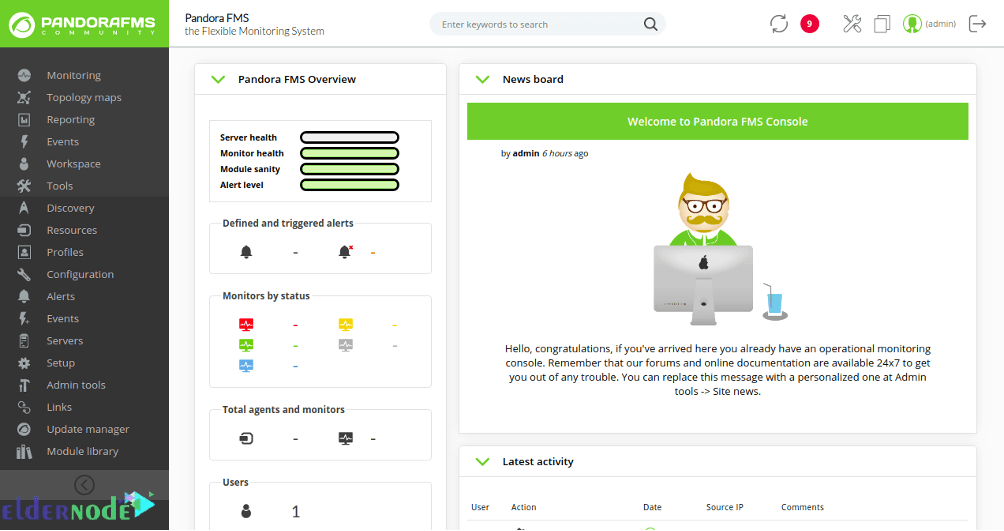
In the end, provide the default admin username as admin and password as pandora. Click on the Login button. You should see the Pandora dashboard on the following screen:
Conclusion
This article presented Tutorial Setup Pandora FMS on Debian 10. To start monitoring from the Pandora FMS, you can add client systems. If you are interested in learning more, refer to How to Install Pandora FMS on Windows 10 RDP.