Suricata is a free and open-source network threat detection engine. Using Suricata allows you to detect intrusion (IDS), prevention intrusion (IPS), and network security monitoring. Since Suricata does well in deep packet inspection and pattern matching, it is useful for threat and attack detection. Suricata is developed by the OISF and is owned by a community-run non-profit foundation, the Open Information Security Foundation (OISF). Also, the source code of Suricata is licensed under version 2 of the GNU General Public License. Join us with this article to review Tutorial Setup And Configure Suricata On Debian 9, 10. Count on the technical team of Eldernode and order your considered package to purchase your own Linux VPS.
Table of Contents
How To Setup And Configure Suricata On Debian 9 step by step
Suricata supports most Operating Systems such as Linux, FreeBSD, OpenBSD, macOS / Mac OS X, and Windows. Since Suricata is multi-thread you will be able to scale horizontally on a single appliance by adding packet processing threads as the traffic volume makes necessary. Stay with us to review the installation, setup, and configuration of Suricata on Debian 9.
Suricata Features
Suricata is a best-of-breed signature-based intrusion detection platform – and it’s one of three important detection engines on the Bricata platform. Let’s read about the benefits of that:
1- High Performance
2- Automatic protocol detection
3- Lua scripting
4- Industry-standard outputs
5- Offline analysis of PCAP files
6- Traffic recording using Pcap logger
7- Unix socket mode for automated PCAP file processing
8- Advanced integration with Linux Netfilter firewalling
While many of the features and functionalities are similar to Snort – Suricata is different in several important ways:
1- It’s multi-thread so a single instance can perform at much higher traffic volumes
2- There is more support available for application layer protocols
3- It supports hashing and file extraction
4- It has hooks for the Lua scripting language, which can be used to modify outputs and even create complex and detailed signature detection logic.
Prerequisites to Install and configure Suricata on Debian 9
To let this tutorial work better, please consider the below Prerequisites:
_ A non-root user with Sudo privileges.
To set up, follow our Initial server setup on Debian.
Install Suricata on Debian Linux
The Suricata software is well integrating into Debian. Installing the deb package from the official Debian repository will give you a Suricata ready for use. Before you can build Suricata for your system, run the following command to ensure that you have everything you need for the installation:
apt-get -y install libpcre3 libpcre3-dbg libpcre3-dev \build-essential autoconf automake libtool libpcap-dev libnet1-dev \libyaml-0-2 libyaml-dev zlib1g zlib1g-dev libmagic-dev libcap-ng-dev \libjansson-dev pkg-config rustc cargoThen, use the commands below to download and build Suricata:
wget http://www.openinfosecfoundation.org/download/suricata-5.0.0.tar.gztar -xvzf suricata-5.0.0.tar.gzcd suricata-5.0.0Suricata can install on various distributions using binary packages. In Debian 9:
sudo apt-get install suricataNote: In the “stable” version of Debian, Suricata is usually not available in the latest version. A more recent version is often available from Debian backports, if it can be built there.
Now, you should run the following commands to check what version of Suricata you have running and with what options as well as the service state:
sudo suricata --build-infosudo systemctl status suricataHow to Setup Suricata On Debian 9 | Debian 10
As we mentioned in the prerequisites section, do not forget to enter all commands as root/super-user because for Debian operating system it is not possible to use ‘Sudo’ without installing and configuring it first.
Then, start with creating a directory for Suricata’s log information:
sudo mkdir /var/log/suricataThen, you need to prepare the system for using it. So, run:
sudo mkdir /etc/suricataNow, you need to copy classification.config, reference.config, and suricata.yaml from the base build/installation directory to the /etc/suricata directory. Do so by entering the following:
sudo cp classification.config /etc/suricatasudo cp reference.config /etc/suricatasudo cp suricata.yaml /etc/suricataHow to Configure Suricata on Debian 9 0r Debian 10
Suricata uses the Yaml format for configuration. The Suricata.yaml file included in the source code, is the example configuration of Suricata. It means that the Suricata main configuration file is located in /etc/suricata/suricata.yaml. This document will explain each option.
First, check the available interface cards to identify which one you would like Suricata to use:
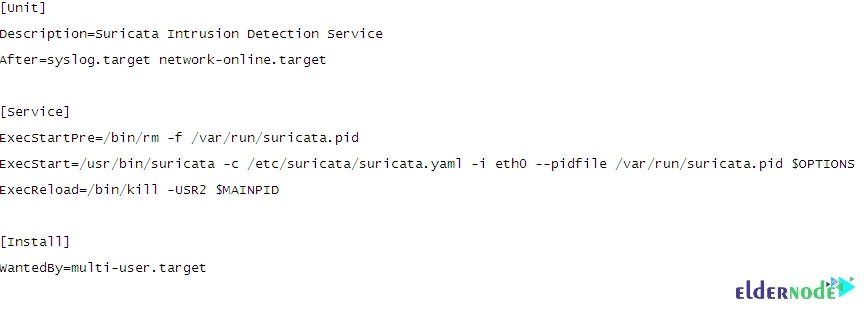
ifconfigThen, create a Suricata systemd unit file. Instead of eth0, you can enter the interface card of your preference:
sudo vim /etc/systemd/system/suricata.service

To reload systemd unit files, run:
sudo systemctl daemon-reloadNext, use the command below to start and enable the Suricata service:
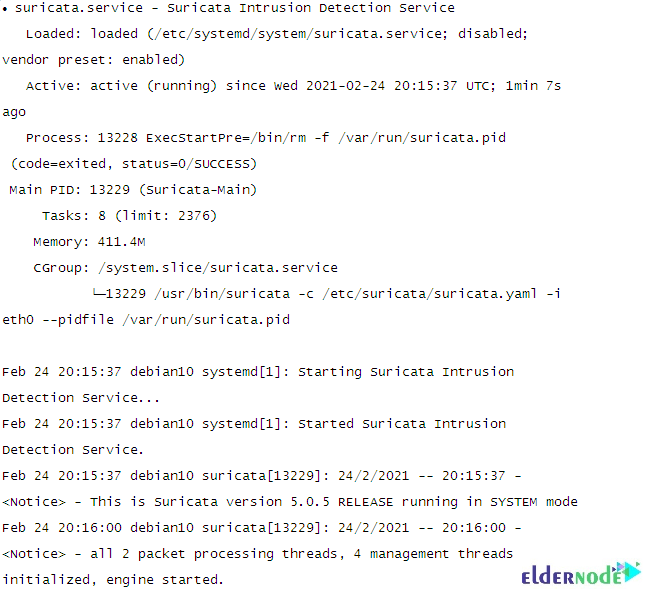
sudo systemctl start suricataAnd finally, confirm service status by running the following command:
systemctl status suricata
Conclusion
In this article, you learned Setup And Configure Suricata On Debian 9. From now on, you can see what’s happening in the wires of your network. it usually runs by loading a set of pre-defined rules for matching different network protocols and flow behaviors. If you are interested to read more, refer to Introducing Icinga 2 Linux Server Monitoring Tool.


