SeaweedFS is an open-source distributed object store and file system to store and serve billions of files fast. It is a simple and highly scalable storage system for blobs, objects, files, and data warehouses. Blob store has O(1) disk seek, local tiering, cloud tiering. You may know bout Ceph, GlusterFS, and HDFS, SeaweedFS is similar to these file systems. But it can be easily integrated with the cloud and achieve both fast access times without any client-side changes. Also, it is fast and simple, in both setup and operation. In this article, you will learn How To Install SeaweedFS Cluster On Debian 10. If you are preparing to purchase a fully managed VPS, order your considered package on Eldernode and buy your own Linux VPS.
Table of Contents
Tutorial Install SeaweedFS Cluster On Debian 10
Introducing SeaweedFS
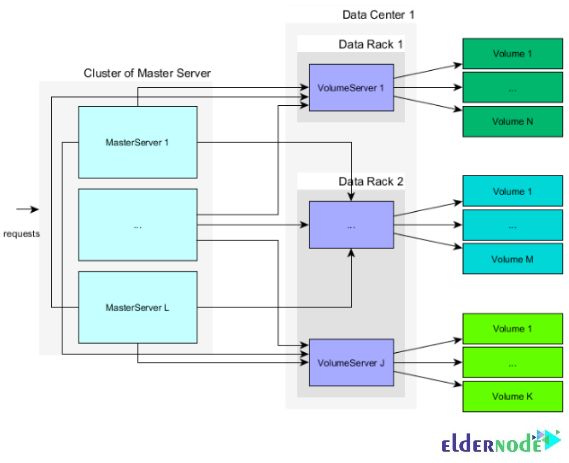
SeaweedFS is an independent Apache-licensed project. It provides some notable features such as Automatic master servers failover, Automatic entry TTL expiration, Parallel processing, Handle large and small files, Low-latency access to any file, and so on. As you read, there are two objectives for SeaweedFS. To store billions of files and to serve the files fast. As an Object Store, SeaweedFS is able to handle small files efficiently. In this way, the central master manages instead of managing all file metadata in a central master, manages volumes on volume servers, and these volume servers manage files and their metadata. In addition, adding/remove servers does not cause any data re-balancing unless triggered by admin commands.
Install SeaweedFS Cluster On Debian 10 | Debian 9
Let’s go through the steps of this guide to review SeaweedFS installation on Debian 10.
Step 1:
First, you must install the latest software and patches. Also, you will install the tools you need here:
sudo apt updatesudo apt install vim curl wget zip git -ysudo apt install build-essential autoconf automake gdb gitlibffi-dev zlib1g-dev libssl-dev -yStep 2:
To fetch and install Go, you can continue in two methods.
Method 1:
You can install it from the APT repository. So, run:
sudo apt install golangMethod 2:
Also, you can pull from the source and install it manually. To fetch the latest Go tarball version, visit the Go download page.
cd ~wget -c https://golang.org/dl/go1.15.5.linux-amd64.tar.gz -O - | sudo tar -xz -C /usr/localStep 3:
When you passed the two above steps successfully, add the “/usr/local/go/bin” directory to the PATH environment variable so that the server will find Go executable binaries. To do this, you can append the following line either to the /etc/profile file or the $HOME/.profile file.
Note: In a system-wide installation you can add the line below to the /etc/profile file:
echo "export PATH=$PATH:/usr/local/go/bin" | sudo tee -a /etc/profileAnd for the current user installation, you are recommended to add it to $HOME/.profile:
echo "export PATH=$PATH:/usr/local/go/bin" | tee -a $HOME/.profileStep 4:
The new PATH environment variable can be loaded into the current shell session, depending on the file you edited source the file in the previous step.
source ~/.profileOr
source /etc/profileStep 5:
Since you need to get the necessary files into your server, use all sources available in GitHub. So, clone the repository and proceed to install:
cd ~git clone https://github.com/chrislusf/seaweedfs.gitStep 6:
It is time to download, compile, and install SeaweedFS. When you did clone all the sources, navigate into the new directory and install the SeaweedFS project by running the commands below:
$ cd ~/seaweedfs$ make install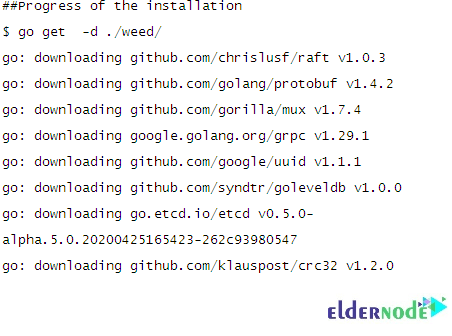
Step 7:
Now, you may find the executable “weed” in your $GOPATH/bin directory. As you see, weed created $GOPATH under your current home directory after the installation. So, you can find weed here “~/go/bin/weed“. To fix this issue, copy SeaweedFS binaries to the earlier location where Go was installed in Step 2 like this:
sudo cp ~/go/bin/weed /usr/local/bin/Step 8:
Since the “weed” command is in the PATH environment variable, you can configure SeaweedFS comfortably:
$ weed versionversion 30GB 2.12 6d30b21b linux amd64How to use SeaweedFS on Debian Linux
By default, the master node runs on port 9333, and the volume nodes run on port 8080. By starting one master node, and two-volume nodes on port 8080 and 8081 respectively, you can understand this better. So, as you guess, they should be started from different machines but you may use one server as an example. If you intend to start the volumes on different servers, make sure that the -mserver IP address point to the master. Also, consider that the port on the master must be reachable from the volume servers/nodes.
Note: SeaweedFS uses HTTP REST operations to read, write, and delete. The responses are in JSON or JSONP format.
How to start Master Server on Debian 10 using SeaweedFS
The master node runs on port 9333 by default. There are two methods to start the master server. Let’s review them in the following:
Methode 1: Start the master server manually
weed master &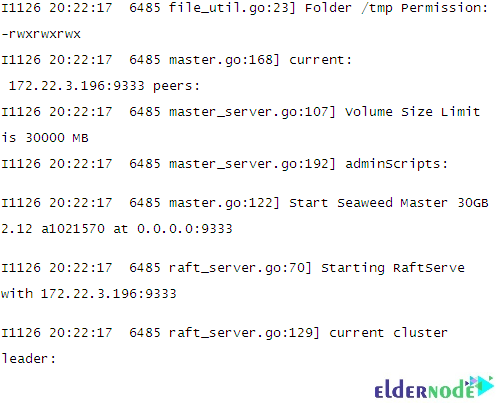
Method 2: Start the master server using Systemd
Also, you can start the master using Systemd by creating its unit file:
sudo tee /etc/systemd/system/seaweedmaster.service<<EOF 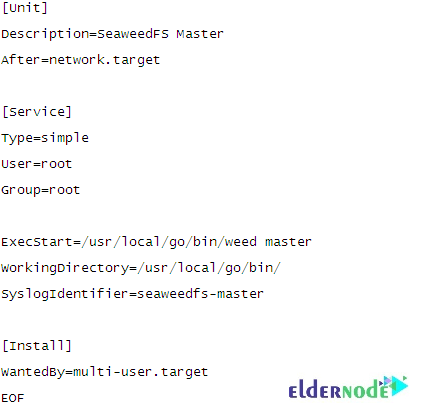
Once the file is updated, reload the daemon and start the master.
sudo systemctl daemon-reloadsudo systemctl start seaweedmastersudo systemctl enable seaweedmasterThen check its status.
systemctl status seaweedmaster -l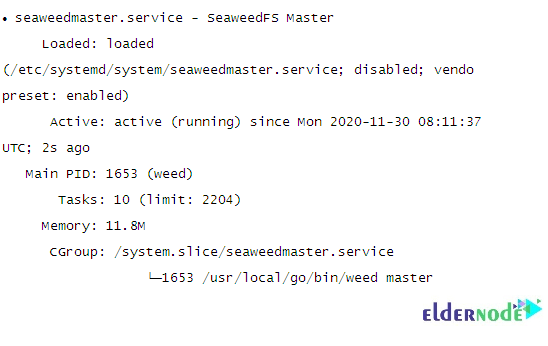
How to start Volume Servers on Debian 10 using SeaweedFS
When the master is ready and waiting for the volumes, you can now have the confidence to start the volumes using the following commands. Let’s create sample directories firstly:
mkdir /tmp/{data1,data2,data3,data4}}Now, you can create the first volumes.
Option 1: The manual way
weed volume -dir="/tmp/data1" -max=5 -mserver="localhost:9333" -port=8080 &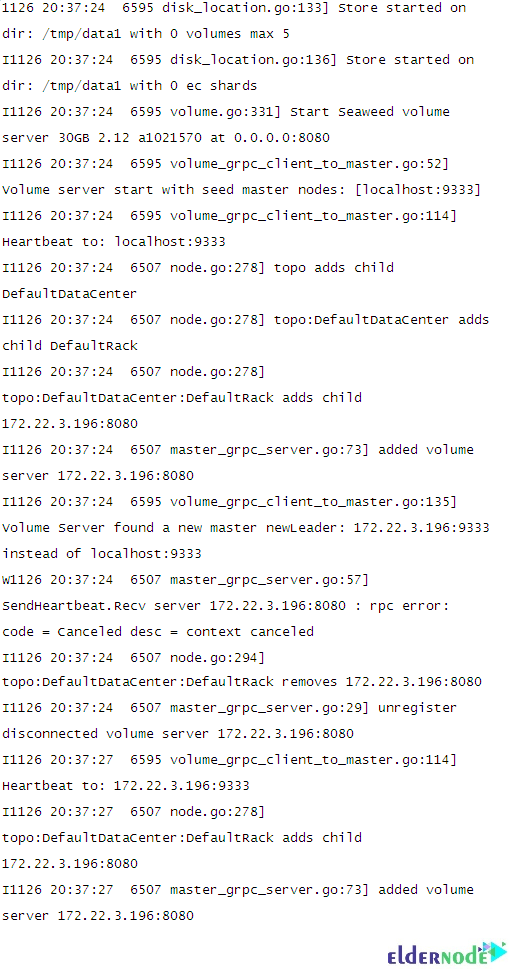
Then create the second one:
weed volume -dir="/tmp/data2" -max=10 -mserver="localhost:9333" -port=8081 &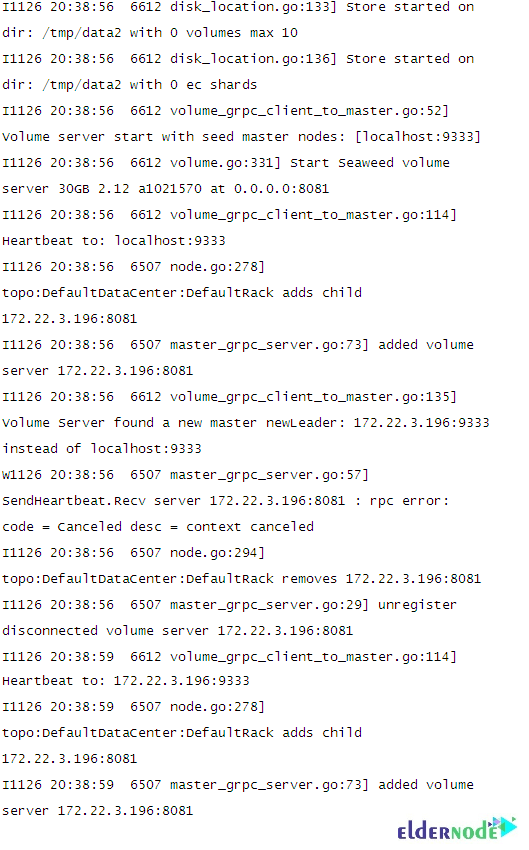
Option 2: Using SystemD
You need to create two or more volume files in case you require more to start the volumes using Systemd. Look at the below explanations to learn more.
For Volume1:
sudo vim /etc/systemd/system/seaweedvolume1.service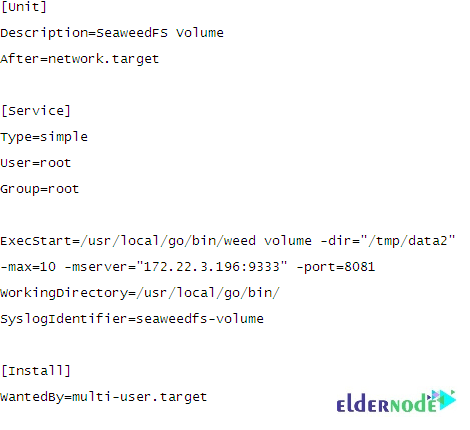
At this point, replace the volume path with your correct value, then start and enable:
sudo systemctl daemon-reloadsudo systemctl start seaweedvolume1.servicesudo systemctl enable seaweedvolume1.serviceCheck status:
$ systemctl status seaweedvolume1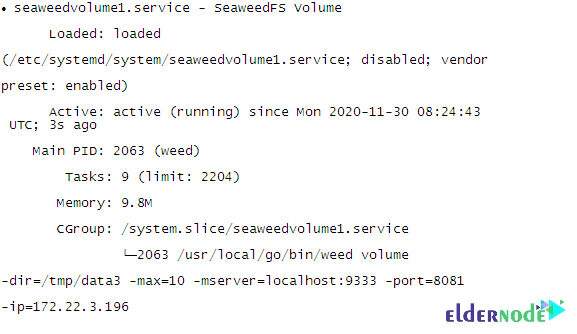
For Volume2:
sudo vim /etc/systemd/system/seaweedvolume2.service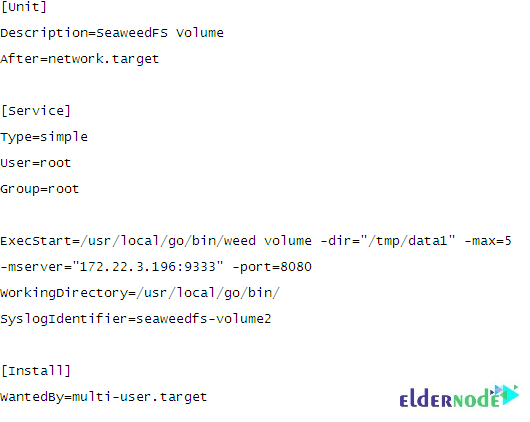
After updating the files, reload the daemon as illustrated.
sudo systemctl daemon-reloadsudo systemctl start seaweedvolume2sudo systemctl enable seaweedvolume2Then check their statuses
sudo systemctl status seaweedvolume2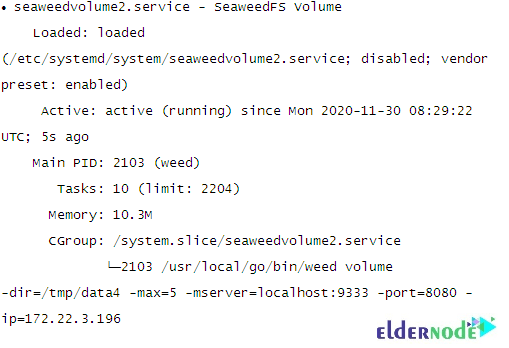
How to write a sample file on Debian 10 using SeaweedFS
In this section, you will upload a file to the SeaweedFS object store is interesting. So, you must send an HTTP POST, PUT, or GET request to /dir/assign to get a File ID (fid) and a volume server URL:
$ curl http://localhost:9333/dir/assign{"fid":"7,0101406762","url":"Your_file_ID:8080","publicUrl":"Your_file_ID:8080","count":1}Next, you need to store the file content. So, send an HTTP multi-part POST request to URL + ‘/’ + File ID (fid) from the response. Our fid is 7,0101406762, URL is Your_file_ID:8080. Let us send a request like this. You will get a response as shown below it:
$ curl -F file=@/home/tech/teleport-logo.png http://Your_file_ID:8080/7,0101406762{"name":"teleport-logo.png","size":70974,"eTag":"ef8deb64899176d3de492f2fa9951e14"}How to access SeaweedFS on Debian 10
To access the SeaweedFS, use the URL http://your-server-ip:8080/7,016bad1bc0. In this way, you will view the file you stored in the SeaweedFS object-store. Look at the below image which shows your uploaded file.
Conclusion
In this article, you learned How To Install SeaweedFS Cluster On Debian 10. The architecture of SeaweedFS is fairly simple and the actual data is stored in volumes on storage nodes. Instead of managing chunks as distributed file systems do, SeaweedFS manages data volumes in the master server.