Nowadays, setting up your server with IPv6 and accessing it via IPv6 is very important. This article will teach you How to Set IPv6 on Ubuntu 20.04 LTS Server with netplan. You can apply the instructions we used in this tutorial to any public network setup where you want to set default routing. Eldernode website offers economical Ubuntu VPS servers, which you can check out the offered package to purchase it.
Table of Contents
How to Set IPv6 on Ubuntu 20.04 LTS Server with netplan
There are several ways to set up IPv6 on an Ubuntu 20.04 VPS. One of these methods is using netplan, which is one of the most reliable. Netplan is a tool for configuring and managing the network in Ubuntu, which is added along with other methods such as Network Manager in the Ubuntu operating system. This method can control NetworkManager and network backend systems and uses YAML to define your network settings.
How to Enable IPv6 on Ubuntu 20.04 LTS Server
First, you need to find the allocated IPv6 subnet. To do this, log in to your Ubuntu server and check the Service details section from the Client Area to see both IPv4 and IPv6. From the assigned IPv6 subnet you can easily extend the default gateway for your assigned subnet.
After you have this information, create your netplan configuration file. Since netplan reads network configuration files from /etc/netplan/*.yaml, you can create the file with any name ending in .yaml. If you have multiple interdependent configuration files, it is better to implement numbered naming to control the loading sequence.
Since the Ubuntu 20.04 templates have DHCP configuration for IPv4 in 01-netcfg.yaml, now you should extend the Ubuntu 20.04 templates with the following configuration parameters:
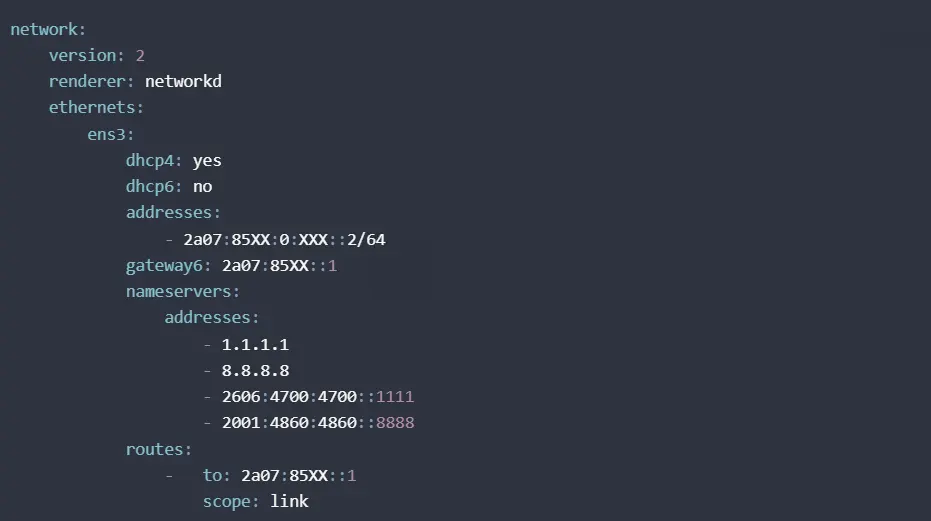
Then run the following command to apply the changes:
netplan applyCheck if the netplan configuration is applied successfully. For this, you can check the server syslog or the IPv6 routes:
ip -6 route showFinally, advertise your IPv6 address on the network with Neighbor Solicitation Protocol with the following command. This makes the allocated IP available from all over the Internet:
ping -6 black.hostHow to Add IPv6 on Ubuntu 20.04 LTS Server with netplan
After setting up IPv6 on your Ubuntu server, you can add additional addresses under the address key in your configuration file. You can add the addresses as an additional list item in the current format or as an object sequence containing all addresses. As in the following example:

Don’t forget to apply the changes.
Lastly, you need to announce the added IPs by running the following command and at the same time specify the output interface/IP address:
ping -6 -I 2a07:85XX:0:XXX::3 black.hostThat’s it!
Conclusion
Netplan is a tool for configuring and managing the network in Ubuntu. In this article, we taught you how to set IPv6 on Ubuntu 20.04 LTS server with netplan. I hope you found this tutorial useful and that it helps you to set up IPv6 on Ubuntu 20.04. If you encounter a problem or have any questions during the setup process, you can contact us in the comments section.