Caching systems keep static pages and stable codes in their memory, and when users visit the website, the cache service gives the user’s response. There are various caching services that can be used. One of the most popular of which is Varnish. This article will explain 8 Steps to Optimize Your WordPress with Varnish. If you intend to buy a Linux VPS server, you can check out the packages offered on the Eldernode website.
Table of Contents
How to Optimize Your WordPress with Varnish
Varnish is an HTTP accelerator that focuses on HTTP and is placed as a caching service in front of Apache or Nginx web servers. It is generally designed for web servers that have very high traffic and are constantly being served. Currently, large websites use this system, among them Wikipedia and many online newspapers, as well as many famous social networks. You can use Varnish to optimize your WordPress.
In this tutorial from the WordPress training series, you will learn how to optimize your WordPress with Varnish.
1- Installing Varnish
The first step to optimizing your WordPress is to install Varnish. Varnish cache also known as a cache reverse HTTP proxy, is a fast, high-performance web application that speeds up your website by forwarding incoming HTTP requests to your web server. It sits in front of a web server and captures all the web traffic most users access and stores it in memory. By doing this, it increases the retrieval time of web pages. This accelerator is available for many Linux distributions including RedHat, CentOS, Debian, and Ubuntu. To install the Varnish cache on different operating systems, you can check the latest releases at Varnish’s official website.
2- Adding the Plugin on WordPress
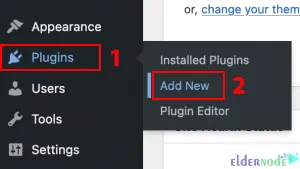
Once the Varnish is installed, the second step is to add the Varnish HTTP cache plugin on WordPress. You can also use several plugins instead of the Varnish HTTP cache. To do this, open the WordPress dashboard and go to the Plugins >> Add New path:
Now search for Varnish HTTP Purge and click Install Now. Finally, you should activate it.
3- Enabling Custom Permalinks
In this step, you should enable mod_rewrite and use a custom URL structure for permalinks and archives to make Varnish HTTP Purge work correctly. To do this, click on Settings >> Permalinks >> Custom Structure in the WordPress dashboard.
Now type the /%year%/%monthnum%/%post_id% and click Save Changes. Lastly, open a command prompt and enter the following command as shown below:
a2enmod rewrite4- Moving Apache to a Different Port
Moving Apache to a different port is another step to optimize the WordPress website; that you should do before configuring Varnish to handle all the web traffic to your WordPress website. Note that you should change all occurrences of port 80 with a text editor in /etc/apache2/ports.conf and any files under /etc/apache2/sites-enabled/ to 8080.
5- Serving from Varnish
After port 80 is available, update the Varnish configuration and put it in front of Apache and WordPress. Open /etc/default/varnish with your desired text editor and change the port from 6081 to 80. Because the default installation Varnish will wait for connections on port 6081.
6- Exclude URLs
Varnish uses the backend or origin server to determine where to retrieve content that is not persistent in its cache. There are some URLs that you should not cache. Open /etc/varnish/default.vcl using your desired text editor to add the following commands:
if (req.url ~ "wp-admin|wp-login") { return (pass); }7- Extend Caching
In the Cache-Control HTTP header, the max-age parameter is used by the Varnish. This can establish how long the content is considered fresh before contacting the backend again. By default, Varnish uses 120 seconds and you can extend this period by updating /etc/varnish/default.vcl:
sub vcl_backend_response { if (beresp.ttl == 120s) { set beresp.ttl = 1h; } }8- Handling Purge Requests and Securing Purge
When updating content in WordPress, the Varnish HTTP Purge plugin will ask Varnish to remove it from the cache. It retrieves the most up-to-date version from the backend on the next request. You can do this by adding the following above vcl_recv in /etc/varnish/default.vcl:
if (req.method == "PURGE") { if (req.http.X-Purge-Method == "regex") { ban("req.url ~ " + req.url + " && req.http.host ~ " + req.http.host); return (synth(200, "Banned.")); } else { return (purge); } }That’s it! You can optimize your WordPress with Varnish successfully with these 8 steps.
Conclusion
Varnish is a caching HTTP reverse proxy that can help you to optimize your WordPress website. In this article, we taught you how to optimize your WordPress with Varnish using 8 steps. I hope this tutorial was useful for you and helps you to optimize your WordPress with Varnish. If you have any questions or suggestions, you can contact us in the Comments section.


Another interesting WordPress SEO plugin to speed up your site:
https://wordpress.org/plugins/optipic/
OptiPic plugin automatically converts all images to Webp (for browsers that support webp) and compressed/optimized png/jpeg (for browsers that don’t support webp).
By optimizing images, their loading on the page is accelerated and page rendering is accelerated.
And this, in turn, improves the SEO performance of the site page.
Thank you for your comment.