Jitsi Meet is a free video-conferencing solution. With this set of open-source projects, you will be able to build and deploy secure video conferencing. Audio, dial-in, recording and simulcasting are all free. Jitsi Meet is secure and flexible, and anonymous. So, you even do not have to create an account or subscription. Jitsi is best known for its Jitsi Meet video conferencing platform, meet.jit.si where they host a Jitsi Meet instance that the community can use for totally free video conferences. The Jitsi Video bridge powers all multi-party video capabilities. This guide is Tutorial Install Jitsi Meet video conference on Debian 10, 9. If you are going to purchase your own Linux VPS, you can choose one of the available packages in Eldernode and order what you really need.
Table of Contents
How To Install Jitsi Meet video conference on Debian 10 | 9
If you are familiar with Unix installations, setting up Jitsi Meet will be a simple experience for you. In the following of this guide, you will learn more about Jitsi and the way you can install it on Debian 10 | 9.
What is Jitsi Meet?
Jitsi Meet is a 100% Open-Source video conferencing solution. It is fully encrypted with an advanced security setting. You can start a video chat with the whole team and invite anyone you wish via a simple, custom URL. You can use and develop with it freely. Jitsi also hosts and runs meet.jit.si as a free service. You may wish to record a Jitsi conference. You just need to live stream your conference to YouTube and access the recording there. It will record easily. As a web developer, you can embed a Jitsi Meet call into your website.
Since it has an external API, you can use it to embed an existing Jits Meet instance into any webpage with just a few lines of code. The options of Meet are possible to change via configuration file and you can actively control the conference with a variety of commands and events.
Jitsi Projects
Jitsi has a bunch. But let’s review some of its most popular ones and the major Jitsi projects:
1- Jitsi Meet
Secure, Simple, and Scalable Video Conferences that you use as a standalone app or embed in your web application.
2- Jitsi Videobridg
The media server engine (aka Selective Forwarding Unit (SFU)) that powers all of Jitsi’s multi-party video conferences.
3- Jigasi
A gateway service that connects SIP telephony to a Jitsi Video bridge conference
Jibri: a broadcaster and recorder used for saving video call recordings and streaming to YouTube Live.
4- Jidesha
Chrome and Firefox extension for screen sharing.
Jitsi Features
To help developers, Jitsi Meet includes statistics and integrations features and a callstats.io integration. However, it comes with so many features. Here are the main features of that:
1- Auto-view the active speaker or click on any attendee to see their video
2- Android and iOS apps
3- Text chatting (web only)
4- Lock a room with a password
5- Screen sharing (if Jidesha is setup, only required in Chrome)
6- Streaming a conference to YouTube live (if Jibri is configured)
7- Shared text document based on Etherpad
8- Raise/Lower your hand for attention
9- Participant talk-time statistics
10- Push-to-talk mode
11- Play a YouTube video to all attendees call
12- Audio-only option
13- Telephone dial-in to a conference (if Jigasi is setup)
14- Dial-out to a telephone participant (if Jigasi is setup)
15- Integration in other apps/websites
Prerequisites to Install Jitsi Meet on Debian
To let this tutorial work better, please consider the below Prerequisites:
_ A non-root user with Sudo privileges.
_ To set up, follow our Initial server setup on Debian 10.
_ OpenJDK 8 or OpenJDK 11 must be used.
_ At least 4 GB of RAM
_ Domain or subdomain pointed to your Instance
How To Install Jitsi Meet on Debian 10 | Debian 9
To run Jitsi on your own desktop or server, download Jitsi Meet and all Jitsi related projects from its official website. Let’s go through the steps of this guide for a quick Jitsi-Meet installation on a Debian-based GNU/Linux system.
Step 1:
First, you need to configure the hostname of the server to the domain name that you will use for your Jitsi instance. To set the current hostname and modify the /etc/hostname run the command below:
sudo hostnamectl set-hostname jitsi.your-domainTo check if this is running successfully or not, type:
hostnameStep 2:
In this step, you will Setup and configure your firewall. To allow traffic to the Jitsi Meet server, the following ports must be opened in your firewall:
– 80 TCP – for SSL certificate verification/renewal with Let’s Encrypt
– 443 TCP – for general access to Jitsi Meet
– 10000 UDP – for general network video/audio communications
– 22 TCP – if you access your server using SSH (change the port accordingly if it’s not 22)
– 3478 UDP – for querying the stun server (Coturn, optional, needs config.js change to enable it)
– 5349 TCP – for fallback network video/audio communications over TCP (when UDP is blocked for example), served by coturn
In the case of using ufw, you can use the following commands:
sudo ufw allow 80/tcpsudo ufw allow 443/tcpsudo ufw allow 10000/udpsudo ufw allow 22/tcpsudo ufw allow 3478/udpsudo ufw allow 5349/tcpsudo ufw enableAnd then, run the command below to check the firewall status:
sudo ufw status verboseStep 3:
Now you are ready to install the Jitsi Meet package from that repository. Run the following command to install the Jitsi repository key onto your system:
curl https://download.jitsi.org/jitsi-key.gpg.key | sudo sh -c 'gpg --dearmor > /usr/share/keyrings/jitsi-keyring.gpg'Now, to create a sources.list.d file with the repository type:
echo 'deb [signed-by=/usr/share/keyrings/jitsi-keyring.gpg] https://download.jitsi.org stable/' | sudo tee /etc/apt/sources.list.d/jitsi-stable.list > /dev/nullStep 4:
Next, update your package list and install Jits Meet:
sudo apt-get -y updateNote: The installer will check if Nginx or Apache are present (in that order) and configure a virtual host within the webserver it finds to serve Jitsi Meet.
If you are already running Nginx on port 443 on the same machine, turn server configuration will be skipped as it will conflict with your current port 443.
sudo apt-get -y install jitsi-meetAlso, you can install only the packages you need:
sudo apt-get -y install jitsi-videobridgesudo apt-get -y install jicofosudo apt-get -y install jigasiHow to obtain a Signed TLS Certificate
To have encrypted communications, you need a TLS certificate. During the installation of Jitsi Meet, you can choose to generate a new self-signed certificate and create a Lets-Encrypt Certificate later ( recommended option) or choose a different challenge type of Let’s Encrypt. If you do not want to use a different certificate, create that certificate first and then install Jitsi meet and choose I want to use my own certificate.
Jitsi Meet supplies a program to automatically download a TLS certificate for your domain name that uses the Certbot utility. So, install this program before you run the certificate installation script.
To install the Certbot package, run:
sudo apt install certbotSince your server is now ready to run the TLS certificate installation program, run the following command to generate a Let’s Encrypt certificate:
sudo /usr/share/jitsi-meet/scripts/install-letsencrypt-cert.shsudo /usr/share/jitsi-meet/scripts/install-letsencrypt-cert.shNote: this will install Nginx and configure it for use with Jitsi.
How to confirm Jitsi Meet installation on Debian 10 | 9
Confirm that your installation is working or not, follow the below path. Open your favorite browser and enter the hostname or IP address from the previous step into the address bar. If you used a self-signed certificate, your web browser will ask you to confirm that you trust the certificate. If you are testing from the iOS or Android app, it will probably fail at this point, if you are using a self-signed certificate.
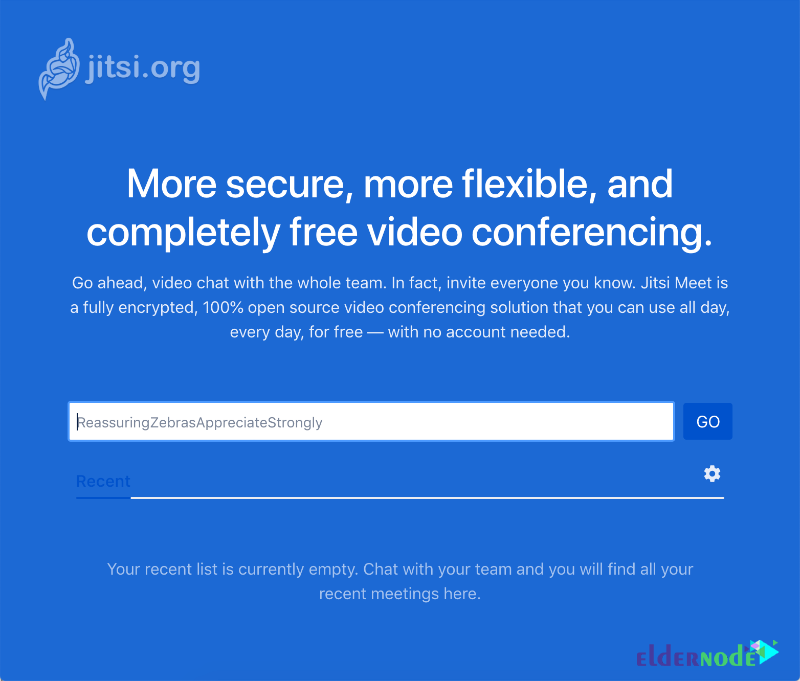
How to use Jitsi Meet video conference on Debian 10 | 9
Finally, you should see a web page prompting you to create a new meeting. Make sure that you can successfully create a meeting and those other participants are able to join the session. If you face no error and see all is working, it means you have an operational Jitsi conference service.
Now, let’s Create Users in Prosody to Enable Conferencing.
Run the following command to create a user in Prosody. In this way, conference rooms will be created:
sudo prosodyctl register Eldernode meet.testprojects.me S3cureP@sswd1Next, let’s restart all the Jitsi services to apply the recent changes using the systemctl command as shown:
sudo systemctl restart prosody && sudo systemctl restart jicofo && sudo systemctl restart jitsi-videobridge2If you face no error and see all is working, it means you have an operational Jitsi conference service.
Once the conference room is displayed as below, start the conference by clicking “I am the host”.
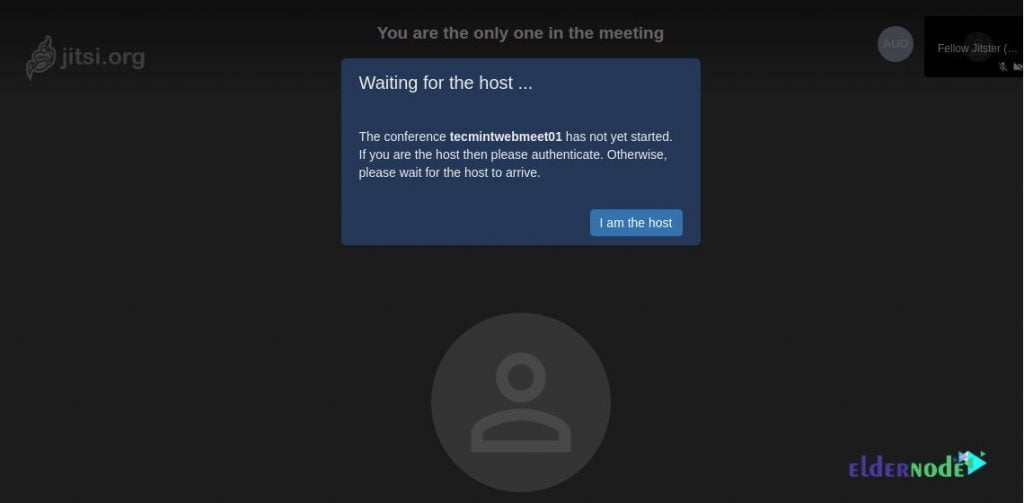
Then enter your username and password to authenticate and click OK.

How to uninstall Jitsi Meet on Debian 10 | 9
If you need to uninstall Jitsi Meet, run the command below to remove it:
sudo apt purge jigasi jitsi-meet jitsi-meet-web-config jitsi-meet-prosody jitsi-meet-turnserver jitsi-meet-web jicofo jitsi-videobridge2If you found that Jigasi and Jitsi video bridge packages are not removed yet, run the uninstall command a second time and it should be ok.
Conclusion
In this article, you learned Install Jitsi Meet video conference on Debian 10 | 9. If you are using Jitsi Meet, try to share your experience with your friends on Eldernode Community and ask them about using Jitsi to host secure and private video conference rooms.