[Updated on Date: 2021-01-07] Django is a Python Web framework for developing dynamic websites and applications. As a developer, you need Django to take applications from initial to complete quickly while higher security is provided. In this article, you will learn How To Install Django on Ubuntu 18.04 LTS. To decrease common security mistakes and create Python web applications let’s learn about this free and open-source software to enjoy its features as well as big companies. Also, you can buy your own Ubuntu VPS or find your considered package on Eldernode.
To let this tutorial work better, please consider the below Prerequisites:
A non-root user with sudo privileges.
To set up, follow our Initial Setup with Ubuntu 18.04
Table of Contents
Tutorial Install the Django on Ubuntu 18.04
Join us to review this guide. You will run Django on an Linux Ubuntu 18.04 server. A number of large companies are developed by Django. You can find the names such as The Washington Post, Discuss, Instagram, Mozilla, Pinterest and so more.
There are 3 different methods to install Django. In this article, we will review these ways:
1- Global install from packages
2- Install with pip in a virtual environment
3- Development version installs with git
Install The Django on Ubuntu 18.04 LTS
The Django is available in the official Ubuntu repositories and is ready to be installed with the conventional apt package manager.
First, use the command below to update your local package index.
sudo apt updateNow, you can check the Python version by running the following command:
python3 -VThen, to install Django, type:
sudo apt install python3-djangoAlso, you can check if the installation was successful or not.
django-admin --versionInstall with pip in a Virtual Environment
To use a flexible way to install Django, creating a virtual environment is a good idea. By using tools of venv and virtualenv it will be possible.
Again, you are recommended to refresh the local package index:
sudo apt updateUse the command below to see what Python version is installed.
python3 -VTo install pip from the Ubuntu repository, type:
sudo apt install python3-pipNow use pip to install the venv package
sudo apt install python3-venvBy starting a new project, you can also create a virtual environment for that. To start by creating the project and move into that directory, run:
mkdir ~/newproject cd ~/newprojectUsing the Python command (compatible with your version of Python) you can create a virtual environment within the project directory.
python3.6 -m venv my_envYou can change its name to a descriptive one. A directory will be created with that name.
Activate the isolated environment to install packages into that.
source my_env/bin/activateUse pip to install Django in your new environment. Also, note that you do not need to use sudo since you are installing locally:
(my_env) $ pip install djangoNow, you can verify the installation by running:
(my_env) $ django-admin --versionIssue the deactivate command to let you leave your virtual environment.
(my_env) $ deactivateYou can re-active your virtual environment any time you need to back to work just by moving into your project directory and activating that.
cd ~/newproject source my_env/bin/activateDevelopment Version Install with Git
In this step, you see how to install the latest development version instead of the stable release by acquiring the code from the Git repo. To develop the version of Django, download and install Django from its repository. So, let’s do this from within a virtual environment.
Use the following command to update the local package index firstly:
sudo apt updateTo check the version of Python you have installed, type:
python3 -VAnd to install pip from the official repositories, run
sudo apt install python3-pipInstall the venv package to create your virtual environment:
sudo apt install python3-venvThen, to clone the repository to a directory called ~/django-dev within your home directory, type:
git clone git://github.com/django/django ~/django-devNoe, change to this directory:
cd ~/django-devAgain, by using the Python command (compatible with your version of Python) you can create a virtual environment within the project directory.
python3.6 -m venv my_envNext, to activate it:
source my_env/bin/activateUse pip to install the repository. The -e option will install in “editable” mode, which is necessary when installing from version control:
(my_env) $ pip install -e ~/django-devCheck if the installation was successful or not by running:
django-admin --versionHow to Create a sample Project
While Django is installed, you can build your project. Let’s see how you can create a project and test it on your development server.
To create a directory for your project and change into it, run:
mkdir ~/django-test cd ~/django-test Now you can create your virtual environment by typing:
python3.6 -m venv my_envAnd then, to activate the environment:
source my_env/bin/activateInstall Django:
(my_env) $ pip install djangoAlso, you can use django-admin to build your project. startproject will create a directory within your current working directory that includes:
A management script, manage.py, which you can use to administer various Django-specific tasks.
A directory (with the same name as the project) that includes the actual project code
To avoid having too many nested directories, however, let’s tell Django to place the management script and inner directory in the current directory (notice the ending dot):
(my_env) $ django-admin startproject djangoproject .To migrate the database (this example uses SQLite by default), let’s use the migrate command with manage.py. Migrations apply any changes you’ve made to your Django models to your database schema.
To migrate the database, type:
(my_env) $ python manage.py migrateFinally, you can create an administrative user so that you can use the Django admin interface. Let’s do this with the createsuperuser command:
(my_env) $ python manage.py createsuperuserYou will be prompted for a username, an email address, and a password for your user.
How to modify ALLOWED_HOSTS in the Django Settings
Modify one of the directives in the Django settings to be able to test your application successfully.
Use the command below to open the settings file:
(my_env) $ nano ~/django-test/djangoproject/settings.pyInside, locate the ALLOWED_HOSTS directive. This defines a whitelist of addresses or domain names that may be used to connect to the Django instance. An incoming request with a Host header that is not in this list will raise an exception. Django requires that you set this to prevent a certain class of security vulnerability.
Above all, in the square brackets, list the IP addresses or domain names that are associated with your Django server. Each item should be listed in quotations, with separate entries separated by a comma. If you want requests for an entire domain and any subdomains, prepend a period to the beginning of the entry:
. . . ALLOWED_HOSTS = ['your_server_ip_or_domain', 'your_second_ip_or_domain', . . .]When you are finished, save the file and exit your editor.
How to test the Development Server
Since you have a user, you can start up the Django development server. But before that, ypu should ensure opening the appropriate port in your firewall. Open port 8000 by running:
(my_env) $ sudo ufw allow 8000Then, start the development server:
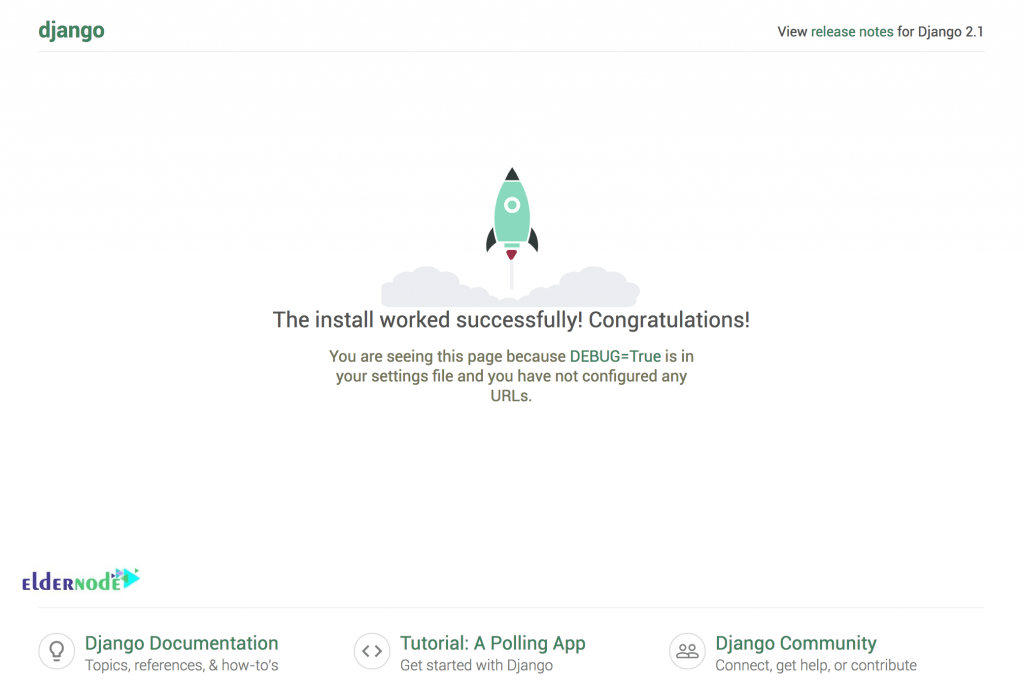
(my_env) $ python manage.py runserver your_server_ip:8000Visit your server’s IP address followed by 8000 in your web browser:
http://your_server_ip:8000You should see something that looks like this:
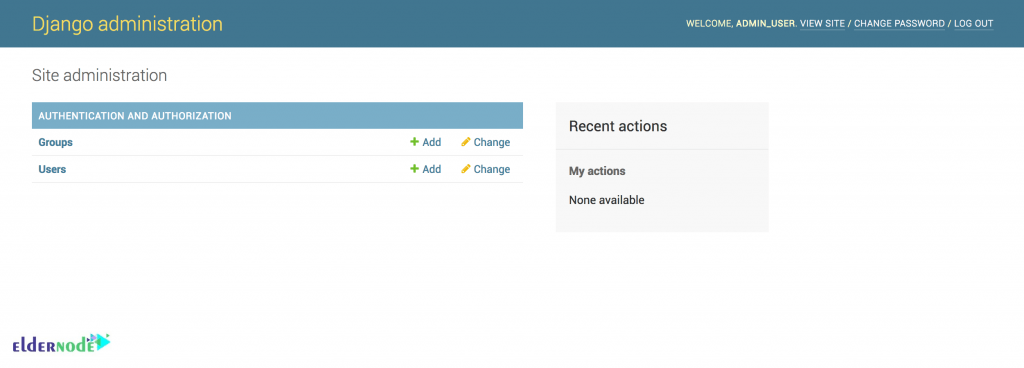
In addition, to access the admin interface, add /admin/ to the end of your URL:
http://your_server_ip:8000/admin/This will take you to a log in screen:

If you enter the admin username and password that you just created, you will have access to the main admin section of the site:
To explain more, anytime you need to stop the development server, type CTRL-C in your terminal. You should check out the Django documentation if you wish to build your applications and customize your site.
Conclusion
In this article, you learned How To Install Django on Ubuntu 18.04. Using Django helps ypu create websites easier. Your probable security mistakes such as SQL, Injection, XSS, CSRF, and clickjacking would be avoided. In case you also need to get the guide of the latest version, follow our article on How to install Django on Ubuntu 20.04.


I can not find Django setting
Django settings define the settings when it is needed. You can find the sensible default value of each setting in the module
django/conf/global_settings.pythere any secret key in Django?
Yes there is. The secret key is a salt used to generate hashes.
Thank you. Which database do you suggest for Django?
Most of Django developers prefer PostgreSQL. Since, the Django installs and configure SQLite automatically and is a common database you are recommended to choose it.
What database should be choosing for Python?
The best choice is PosrgreSQL and MySQL which are the most common open source database for storing Python web application’s data.
My application is not working.
Please make sure to use the correct username, password, database name and hostname in the /projectname/settings.py file.