Ghost is a free and open-source blogging platform. This tool, written in JavaScript, is distributed under the MIT license. Ghost is designed to simplify the online publishing process for specific blogs as well as online publishing. The concept of the Ghost platform was first published in November 2012 in a blog post by project founder John O’Nolan. Ghost is coded in Node.js, a server-side JavaScript execution engine, and an Ember.js admin client. In this article, we try to teach you about Tutorial Install and Configure Ghost on Ubuntu 20.10. You can visit the packages available in Eldernode if you wish to purchase an Ubuntu VPS server.
Table of Contents
How to Install and Configure Ghost on Ubuntu 20.10
In the next section, we will list the prerequisites for installing Ghost on Ubuntu 20.10. Then we will teach you how to install, configure and use Ghost step by step. Please join us.
Prerequisites for installing Ghost on Ubuntu 20.10
Before you want to install Ghost on Ubuntu 20.10, you need to install and prepare some prerequisites. These prerequisites are:
_ NGINX for SSL
_ A supported version of Node.js
_ MySQL 5.7 or 8.0
_ Systemd
_ A server with at least 1GB of memory
_ A registered domain name
Note: Before getting started you should set up a working DNS A-Record from your domain, pointing to the server’s IP address. This must be done in advance so that SSL can be configured during setup.
Here are all the prerequisites for installing Ghost-CLI. You must first create a new user. To do this, you must log in to your server as a root user:
ssh root@your_server_ipadduser <user>Now you need to add the user to the Superuser group to open admin privileges using the following command:
usermod -aG sudo <user>You can now log in as a new user using the following command:
su - <user>Finally, update the “package lists” and “installed packages” using the following commands:
sudo apt-get updatesudo apt-get upgradeInstall Nginx on Ubuntu 20.10
In this section, we are going to teach you how to install Nginx on Ubuntu 20.10. Because Ghost uses an NGINX server, the SSL configuration requires NGINX 1.9.5 or higher. So you can do this using the following command:
sudo apt-get install nginxThe point to note is that if ufw is enabled, the firewall will allow HTTP and HTTPS connections. You can open the firewall using the following command:
sudo ufw allow 'Nginx Full'Install MySQL on Ubuntu 20.10
After you have successfully installed Nginx, now it is time to install MySQL. Using the following command you can install MySQL to create a database:
sudo apt-get install mysql-serverA password is required to ensure MySQL compatibility with Ghost-CLI. So you have to use the following command to set the password:
sudo mysqlNow you should replace ‘password‘ with your password:
ALTER USER 'root'@'localhost' IDENTIFIED WITH mysql_native_password BY 'password';Then exit MySQL with the following command:
quitNow you can log in to your Ubuntu user again using the following command:
su - <user>Install Node.js on Ubuntu 20.10
In this section, we will teach you how to install Node.js on Ubuntu 20.10. Note that you must install the supported version of Node at the system level as described below. The first step is to add the NodeSource APT repository for Node:
curl -sL https://deb.nodesource.com/setup_14.x | sudo -E bashThen you need to install Node.js using the following command:
sudo apt-get install -y nodejsIn the next section, join us to teach you to step by step How to Install Ghost on Ubuntu 20.10.
How to Install Ghost on Ubuntu 20.10
Before starting the installation, we must say that you need to install the npm module in the first step by using the Ghost-CLI tool for easy use and configuration of Ghost. Note that the npm module can be installed with npm or thread:
sudo npm install ghost-cli@latest -gAfter you have successfully installed Ghost-CLI, you can now install Ghost. Since Ghost needs to be installed in its own directory, you first need to create a directory. You can use the following command to create a directory. It should be noted that in the following command you should change “sitename” to whatever you like:
sudo mkdir -p /var/www/sitenameThe next step is to set up the directory owner, which you can replace <user> with your username in the following command:
sudo chown <user>:<user> /var/www/sitenameYou can use the following command to set the correct permissions:
sudo chmod 775 /var/www/sitenameFinally, you can log in using the following command:
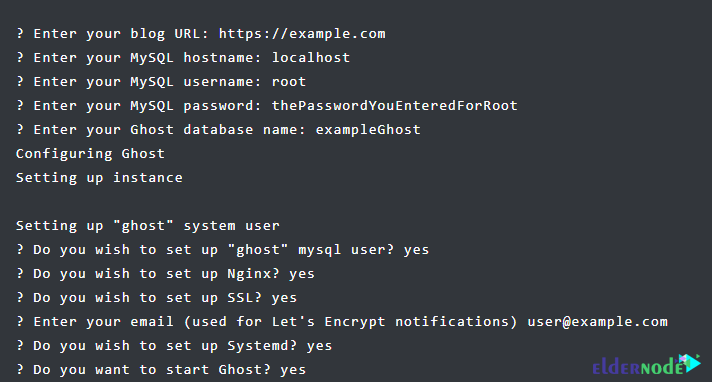
cd /var/www/sitenameAfter successfully completing the above steps, you should now install Ghost in the final step by executing the following command:
ghost installDuring installation, you must answer the questions as shown below:
How to Configure and Use Ghost on Ubuntu 20.10
Once you have successfully installed Ghost, it is time to configure and run it. You can see the running Ghost processes using the following command:
ghost lsNote: In the future when a newer version of Ghost is released, you can run ghost update from the /var/www/ghost directory to update to the newest version.
Now to complete the setup process, you should navigate to the Ghost configuration page by appending /ghost to the end of your blog’s URL or IP. This example uses https://example.com/ghost.
You must first create your account on the Welcome page:

Then, as you can see in the image below, you need to enter your email, create a user, password, and blog title:

In the next step, you can invite more members to your team. It should be noted that if you prefer to skip this step, click on “I’ll do this later, take me to my blog!“.

Finally, you can go to the Ghost Admin to create the first post, change the theme of your site, or configure additional settings:

Note: If you have any problems installing or updating Ghost, you can troubleshoot the system:
ghost doctorYou can also get help about Ghost by using the following command:
ghost --helpConclusion
In this article, we first tried to fully acquaint you with Ghost and its capabilities. Then we tried to teach you How to Install and Configure Ghost on Ubuntu 20.10.