Server administrators can take help from web servers to set up their sites. LiteSpeed web server has been used for various purposes all over the web for a long time. If you are looking for an optimal server solution for your website, LiteSpeed Web Server is for you. This article will explain 7 Ways to Improve the Performance Site with LiteSpeed. Eldernode website offers economical Linux VPS packages, which can be the best selection.
Table of Contents
How to Improve Performance Site with LiteSpeed
LiteSpeed is lightweight and proprietary web server software that provides high scalability, security, and load balancing. You can use it to replace an existing Apache server without the need to change any programs and operating system details. This web server allows per-IP connections and bandwidth throttling and offers built-in anti-DDoS capabilities. The best feature of LiteSpeed is that it can be integrated without any potential crashes.
1- Enable LiteSpeed cache
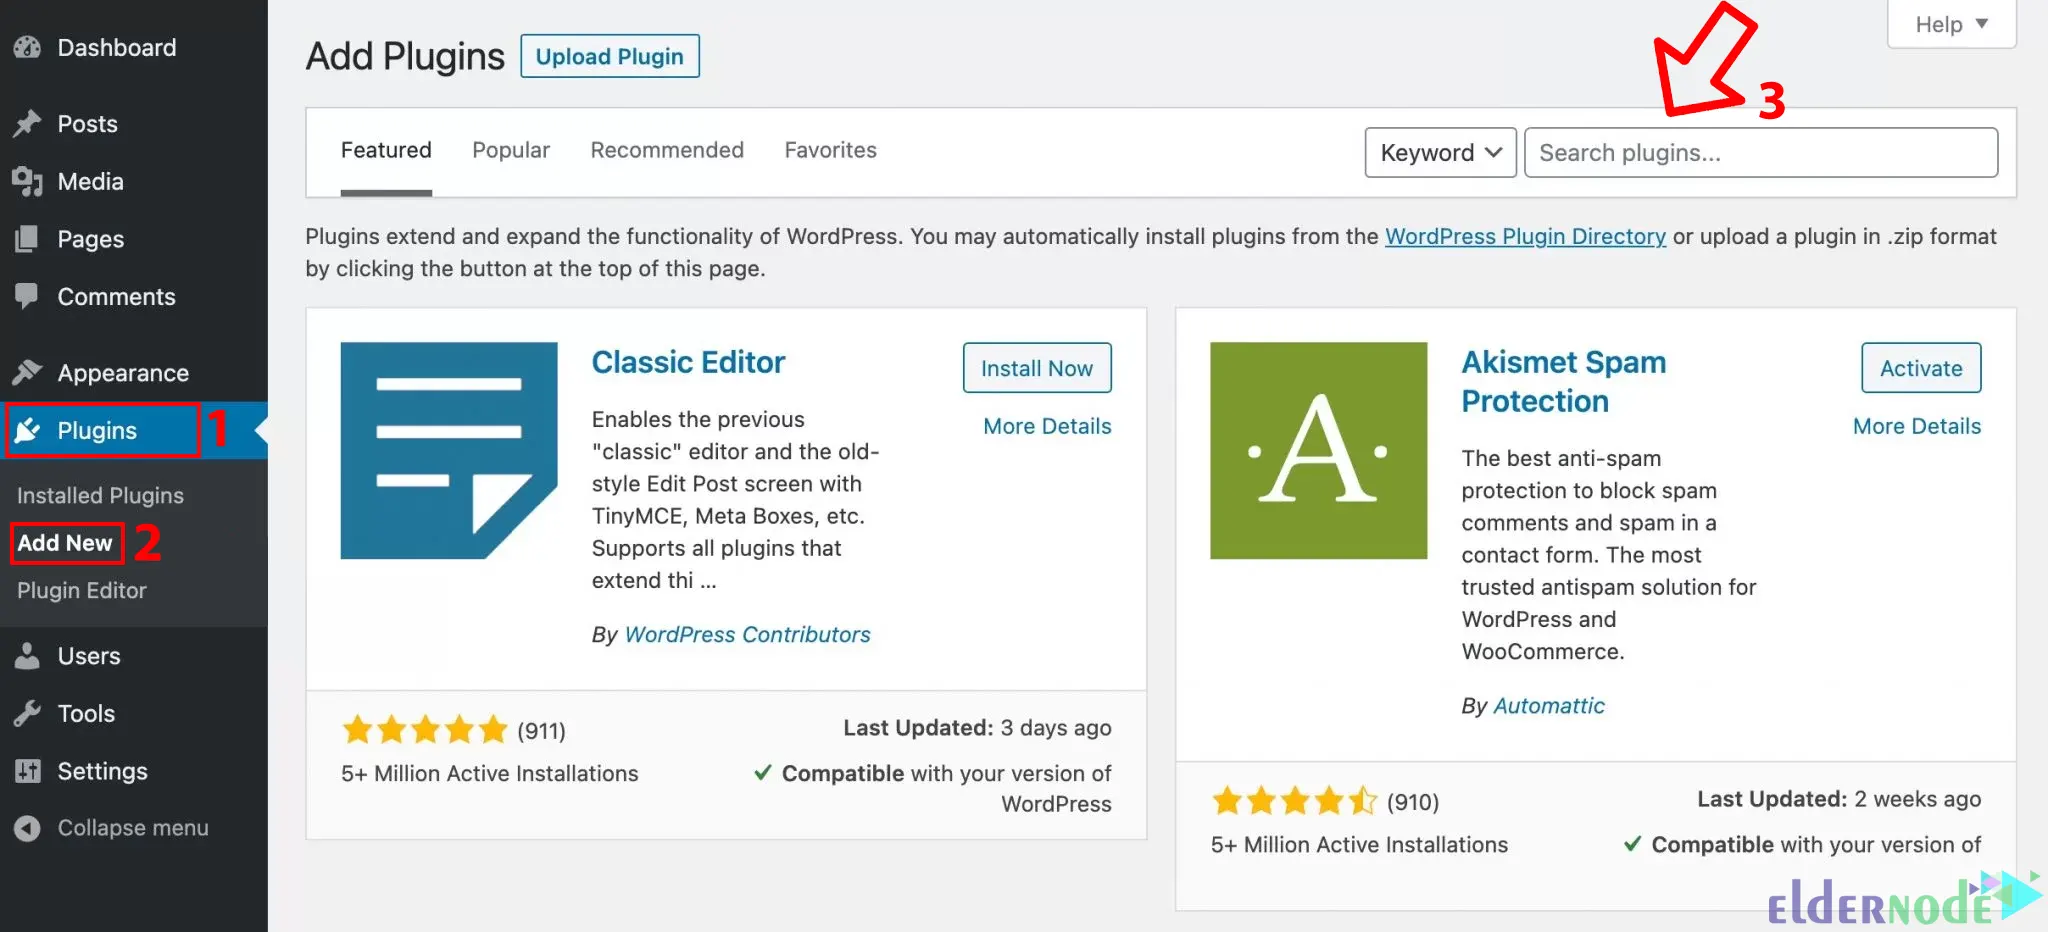
First login to the WordPress Admin panel and go to the Plugins >> Add New path. Search for the LiteSpeed cache in the search box:
Once the plugin is found, click on Install Now:
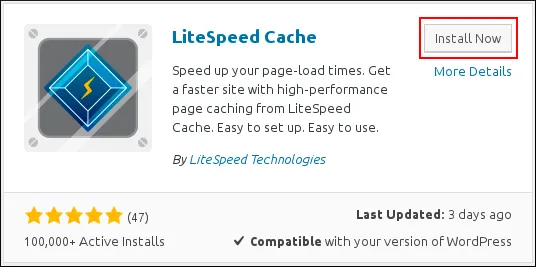
Once the installation is completed, click on Activate to enable the plugin.
2- Configure LiteSpeed cache Settings
In this step, you should configure the LiteSpeed cache settings. Once you have activated the LiteSpeed cache, go to the LiteSpeed cache >> Settings:
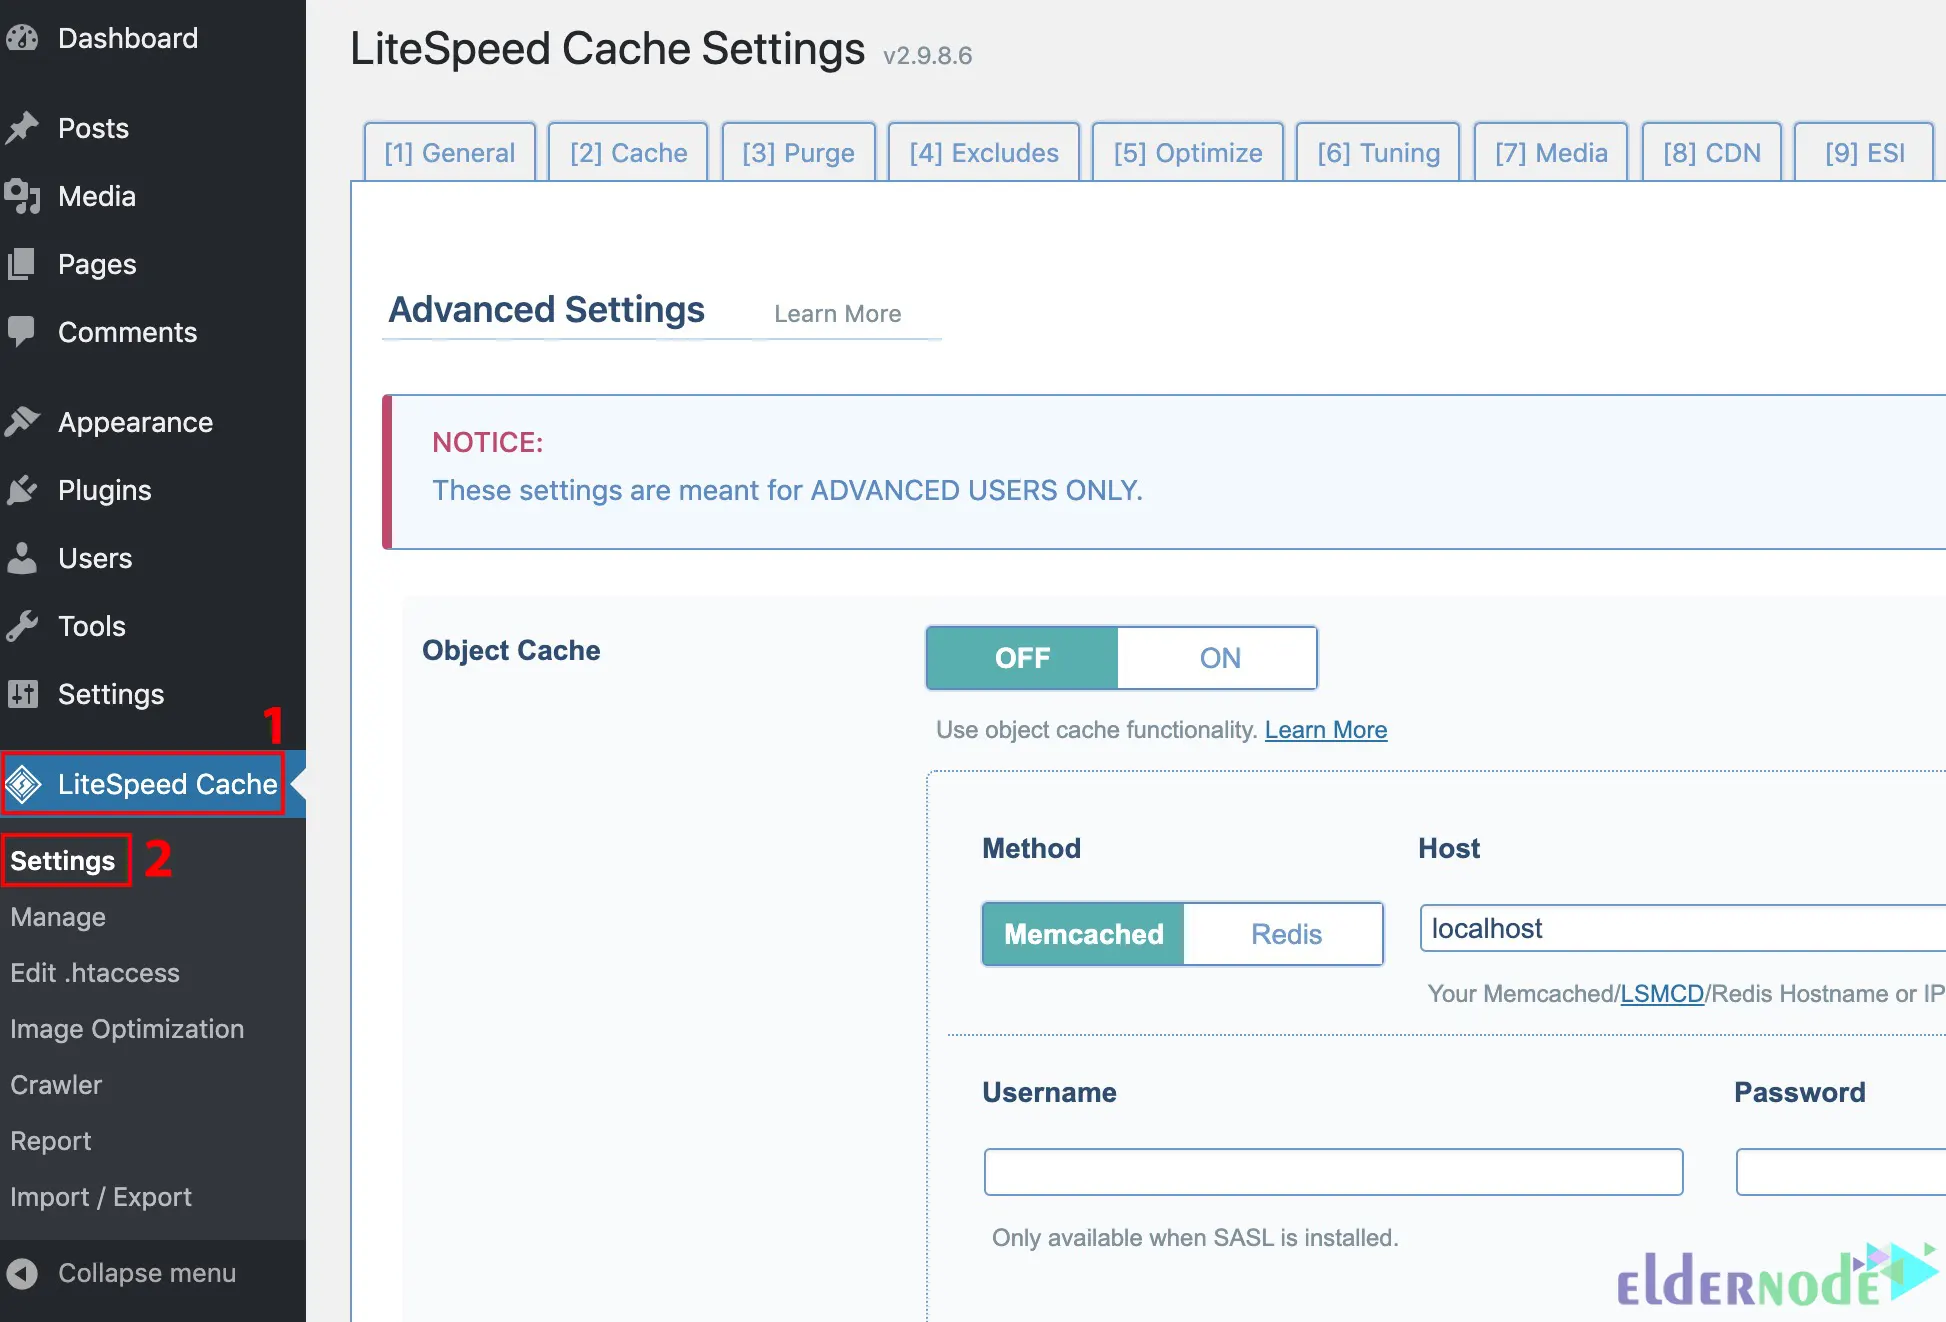
You will see the LiteSpeed cache Settings page:
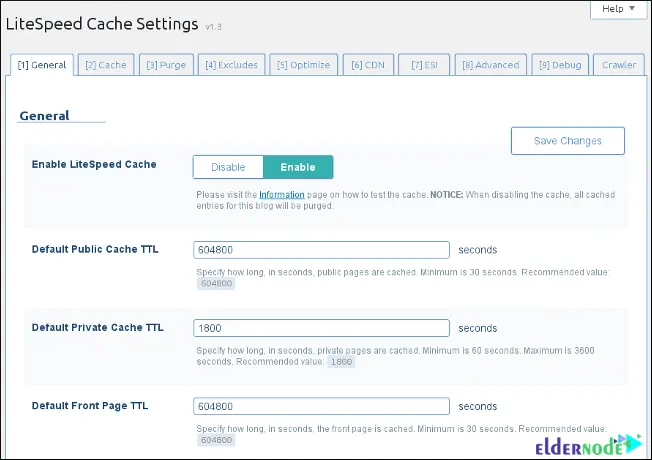
You can review your site settings here:
–> General: It contains TTL settings that control how long various content types are saved in the cache.
–> Cache: The settings of the Cache tab can control caching for special types of content.
–> Purge: The settings of the Purge tab purges content stored in the cache.
–> Excludes: The settings of the Excludes tab define content types that are not cached.
–> Optimize: The settings of the Optimize tab optimize your site.
–> CDN: This tab contains Content Delivery Network settings.
–> ESI: This tab contains Edge Side Includes settings that enable you to cache portions of pages.
–> Advanced: This tab contains some miscellaneous advanced settings.
–> Debug: The settings of debug tab can be used to help troubleshoot problems.
Once you made changes to the settings, click Save Changes.
3- Setup Redirects
Redirect is a referral from one URL to a new URL; whenever users enter the source address in the browser, they are automatically redirected to the destination page. It has many uses that allow you to improve your site performance. In fact, you can transfer your desired domains to one domain through this feature. With a redirect, you make search engines redirect the user to a new page whose URL you choose. If you keep the same domain name, LightSpeed can redirect from your old platform to LightSpeed’s platform.
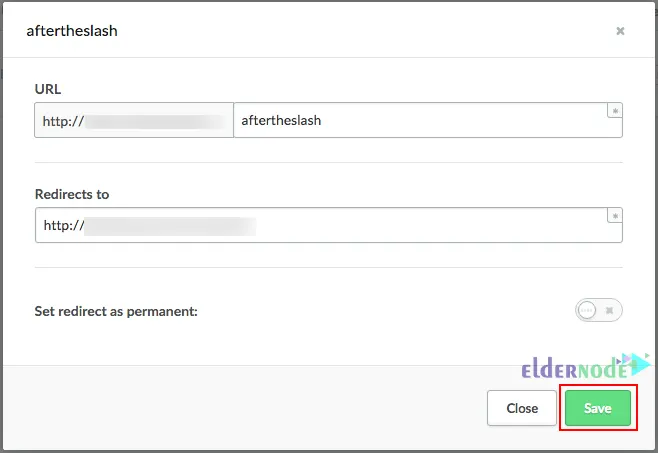
To setup redirects, go to Settings >> Website Settings >> Redirects >> Add Redirect path and configure redirects. You should enter the landing page URL in the URL field and the URL where the page should refer in the Redirects to the field:
4- Disable Gzip Compression
You can disable Gzip compression from the server level in two ways which are rewrite rule and SetEnv/SetEnvIf.
To disable Gzip compression using the rewrite rule in .htaccess, enter the following in .htaccess:
RewriteRule . - [E=no-gzip:1]Also, disabling Gzip compression can be done using SetEnv/SetEnvIf in .htaccess. To do this, just enter the following in .htaccess:
SetEnv no-gzip 15- Setup LiteSpeed cache for Static Files
In this section, you should setup the LiteSpeed cache for static files. Static files do things to enhance your application and do not change as your program runs. Every web application needs to serve up files from the file system. LiteSpeed serves static files faster and can help you to improve the performance website. If it combines with the browser cache, the results will be very good.
6- Configure LiteSpeed cache for Dynamic Pages
Dynamic pages have different content for users that maintain the same layout. You can use programming languages and technologies like PHP, Ajax, and asp.net to create these pages. These pages are designed to display information that frequently changes, such as stock prices, and requires more time to load. One of the ways to improve the performance website is to configure the LiteSpeed cache for dynamic pages. You can configure the LiteSpeed cache for dynamic pages by going to Pages >> Add New >> Dynamic Page path and entering the page name. Then you should choose the desired collection to connect to from the dropdown menu and press Add page.
7- Setup caching Rules and Test your Site Speed
Users can set caching behavior on additional criteria and also continue to match the requested URL with caching rules. Caching Rules allows users to define this behavior on one or more fields available. The last step is to setup caching rules and also test your website speed. Your website must load in less than 5 seconds, otherwise, it will not rank in Google and the website will not improve. Therefore, measuring your website speed accurately is essential.
Conclusion
LiteSpeed Web Server is the leading web server with very high performance and strong scalability that uses very advanced technologies. In this article, we explained 7 ways to improve the performance site with LiteSpeed. I hope this tutorial was useful for you and helps you to improve your performance site with LiteSpeed. If you have any questions or suggestions, you can contact us in the Comments section.

